
INTRODUCTION
Fixed restorative dentistry success is dependent on the exquisite fit of restorations. When the restoration does not fit the prepared margins, recurrent caries as well as periodontal issues, such as chronic inflammation of the gingiva, will likely occur in time.
Retraction cords and pastes have been available for many years to help dilate the sulcus, thus exposing the prep margins for an optimal impression.1 Those methods, which require additional time to allow the chemicals within the product to cause vasoconstriction of the blood vessels within the sulcular tissue prior to an impression, are technique sensitive.2 With hemorrhagic tissue, removal of the retraction cord or paste may reinitiate bleeding, preventing the impression material from fully capturing the preparation margins. This becomes more problematic as the preparation margin needs to be placed deeper in the sulcus due to presentation of caries or old restorative materials necessitating an adequate preparation to achieve a restorative ferrule.3
Lasers are becoming standard equipment in the dental practice. The price of diode lasers has decreased throughout time, making them a more cost-effective option. One of the treatment benefits of the diode laser is the ability to improve restorative impressions.4 Diode lasers have been demonstrated to be safe and effective with an excellent tissue healing response.5-7 In the past, as an alternative to retraction cords and pastes, some practitioners have used electrosurgery to open the sulcular tissue around the preparation to allow better capture of the preparations margins. Unfortunately, electrosurgery, due to its high wattage (power at the tip) and deeper cell effect, has certain soft-tissue complications that have been reported in the literature.8 For example, tissue shrinkage, at the low power setting utilized by the diode laser, is not a problem.
CASE REPORT
Diagnosis and Treatment Planning
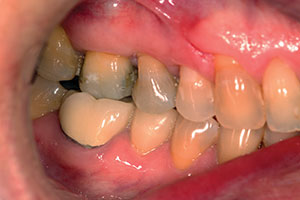
A 55-year-old female patient presented for a dental examination and prophylaxis. The maxillary right first molar and second premolar had large defective resin restorations with recurrent decay at the restoration margins (Figure 1). The first molar presented with an existing MOD composite and the second premolar with an existing DO composite, with both teeth having the current direct restorations replacing approximately 60% of the coronal structure (Figure 2). Additionally, a crack was noted on the mesial marginal ridge of the second premolar. A bite-wing radiograph showed an open margin on the distal of the molar and that the direct resins restorations were moderately deep (Figure 3).
 |
 |
| Figure 1. Maxillary first molar and second premolar requiring crowns due to large, failing, previously placed composite resin restorations. | Figure 2. Occlusal view of the large defective resin restorations on the maxillary first molar and second premolar. |
 |
| Figure 3. Preoperative bite-wing radiograph demonstrating recurrent decay at the distal of the first molar and extensive existing composite restorations. |
Structurally, both teeth would have insufficient healthy tooth structure once the existing composite and recurrent decay were removed to retain and support new directly placed restorations. Contour of the teeth had allowed a food trap between the 2 teeth, and that was a primary concern for the patient. To correct this clinical issue and provide the best long-term result with the remaining tooth structure, full-coverage crowns were indicated.
Clinical Protocol
A local anesthetic (Septocaine [Septodont USA]) was administered to locally infiltrate the posterior right maxilla. The 2 teeth were prepared for full-coverage crowns utilizing diamonds in a high-speed handpiece. During preparation, most of the existing composite restoration was removed along with any recurrent decay. A small area of resin was left on the occlusal of the premolar preparation and distal of the molar as it was intact with no noted dentin breakdown marginally. This would act as pulpal protection and to provide better retention form for the crowns to be placed. Some dark dentin discoloration was noted on both preparations but, using an explorer, it was found to be hard tissue (Figure 4). To achieve an adequate ferrule for the crowns, the margins were placed subgingivally to position them apically to where the resin ended interproximally and to ensure removal of any recurrent decay.
 |
 |
| Figure 4. Occlusal view following preparation of the teeth for full-coverage crowns. | Figure 5. CEREC (Dentsply Sirona) intraoral scan demonstrating poor margin capture related to soft tissues at the preparation margin that prevented adequate scanning. |
 |
 |
| Figure 6. Troughing with the Picasso (AMD LASERS) diode laser began with insertion of the tip into the mid-distal interproximal sulcus (blue dot); the tip was activated and moved to the mid-mesial interproximal. The process was then repeated on the lingual starting at the mid-distal (green dot) to complete the circumferential troughing procedure. | Figure 7. Activated diode tip on the Picasso laser troughing the soft tissue to expose the preparation margins to allow their full capture in the digital impression scan. |
 |
 |
| Figure 8. Occlusal view after diode laser troughing, demonstrating full margin exposure and lack of bleeding. | Figure 9. Buccal view following diode laser troughing with no bleeding noted. |
 |
 |
| Figure 10. CEREC Omnicam intraoral scanning being performed to digitally capture the preparations. | Figure 11. Post-diode laser troughing CEREC scan with full and detailed margin capture of the prepared teeth. |
Restorations would be created utilizing intraoral scanning and in-office milling. However, with margins being placed subgingivally, sulcular retraction (as with traditional impressions) would still be necessary to allow digital capture of the margins. A CEREC (Dentsply Sirona) intraoral scan was taken to demonstrate incomplete capture of the preparation margins circumferentially and the need for tissue retraction to expose the margins for capture. (Figure 5). A diode laser (810 nm) (Picasso [AMD LASERS]) with a 400-μm tip was initiated and set on continuous mode at 0.6 to 1.2W for the anterior or 1.0 to 1.8W for the posterior (1.8W is the preset), then inserted into the sulcus approximately 1.0 mm apical to the restoration margin at the mid-distal interproximally. (Note: A higher power setting may be required when the gingival tissue is fibrous and does not cut at the lower recommended setting. Always start with a low setting and increase power as needed to effectively cut.) The tip was activated and moved through the buccal sulcus to the mid-mesial interproximally. To prevent accidentally cutting through the gingival tissue, the authors recommend maintaining contact with the tooth as a guide when laser troughing. This allows widening of the sulcus sufficiently to allow capture of the restoration margins, with either digital or conventional impression techniques, and minimizes tissue shrinkage issues that may occur due to over-troughing. Troughing was completed by inserting the tip back into the mid-distal interproximal, then moving it to the mid-mesial interproximal to complete the circumferential troughing (Figures 6 and 7). The authors have found that the tip cuts easier and more efficiently when used in a pull stroke verses a push stroke; therefore, starting at the distal and moving mesially offers more tip control with less effort or resistance. The result, after completion of laser troughing, should be an open sulcus with exposed margins (Figure 8), and the gingival margin intact at the pretreatment position (Figure 9). Should gingival marginal height need to be moved apically, this can be performed prior to restoration preparation so that the margin can be placed ideally, then laser troughing is performed after preparation of the tooth.9-10 Healthy gingival tissue responds well to the laser troughing and a blood-free field results. Intraoral scanning was carried out (CEREC Omnicam [Dentsply Sirona]) (Figure 10), then a virtual color model was created by the CEREC software and evaluated to ensure all margins were visible (Figures 11 and 12).
Clinically, there may be situations when, even after use of the laser, minor tissue oozing may present. This may occur when soft tissue has been inflamed due to the caries or defective restorations. Inflamed tissue may also be caused by periodontal issues that can be related to poor home care or systemic conditions (such as diabetes), leading to bleeding that can create challenges for taking either digital or traditional impressions. Additionally, deeply placed margins may not be easily captured digitally even when troughed by a laser. More aggressive laser troughing may not be possible due to aesthetic complications that can result, such as recession. Some sulcular dilation may be needed to supplement the use of the laser. As previously discussed, retraction pastes and cords are time consuming and, in addition, may also cause some bleeding that can hamper impression capture after the retraction cord or paste is removed.
For this patient and clinical presentation, a light-body vinyl polysiloxane (VPS) (NoCord Wash VPS [Centrix]) containing a hemostatic agent (15% ammonium aluminum sulfate) to dilate the tissue and stop any sulcular bleeding was injected into the sulci circumferentially (Figure 13). Then, all of the prepared teeth were covered with the NoCord Wash VPS material. (Figure 14). Next, a heavy-body VPS (NoCord MegaBody VPS (Centrix) was placed into the tray (Figure 15). The high-viscosity tray material drives the wash material into the sulcus. The patient was instructed to occlude into the dual-arch tray until the impression material set (Figure 16).
For those practices utilizing traditional physical impression techniques, the NoCord system provides a unique one-step, self-retracting impression material that does not require additional cord or retraction pastes (Figure 17). Should the practitioner be utilizing intraoral digital scanning for impression capture, the NoCord material can aid in sulcus dilation when margins are very deep and using a wider trough could compromise the soft-tissue position following healing. As mentioned earlier, some patients may be prone to oozing for a variety of reasons following troughing, hampering digital capture of the margins. The use of NoCord impression material, combined with its hemostatic agents, can also stop the oozing and safely widen the suclus to allow a more accurate and detailed capture of the margins. Having this option can help prevent the need to have the patient return for another appointment to attempt a better intraoral scan or more time consuming use of cords or pastes at that appointment.
The restorations for this case were then digitally created with ideal contours and anatomy using the CEREC Software 4.4 (Figures 18 and 19).
Various all-ceramics are available for in-office CAD/CAM procedures, and the optimal material selection is based upon both strength and aesthetic needs. The stronger materials tend to be more opaque and often less aesthetic, and are indicated for molars that undergo greater occlusal loading.In this clinical case, the material utilized on the molar was to be different (higher strength required) than on the premolar (higher aesthetics needed). VITA Enamic (VITA North America), a recently introduced hybrid polymer-ceramic material, was selected for the molar restoration. Enamic has been found to mimic the strength and toughness of dentin and enamel. The dual ceramic-polymer network allows for both elasticity and a high-load capacity when adhesively bonded into place. VITA TriLuxe (VITA North America), an aesthetic fine-structure feldspar ceramic, was selected for the premolar restoration. This material offers outstanding light transmission and fluorescent properties. The VITA TriLuxe milling blocks offer 3 different color saturations and translucencies integrated into a single block for
more natural aesthetics.
 |
 |
| Figure 12. Occlusal view of CEREC scan after diode laser troughing demonstrated full capture of the margins of the prepared teeth. | Figure 13. Following laser troughing, a light-body (wash) vinyl polysiloxane (VPS) (NoCord Wash [Centrix]) was expressed into the dilated gingival sulci. |
 |
 |
| Figure 14. The preparations were then completely covered with additional NoCord Wash VPS material. | Figure 15. An appropriate tray was filled with a heavy-body VPS tray material (NoCord MegaBody VPS [Centrix]). |
 |
 |
| Figure 16. The tray was inserted intraorally allowing the NoCord MegaBody VPS to drive the NoCord Wash VPS into the sulci to capture the preparation margins subgingivally. | Figure 17. The set impression was removed and the subgingival margins could then be noted circumferentially on the preps. |
 |
 |
| Figure 18. Buccal view of the virtual created crowns utilizing the CEREC Software 4.4 prior to milling. | Figure 19. Occlusal view of the virtual created crowns utilizing the CEREC Software 4.4 prior to milling. |
 |
| Figure 20. Buccal view of the completed molar (VITA Enamic [VITA North America]) and bicuspid (VITA TriLuxe [VITA North America]) restorations. |
The finished restorations were tried in and the occlusion evaluated. Next, the preparations were cleaned using an over-the-counter 3% liquid hydrogen peroxide in a syringe with a metal Dento-Infusor Tip (Ultradent Products), then rinsed and dried with an air-water syringe. The preparations were then coated with the primer component (bottle 1) of OptiBond XTR (Kerr Dental) and dried with water- and oil-free air. This was followed by the application of adhesive (bottle 2, OptiBond XTR) that was then air-dried and light-cured for 10 seconds (Bluephase Style M8 [Ivoclar Vivadent]). A ceramic etch-and-silane solution (Interface [Apex Dental Materials]; a 2-bottle system) was mixed and applied to the interior surfaces of the 2 crowns with a microbrush and then, after 10 seconds, air-dried. The adhesive component (bottle 2) of OptiBond XTR was applied to the interior of the crowns, air-thinned, and light-cured. Next, a dual-cure resin cement (Anchor [Apex Dental Materials]) was dispensed from the automix gun into the crowns, and the crowns were then seated on the preparations. The margins were tack-cured for 5 seconds with the curing light, followed by the removal of excess cement at the margins. Floss was used to further remove any excess cement in the interproximal areas. Next, the crowns were fully light-cured for 20 seconds from the buccal and lingual aspects. Then an explorer was used to physically verify that no excess cement remained at the restoration margins. Finally, the occlusion was rechecked and adjusted as needed (Figure 20).
CLOSING COMMENTS
Clinical success in crown and bridge is directly related to an accurate fit of the restorations on the prepared teeth. This, in turn, is dependent upon the accurate capture of the restoration margin, whether the impression is done using traditional physical materials and techniques or via new digital scanning techniques.
Diode lasers are quickly becoming a commonplace tool in the dental practice and have many applications in treatment, including enhancing the accuracy of impressions. The diode laser is well tolerated by the soft tissue, has coagulation capabilities, and requires minimal time to implement.
References
1. Gherardi F, Quaranta M, Montanari G. Technique for the use of retraction cord [in Italian]. Dent Cadmos. 1982;50:61-63.
2. Prasanna GS, Reddy K, Kumar RK, et al. Evaluation of efficacy of different gingival displacement materials on gingival sulcus width. J Contemp Dent Pract. 2013;14:217-221.
3. Phatale S, Marawar PP, Byakod G, et al. Effect of retraction materials on gingival health: a histopathological study. J Indian Soc Periodontol. 2010;14:35-39.
4. van As G. Posterior crown troughing with the AMD Picasso lite diode laser. Dent Today. 2011;30:168.
5. Goharkhay K, Moritz A, Wilder-Smith P, et al. Effects on oral soft tissue produced by a diode laser in vitro. Lasers Surg Med. 1999;25:401-406.
6. Choi H, Lim W, Kim I, et al. Inflammatory cytokines are suppressed by light-emitting diode irradiation of P. gingivalis LPS-treated human gingival fibroblasts: inflammatory cytokine changes by LED irradiation. Lasers Med Sci. 2012;27:459-467.
7. Krishna Ch V, Gupta N, Reddy KM, et al. Laser gingival retraction: a quantitative assessment. J Clin Diagn Res. 2013;7:1787-1788.
8. Wilhelmsen NR, Ramfjord SP, Blankenship JR. Effects of electrosurgery on the gingival attachment in rhesus monkeys. J Periodontol. 1976;47:160-170.
9. Stuffken M, Vahidi F. Preimpression troughing with the diode laser: a preliminary study. J Prosthet Dent. 2016;115:441-446.
10
. Lee EA. Laser-assisted gingival tissue procedures in esthetic dentistry. Pract Proced Aesthet Dent. 2006;18(suppl):2-6.
Dr. Kurtzman is in private general practice in Silver Spring, Md. A former assistant clinical professor at University of Maryland, he has earned Fellowships in the AGD, American Academy of Implant Prosthodontics, American College of Dentists, International Congress of Oral Implantologists (ICOI), Pierre Fauchard Academy, and Association of Dental Implantology; Masterships in the AGD and ICOI; and Diplomate status in the ICOI and American Dental Implant Association. He has lectured and has published articles internationally. He has been listed in Dentistry Today’s Leaders in Continuing Education since 2006. He can be reached at via email at the folllowing address: [email protected].
Disclosure: Dr. Kurtzman has consulted for Centrix and AMD LASERS.
Dr. Agarwal, a 1999 graduate of University of Missouri-Kansas City, maintains a full-time private practice emphasizing aesthetic restorative and implant dentistry in Raleigh, NC. His work and practice have been featured in numerous consumer and dental publications. His practice focuses on clinical excellence, customer service, and allowing patients to choose optimal dentistry. Through his real-world approach to dentistry, practice enhancement, and balancing life, he has motivated dentists and energized team members to increase productivity and profitability. Dedicated to continuing education (CE), he has completed extensive CE with many dental leaders and regularly presents to study clubs and dental organizations nationally. He can be reached via the website raleighdentalarts.com or via email at the address [email protected].
Disclosure: Dr. Agarwal has received speaking honoraria in the past from Dentsply Sirona.
Also By These Authors
Digitizing Implant Treatment: Abutment Design, Fabrication, and Provisionalization
Improving the Local Anesthesia Experience for Our Patients

