


Filling root canals seems to be the primary obsession of dentists providing endodontic therapy to their patients. This is because we as clinicians (especially endodontists) are judged by how ideal the fill looks after the case is finished. But the more fundamental cause of this focus is the common frustration dentists experience during the obturation procedure itself.
Ironically, problems encountered during filling procedures are most often not about obturation but are related to missteps during negotiation and shaping procedures.1 If you never get to the end of a root canal during the negotiation phase of treatment, you will never shape or fill to that point afterward. When curved canals are blocked, ledged, or prematurely obturated by separated instruments, it is impossible to enjoy the fill unless you state that you meant to do it—that you like filling short apically.
Fortunately, our concepts, instruments, and techniques for the preparation of primary canals prior to obturation have never been so accessible to dentists having a wide range of talent and experience. With the use of patency clearing and lubricants during negotiation, apex locators for length determination, and variably tapered nickel titanium files for shaping, ideal root canal preparations can be accomplished by novice dentists in nearly every case, thereby eliminating most of the frustrations inherent to obturating primary canals to any desired endpoint.2
APICAL EXTENT OF FILLING
Now that root canal preparation is more a science than an art, how do we decide the ideal endpoint for filling? The best research I’ve read in answer to this question was done by Sjogren, et al3, who looked at root canals filled short and long with positive and negative culturing results in each group. They showed that high success rates were achieved regardless of long or short filling when the culture came back negative; but when the culture came back positive, only the fully filled cases worked predictably. The authors theorized that success was achieved because the remaining bacteria were entombed in the canal. Infected or not, all of the cases worked when the canals were filled to or beyond the terminus!
For me, this study proved 2 things: first, the old adage that we really don’t even need to fill the canals in teeth if we can just create a totally sterile environment inside root canal systems and place perfect seals coronal to them.4 Second, because no one can ensure sterility in any given root canal space, the surest chance of clinical success is gained when root canal systems, in all of their complexities, are filled to their full apical and lateral extents, even though that means there may be surplus material beyond the confines of the root canal space.
Surplus Filling Material
What about all the studies reported in the literature that show a correlation of overfills to higher failure rates? How do we reconcile these findings with Sjogren and coworkers’3 results? There is a very straightforward but generally unrecognized difference between most of the studies done in the 1960s, 70s, and 80s versus studies done in the last 14 years. Virtually all of those earlier studies looked at fills in preparations done with the apical stop technique.
By definition, an apical stop preparation cannot be overfilled (a stop is an intentional ledge form just short of the canal terminus) unless length determination was mistaken and the stop is nonexistent. Sjogren et al3 stated in their discussion that success in their overfilled cases was likely due to the specialist clinician’s ideal preparation form, which ensured an adequate seal. Schilder5 would describe this result as overextended but not underfilled.
OK, that sounds logical, but what about surplus sealer? Why do clinicians who use lateral condensation fear sealer puffs while clinicians who use warm gutta-percha techniques not only feel like they are nothing to fear but actually enjoy seeing them at the root surface in postoperative films?
This great difference in opinion also has a basis in many clinicians’ experience. AH26 and Grossman’s sealers (for decades the most commonly used sealers by clinicians doing cold lateral condensation) are not only extremely inflammatory but they take days to set, extending the time that their toxic effects are felt when they are pushed into periradicular tissues during obturation. It’s no surprise that clinicians become gun-shy of sealer puffs when they so often have patients complain about pain in these circumstances.
Most warm gutta-percha fills are done with Sybron/Kerr Pulp Canal Sealer—a quick-setting, well-tolerated sealer.6 Because of this, clinicians who do techniques that routinely fill lateral canals seldom hear a patient complain about significant postoperative pain episodes, so they wonder what all the fuss about surplus sealer is about.
LATERAL EXTENTS OF FILLING
What about the lateral extent of our fills? Surprising to me, the importance of filling lateral and accessory canals is still controversial despite 35 years of arguing among specialists. Those who do 3-D obturation techniques have historically claimed technical and even moral superiority over those who do techniques that only fill primary canals.5 Those who use obturation techniques that are less effective in filling root canal aberrations claim that no credible research exists to prove that filling lateral canals makes a difference in clinical outcome.7
In fact, if filling lateral canals is so important, what about all of those millions of endodontic cases filled with single cone or lateral condensation techniques? Thirty percent to 50% of those canals had lateral or accessory ramifications, and at least 70% of them worked in spite of only the primary canals being filled. How do we explain that?
This mystery has an even more obvious answer that was recently offered by Haapasalos.8 What Haapasalos found was a significant inhibition of bacterial growth in culture dishes around AH26 and Grossman’s sealers. When single cone or cold lateral condensation fills are done with these sealers, they are placed in primary canal spaces adjacent to unfilled lateral and accessory canals, where these sealer’s toxic effects can kill bacteria left in those side channels. You don’t have to fill lateral canals as long as all of the bugs in them are dead.
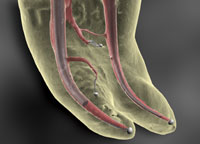
Unfortunately, many side canals are 6 to 7 mm in length (Figure 1), making it unlikely that they can be killed in this manner. I therefore choose to fill all canal forms as completely as I can so that I roll a bolus of filling material past any bacteria I have inadvertently left in side canals to entomb them. This achieves the same outcome as if I killed every bug in the space.
 |
| Figure 1. Maxillary molar with MB2 canal bifurcating off the MB1 canal and extending 7 mm further before bifurcating again and exiting on the root surface. This side canal was non-negotiable and therefore most likely not sterile before obturation. Fortunately, a bolus of sealer and warm gutta-percha was rolled through its full length, entombing any remaining bacteria and allowing a success in spite of severe anatomic challenges. |
Today, with centered condensation techniques, it takes less training time and less chairside time to fill lateral canals than it takes to do a good job of lateral condensation.9 So for me, the question of whether to fill lateral canals or not seems like a no-brainer. With a centered condensation technique, I can completely fill a root canal system with 10 accessory canals in less than 6 seconds (Figure 2). Why would I work harder to avoid the thrill of the fill?
 |
| Figure 2. Maxillary lateral incisor with complex anatomy, all of it filled in a single Continuous Wave downpacking movement (2.5 seconds). |
CENTERED CONDENSATION
Centered condensation obturation techniques efficiently and effectively move filling materials through root canal systems by driving the condensation device, be it an electrically heated plugger or a preheated carrier, through the center of a thermoplastic material like gutta-percha. The filling material, lubricated by the sealer cement, is displaced coronally as the condensation device moves apically, causing a streaming effect of the material against the primary canal walls. This fills lateral canals, accessory canals, fins, loops, and isthmuses in its wake (Figure 3).
 |
| Figure 3. Schematic diagram of the streaming effect created as the condensation device is driven through the center of the filling material. |
When the condensation device closely approximates the geometry of the canal preparation, all of the lateral ramifications off the primary canal (assuming they have been cleaned out) are filled within 1 to 6 seconds, regardless of their number or extent. In the Continuous Wave technique, the apical accuracy of obturation is determined by the quality of the apical resistance form of the preparation and the fit of the filling cone (Figure 4). In the GT obturator technique, apical accuracy is determined more by the carrier placement method.

| Figure 4. The new System-B/Elements obturation device by SybronEndo. Detachable sleeves allow sterile handpiece surfaces, and an inline motor-driven extruder adds backfilling capability. |
THE GT OBTURATOR TECHNIQUE
This technique requires a GT obturator (DENTSPLY) of the same size as the final GT file (DENTSPLY) used to shape the canal to be filled, a scalpel for removing excess gutta-percha from the carrier, paper points, sealer, and a GT obturator oven (DENTSPLY Tulsa).
The selected GT obturator is prepared by using the scalpel to cut off the gutta-percha from its tip until approximately 1.5 mm of the carrier end is exposed. In canals 17 mm or longer, this tip adjustment lessens the possibility for overfilling caused by the close fit of GT obturators in GT-cut canal shapes. The rubber stop on the carrier is measured 1 mm short of length, as a sealer and gutta-percha front develops and moves ahead of the carrier during its insertion through the canal.
A clever supplemental technique is to measure the distance from the reference point to the orifice level of the canal to be filled, to transfer that measurement from the preset stop down the shank of the carrier, and to score the gutta-percha at that length. By grasping the gutta-percha on the carrier with cotton pliers coronal to the score mark and twisting, the coronal surplus is removed, eliminating the need later to clean it out of the access cavity after placement of the GT obturator.
The prepared GT obturator is placed in the receptacle of the oven arm, hanging it by the handle (not by the stop). The oven arm is carefully lowered to its click stop, and the correct obturator size button is selected and pushed to prepare the oven for the heating cycle. If the clinician is not finished prepping the canal, the oven will hold a steady temperature for 60 seconds after the first beep.
The canal is dried, and its length is confirmed with paper points. It is coated with sealer on a paper point, and all of the surplus sealer is blotted out with successive paper points. Initially, the paper points will come out of the canal coated with sealer. This indicates a pool of sealer in the canal lumen, a set-up for surplus sealer being squeezed out the canal end during insertion of the GT obturator. When this pool of sealer has been removed, the next paper point will come out of the canal spotted rather than coated with sealer.
Press down on the back of the oven arm and slowly allow the arm to rise. Place the tip of the carrier into the canal orifice and slowly, over 5 to 6 seconds, move it to its final position in the canal (Figures 5 to 8). Rapid insertion will result in unnecessary surplus being expelled beyond the root canal terminus.
 |
 |
| Figure 5. GT obturator, showing gutta-percha cut back from its tip as it starts down the canal. | Figure 6. GT obturator further into canal showing gutta-percha moving toward its tip as it pushes though the narrowing canal space. |
 |
 |
| Figure 7. GT obturator as gutta-percha moves even with the carrier tip. Note the side canal beginning to be filled. | Figure 8. GT obturator in its ideal final position 1 mm short of the canal terminus showing the typical sealer and gutta-percha front extending to full length with a small puff of sealer. Note the fill in the lateral ramification. |
Once the GT obturator is in place, the carrier shank is cut at the orifice with a high-speed bur or ultrasonic tip before inserting the next obturator in a multicanaled tooth. If a post space is desired, the carrier is cut out of the coronal aspect of the canal with a Preppi Bur (a nonfluted, high-speed, round bur, DENTSPLY Tulsa) or an ultrasonic tip with a round end, such as the Buc-1 (Spartan).
A Continuous Wave (CW) electric heat plugger (SybronEndo) is selected to be of the same taper as the GT file used to shape the canal (Figure 9) or the same taper as the nonstandardized gutta-percha cone fit in a non-GT shaped preparation. In multicanaled teeth, a separate plugger must be fit for each canal. The selected plugger, placed in the System-B/Elements handpiece (SybronEndo), is pushed into the canal and wiggled back and forth until it bottoms out. These pluggers are made of dead-soft stainless steel, and the canal will bend them perfectly. It is critical that the selected plugger be fit into the prepared canal prior to cementation of the filling cone, not only to bend the plugger, but also to set the stop to a reference point on the tooth so the downpack can be ended before the binding point has been reached.
 |
| Figure 9. Continuous Wave electric heat pluggers in sizes 0.04, 0.06, 0.08, 0.10, and 0.12 tapers (left to right). |
The final position the plugger will move to in the canal is checked by holding the stop on the prefit plugger adjacent to the pinch mark on the filling cone fit in that canal and by comparing the tip of the plugger to the tip of the cone. If the plugger is too small, then it will downpack too close to the end of the filling cone, causing an unnecessary overextension of filling material. If the plugger is too large for the canal preparation, then it won’t get close enough to the end of the canal, and it may fail to plastically deform the filling material in the apical third, possibly not filling an apical lateral canal.
If the plugger fits too close to length, then choose a larger plugger. If a ML-0.12 size plugger fits too close to length, simply shorten the stop and end the downpack 4 mm short of full length. If the plugger initially chosen doesn’t fit close enough, choose a smaller size until appropriate length is achieved. Since the pluggers have continuous tapers and GT files cut canal shapes that are coronally parallel, it may be necessary to move down a taper size or even 2 sizes in long teeth.
After plugger fit is completed, the canal is dried in preparation for cone cementation. As in all filling techniques, paper point confirmation of length allows one more chance to adjust length prior to the fill. The fit filling cone is buttered with sealer, and the cone is slowly inserted into the canal to length, moved in and out a couple of times, and seated to length.
Turn the System-B/Elements Unit on and select the downpack icon, which will automatically set the power level and temperature. The cone is seared off at the orifice, and with the fat, stainless steel end of the CW hand plugger, condense the softened gutta-percha at the orifice level. If a 20, 30, or 40 series GT File was used to shape the canal, a No. 1 CW hand plugger is selected; if a 0.12 accessory GT File was used, a No. 2 CWH plugger is used (Figure 10).
 |
| Figure 10. Continuous Wave hand pluggers Nos. 1 and 2. Note the small, flexible nickel titanium apical end and the larger stainless steel orifice end. |
The cold CW plugger is placed against the gutta-percha, and after applying apical pressure, the switch is depressed, beginning the downpack. The CW plugger immediately heats at its tip and starts moving through the canal. When the plugger approaches its binding point in the canal, the switch is released while maintaining apical pressure. The plugger slows to a halt short of the binding point, where a sustained condensation force is held for 5 to 10 seconds (Figures 11 to 13).
After the sustained condensation period is completed, a full second of heat is applied (this is called a separation burst), another 1-second pause without heat is held, and the CW plugger is removed with the gutta-percha that was displaced along its sides (Figure 14). Shorting the separation burst of heat is an invitation to pulling the cone out. If that happens, just put the cone, still attached to the CW plugger, back in the canal, do a 2-second separation burst of heat, and the apical mass of gutta-percha should stay in the root.
 |
 |
| Figure 11. The switched-on Continuous Wave electric heat plugger begins its movement through the cemented gutta-percha cone. | Figure 12. The Continuous Wave plugger is nearing its binding point, and the switch has been released as apical pressure is maintained. |
 |
 |
| Figure 13. The Continuous Wave plugger is in final position just short of the binding point with a sustained condensation force being held. Note the lateral canals filled with sealer and gutta-percha. | Figure 14. After a 1-second separation burst of heat is applied, the Continuous Wave plugger is withdrawn, leaving the apical mass of gutta-percha. |
The small, flexible nickel titanium end of the No. 1 CW hand plugger is used to condense and set the apical mass of gutta-percha (Figure 15). Be careful not to penetrate the apical gutta-percha, creating a cylindrical hole that will be a set-up for a void on the backfill.
Alternatively, in a straight canal, the CW electric heat plugger can be removed by pushing apically and rotating without the separation burst of heat. This allows the gutta-percha condensed alongside the plugger to remain in the canal as a set-up for a single cone backfill, the fastest and easiest backfill possible.
Backfilling is done with an Obtura II gun (Spartan/Obtura) or the new, inline, motor-driven System-B/Elements extruder by Sybron-Endo. A No. 23 gauge needle works best in this application as long as it is held in the canal for 5 seconds before extrusion. This warms the canal wall to accept the syringed gutta-percha without prematurely setting it and creating a void (Figure 16). Also important to prevent the void is to be sure that apical pressure be maintained on the needle during the backfill to create hydraulic pressure on the syringed material throughout the backfill (Figures 17 and 18).
 |
 |
| Figure 15. The small nickel titanium end of the No.1 Continuous Wave hand plugger is used to condense the apical mass of gutta-percha until cooled and set. | Figure 16. A No. 23 gauge backfilling needle is placed to its binding point and is held in place for 5 seconds before gutta-percha is extruded. This heats the canal wall, reducing the chances of a void in the backfill. |
 |
 |
| Figure 17. After the extruded gutta-percha fills the space ahead of the needle, it bumps the needle back. Holding a light apical pressure on the needle throughout backfilling creates the hydraulic force needed to eliminate voids. | Figure 18. Completed obturation. |
Don’t Forget to Irrigate
Ironically, I’ve seen more irrigation failures since the introduction of rotary shaping than when we only used hand instruments. If you have shaped a root canal system in 90 seconds, it still needs 30 to 60 minutes of irrigation time to remove vital inflamed tissue from lateral ramifications or it needs to be filled with calcium hydroxide for 2 weeks to kill the tissue left in those side spaces. Either will work, but the calcium hydroxide will hurt for 72 hours as it kills the remaining tissue, then it will be totally comfortable.
The etiology for most failures can be diagnosed pharmacologically—it doesn’t get any better on a week’s worth of Augmentin or Clindamycin, and it feels fine 45 minutes after the patient takes a NSAID such as Naprosyn. Remove the root canal filling, soak it, fill it with calcium hydroxide for 2 weeks, and refill it. In most of these cases, I’ve seen a lateral canal filled on the second treatment. In most of these cases, I’ve had resolution of all the symptoms.
It used to be difficult to fill root canal systems in 3 dimensions. Now it’s a cinch. However, you cannot fill what you didn’t clean out. Clean it out, and with today’s concepts, instruments, techniques, and materials, 3-D obturation is simple, fast, and predictable (Figure 19). Clean it out and experience the thrill of the fill!
 |
| Figure 19.Mandibular molar obturated with a GT obturator in the distal canal allowing a 3-D fill beyond the impediment located at the apical bend and with the Continuous Wave technique in the smooth, but severely curved, mesial canals. |
References
1. Buchanan LS. Cleaning and shaping root canal systems. In: Cohen S, Burns RC, eds. Pathways of the Pulp. 5th ed. St Louis, Mo: Mosby Yearbook; 1991: chap 7.
2. Gluskin AH, Brown DC, Buchanan LS. A reconstructed computerized tomographic comparison of Ni-Ti rotary GT files versus traditional instruments in canals shaped by novice operators. Int Endod J. 2001;34:476-484.
3. Sjogren U, Figdor D, Persson S, et al. The influence of infection at the time of root filling on the outcome of endodontic treatment of teeth with apical periodontitis [published correction appears in Int Endod J. 1998;31:148]. Int Endod J. 1997;30:297-306.
4. Seltzer S. Endodontology: Biologic Considerations in Endodontic Procedures. New York, NY: McGraw-Hill; 1971:317.
5. Schilder H. Filling root canals in three dimensions. Dent Clin North Am. Nov 1967:723-744.
6. Pertot WJ, Camps J, Remusat M, et al. In vivo comparison of the biocompatibility of two root canal sealers implanted into the mandibular bone of rabbits. Oral Surg Oral Med Oral Pathol. 1992;73:613-620.
7. Weine FS. Endodontic Therapy. 5th ed. St. Louis, Mo: Mosby; 1996:425.
8. Saleh IM, Ruyter IE, Haapasalo M, et al. Survival of Enterococcus faecalis in infected dentinal tubules after root canal filling with different root canal sealers in vitro. Int Endod J. 2004;37:193-198.
9. Buchanan LS. The continuous wave of obturation technique: ‘centered’ condensation of warm gutta percha in 12 seconds. Dent Today. Jan 1996;15:60-67.
Dr. Buchanan is a diplomate of the American Board of Endodontics and a fellow of the International College of Dentists and American College of Dentists. Dentists interested in his videotape series, “The Art of Endodontics” and his intensive, hands-on laboratory workshops in Santa Barbara, Calif, can call (805) 899-4529. For further information related to this article, visit endobuchanan.com for updates and answers to frequently asked questions indexed by topic. Questions concerning challenging cases can be directed to (800) 528-1590.
Disclosure: Dr. Buchanan consults for and holds patents to the GT System of instruments manufactured and sold by DENTSPLY. He also holds patents with the System-B Heat Source and the BUC ultrasonic tips by Spartan/Obtura, and is the inventor of Continuous Wave of Condensation Technique.


