
 |
|
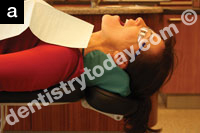
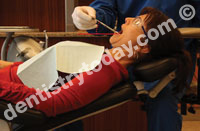
Figure 1. Ask patients to scoot to the end of the headrest, then position with dental ergonomic cushions to properly support the spinal curves. |
 |
|
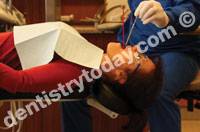
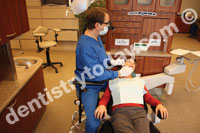
Figure 2. When treating the upper arch, the occlusal plane should be angled backward up to 25º in relation to the vertical plane. (Photo from Positioning for Success DVD, 2010.) |
Seventy-five heads bowed reverently over their sim heads, diligently preparing a restoration on the distolingual of tooth No. 3. From the back, one would assume that the students were not wearing loupes, but from the side, a different reality became apparent. The students were working on the upper arch with the occlusal plane nearly vertical, causing excessive leaning and straining forward—even to see into the mirror. When the occlusal plane was tipped backward about 25°, the postural transformation was amazing.
This is one of the most common ergonomic mistakes I observe, not only in the schools, but also among dentists who have been in practice for many years—dentists who have the most expensive loupes, finest patient chairs, and state-of-the-art ergonomic operator stools. All of this is for naught if the patient isn’t properly positioned to preserve the dentist’s optimal working posture.
Not feeling any pain…yet? Are your patients’ teeth and periodontium completely healthy just because there is no pain? The progression to musculoskeletal disease (MSD) in dentistry is a slow, insidious process—and the proof is in the numbers:
An average of 2 out of 3 dental professionals experience occupational pain.1-12
Nearly one third of dentists who retire early are forced to do so because of a MSD.13
In 2004, approximately $131 million in lost income was attributed to MSDs in the dental profession.14
The causes of MSDs in dentistry are multifactorial, ranging from nonergonomic loupes and improper selection of delivery systems, to generic exercise that worsens muscle imbalances. However, proper patient-positioning techniques can go a long way in preventing the progression toward chronic pain or potential injury for the operator. In fact, it has been shown that dentists who take the time to carefully position their patients to promote a direct view have significantly fewer headaches.10 Patient-positioning techniques will vary slightly depending upon the actual tooth surface being treated, the patient’s tolerance to reclining, and patient chair shape and width.
I had the honor of lecturing at the 2009 International Dental Ergonomics Congress in Krakow, Poland, and was privileged to be able to discuss the topic of patient positioning with the foremost dental ergonomists in Europe. Most dentists in Europe have traditionally positioned themselves quite differently than doctors in the United States, sitting primarily in the 9 o’clock position; which leads to slightly different MSDs than those reported in the United States (T. Dzieniakowski, Personal Communication, June 2009).15 Incorporating the key positioning concepts in the following ergonomic guidelines, I have measured greatly improved dentist and student postures. Many of these concepts are also becoming more widely accepted in Europe.
OPERATOR POSTURE
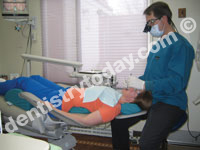
First, it is imperative that the dentist is seated properly and the stool is correctly adjusted.16 (See the Dentistry Today September 2008 article, “Operator stools: How Selection and Adjustment Impact Your Health,” available at dentistrytoday.com.) The assistant may be either standing or seated; alternating between these during the day can be very beneficial for the assistant’s musculoskeletal health. If seated, the assistant’s eye level must be 4 to 6 inches above the dentist’s for optimal viewing of the oral cavity. Some shorter assistants may require a taller cylinder on their stools to achieve this positioning.
 |
 |
|
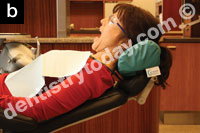
Figures 3a and 3b. A dental cervical cushion can be used to facilitate proper positioning when treating the upper arch (3a) and reversed to treat the lower arch (3b). (Photo from Positioning for Success DVD, 2010.) |
PATIENT POSITIONING SEQUENCE: UPPER ARCH
After the operator and assistant stools are properly adjusted, the patient must be positioned properly depending upon the quadrant and tooth surface being treated. For the upper arch, follow these general guidelines.
1. First, recline the patient to a fully supine position. This can be challenging for some patients who resist reclining due to postural hypotension, inner ear issues, vertigo, and a myriad of other conditions. However, this is oftentimes of a psychological origin. In these cases, try positioning the chair already partly reclined before the patient arrives. In this way, when the chair is fully reclined, it will not feel as dramatic to the patient. Another strategy is to meet them halfway—recline them slightly further than you actually need them reclined, then if they protest, say that you’ll meet them “halfway.” Placing a TV, mobiles, or other distractions on the ceiling can also go a long way in helping to get the patient more comfortable while supine.
2. Always ask the patient to scoot to the end of the headrest. This is especially important if using a flat headrest—reaching or leaning over the “dead” headrest space can lead to a myriad of musculoskeletal dysfunctions.14 Oftentimes, this is not done in deference to patient comfort—their spinal curves may not align properly with the patient chair support when scooted up all the way to the end of a headrest. This is easily resolved with dental ergonomic cushions that support the patient’s neck, lower back and knees (Figure 1).
3. Adjust the head tilt appropriately for the upper arch, angling the double articulating headrest up into the patient’s occiput. This will not only enable better viewing of the oral cavity, but also help relax the patient’s cervical muscles. The occlusal plane of the upper jaw should be tilted backward up to 25° in relation to the vertical plane.17 You can check for proper positioning from the side, using an instrument handle to visualize the angle of the occlusal plane (Figure 2). Cervical support cushions can greatly aid in attaining this position. Position the larger end under the neck for maxillary procedures and reverse the cushion for mandibular treatment (Figures 3a and 3b).
4. Adjust the height of the patient chair so the dentist’s forearms are parallel to the floor or sloping 10° upward. Another guideline is to position the occlusal surface at elbow level or slightly higher while operating.18 If positioning the patient above elbow level, armrests should be considered. The patient’s height may also be determined propriocepti
vely by closing the eyes and slowly moving the arms up and down until a comfortable working position is attained.19 Once the proper height is attained, position the patient chair accordingly.
5. Rotate and/or side-bend the patient’s head to view the treatment area. Rotation is best achieved with verbal cues, while side-bending can be performed manually. For example, when treating the occlusal of tooth No. 3, the patient’s head may be rotated slightly toward the operator.
The operator must then be positioned correctly depending upon the tooth surface being treated.
6. Move into a clock position that establishes a line of view that is perpendicular to the tooth surface being treated. This may be direct or indirect, depending upon the tooth surface being treated. Mirrors should be used whenever direct viewing of the oral cavity requires leaving neutral posture. One study revealed that more dentists who use a mirror are pain-free than those who do not utilize a mirror.20
 |
|
Figure 4. Lighting should parallel the operator’s line of sight as closely as possible to prevent shadowing. Overhead versus head-mounted light shown. Head-mounted lighting will cause the least shadowing. (Photo from Positioning for Success DVD, 2010.) |
 |
|
Figure 5. To enable a direct line of sight that is perpendicular to the lingual of No. 19, the operator moves to the 9 o’clock position. |
 |
| Figure 6. The occlusal plane of the lower arch should be angled 30° to 40° above the horizontal plane when treating molars and premolars. (Photo from Positioning for Success DVD, 2010.) |
For example, when treating the occlusal of tooth No. 3, the dentist should be in the 11 o’clock to 12 o’clock position to enable an indirect line of sight perpendicular to the tooth surface. In general, the 11 o’clock to 1 o’clock positions enable some of the most neutral operator postures, especially of the arms, and should be made easily accessible in the operatory.21 Frequent positioning at the 10 o’clock position without a mirror tends to encourage more arm abduction and neck/ shoulder problems.20
7. Position the tray and delivery system within easy reach. Handpieces and instruments should be at about elbow level. Over-the-patient delivery systems should not cause upward reaching.
8. Identify nearby inter- or extraoral finger fulcrums that enable you to relax the hand and arm.
9. Direct the overhead light to prevent shadowing. The light should parallel the operator’s line of sight to within 15°. Thus, the light will be placed slightly behind and to one side of the operator’s head. A head-mounted light will parallel even more closely with the operator’s line of sight to prevent shadowing (Figure 4).20 Dr. Lance Rucker, professor and chairman of operative dentistry in the Department of Oral Health Sciences at the University of British Columbia, has done valuable research in this area. For the upper arch, a mirror may be used to reflect light onto the surface.
10. The assistant’s thighs should be angled toward the head of the patient, so assistant’s left hip is at patient’s left shoulder. The knees should preferably be interlocking with the dentist to gain the closest, safest positioning and posture.14 While this assistant positioning is a common practice in Europe, many dentists in the United States are uncomfortable with physically contacting the assistant’s leg.
The dentist may ask the assistant, “Can you see?”—a slight adjustment of the hand up or down on the mirror can greatly impact the assistant’s seat posture. The assistant may also need to adjust the stool position, depending upon the arch being treated—the stool may need to be slightly raised to visualize the lower arch. The assistant’s delivery system should be over the lap for easy retrieval of instruments/utilities.
PATIENT-POSITIONING SEQUENCE: LOWER ARCH
1. First, recline the patient to a semi-supine position. This will be only 20° elevated from the horizontal supine position. A common mistake is to position the patient halfway between supine and a full-upright posture for lower arch, which can make visualizing the oral cavity a postural challenge.
2. Adjust the headrest forward, so the patient’s chin tilts downward and the occlusal plane of the lower jaw is close to horizontal when the dentist is working in the 9 o’clock to 10 o’clock position. Reversing the position of a dental cushion will help in attaining this position (Figure 3b). The head will need to be tilted further back when treating anterior teeth of the lower jaw and further still when treating the lower molars and premolars.17
3. Adjust the height of the patient chair so forearms are parallel to the floor or sloping 10° upward. The height of the patient chair when treating the mandibular arch will need to be lower than when treating the maxillary arch. Some patient chairs do not adjust low enough for shorter dentists to attain a safe, relaxed arm posture in the semisupine position. A saddle stool can greatly aid in solving this problem, since it positions the dentist higher—halfway between standing and sitting.
4. Adjust the patient’s head position: Rotate the patient’s head to view the treatment area. For example, when treating the lingual of tooth No. 19, the patient’s head may be rotated away from the operator.
The operator must then be positioned correctly depending upon the tooth surface being treated.
5. Move into a clock position that establishes a line of view that is perpendicular to the lingual surface being treated. This may be direct or indirect, depending upon the tooth surface being treated. For the lingual of No. 19, the dentist should be in the 9 o’clock position to enable a direct line of sight perpendicular to the tooth surface (Figure 5).
When treating the anterior teeth, molars or premolars of the lower jaw, an 11 o’clock to 12 o’clock position may be used. For anterior lower teeth, the lower jaw should be angled backward about 30°. Tilt the headrest slightly backward or use the large end of the dental cushion to slightly elevate the chin. For molars and premolars, the lower jaw should be angled backward even further: about 40° (Figure 6).17 Professor Oene Hokwerda and colleagues have contributed greatly to this education in Europe. A more in-depth article on patient and operator positioning, “Adopting a Healthy Sitting Work Posture,” is available at esde.org.
6. Guidelines for positioning the tray, delivery system and lighting are similar to those for the upper arch.
When treating the lower arch, it is an excellent opportunity for a short- to medium-height assistant to stand. The assistant must stand very close to the patient to avoid leaning and reaching forward with the arms.
CONCLUSION
With tight patient schedules, emergencies, and produc
tion goals to consider, it is easy to overlook proper patient positioning. However, taking the time to position the patient, dentist, assistant, and equipment properly can not only have positive ramifications for the operator’s posture, comfort, and career longevity—it can also lead to better treatment and increased productivity.
Acknowledgement
The author wishes to thank Lee Lehman, manager of Henry Schein, Wilsonville, Ore, for the use of his beautiful showroom for photography, and to models Dr. Keith Valachi and Gayla Goodwin.
References
- Akesson I, Schütz A, Horstmann V, et al. Musculoskeletal symptoms among dental personnel; lack of association with mercury and selenium status, overweight and smoking. Swed Dent J. 2000;24:23-38.
- Alexopoulos EC, Stathi IC, Charizani F. Prevalence of musculoskeletal disorders in dentists. BMC Musculoskelet Disord. 2004;5:16.
- Augustson TE, Morken T. Musculoskeletal problems among dental health personnel. A survey of the public dental health services in Hordaland [in Norwegian]. Tidsskr Nor Laegeforen. 1996;116:2776-2780.
- Chowanadisai S, Kukiattrakoon B, Yapong B, et al. Occupational health problems of dentists in southern Thailand. Int Dent J. 2000;50:36-40.
- Fish DR, Morris-Allen DM. Musculoskeletal disorders in dentists. NY State Dent J. 1998;64:44-48.
- Finsen L, Christensen H, Bakke M. Musculoskeletal disorders among dentists and variation in dental work. Applied Ergonomics. 1998;29:119-125.
- Lehto TU, Helenius HY, Alaranta HT. Musculoskeletal symptoms of dentists assessed by a multidisciplinary approach. Community Dent Oral Epidemiol. 1991;19:38-44.
- Marshall ED, Duncombe LM, Robinson RQ, et al. Musculoskeletal symptoms in New South Wales dentists. Aust Dent J. 1997;42:240-246.
- Ratzon NZ, Yaros T, Mizlik A, et al. Musculoskeletal symptoms among dentists in relation to work posture. Work. 2000;15:153-158.
- Rundcrantz BL, Johnsson B, Moritz U. Cervical pain and discomfort among dentists. Epidemiological, clinical and therapeutic aspects. Part 1. A survey of pain and discomfort. Swed Dent J. 1990;14:71-80.
- Rundcrantz BL, Johnsson B, Moritz U. Occupational cervico-brachial disorders among dentists. Analysis of ergonomics and locomotor functions. Swed Dent J. 1991;15:105-115.
- Shugars D, Miller D, Williams D, et al. Musculoskeletal pain among general dentists. Gen Dent. 1987;35:272-276.
- Burke FJ, Main JR, Freeman R. The practice of dentistry: an assessment of reasons for premature retirement. Br Dent J. 1997;182:250-254.
- Valachi B. Practice Dentistry Pain-Free: Evidence-Based Strategies to Prevent Pain and Extend Your Career. Portland, Ore: Posturedontics Press; 2008.
- Paszynska E. The Ergonomic and Health Status of Polish Dentists as Evaluated by a Questionnaire. Presented at: International Dental Ergonomics Congress; May 29, 2009; Krakow, Poland.
- Valachi B. Operator stools: How selection and adjustment impact your health. Dent Today. 2008;27:148, 150-151.
- Hokwerda O, de Ruijter R, Shaw S. Adopting a healthy sitting working posture during patient treatment. optergo.com/uk/images/Adopting.pdf. Accessed on March 13, 2010.
- Chaffin DB, Andersson G, Martin BJ. Occupational Biomechanics. 3rd ed. New York, NY: Wiley InterScience; 1999:355-391.
- Murphy DC, ed. Ergonomics and the Dental Care Worker. Washington, DC: American Public Health Association; 1998:294-295.
- Rucker LM, Sunell S. Ergonomic risk factors associated with clinical dentistry. J Calif Dent Assoc. 2002;30:139-148.
- Proteau R-A. Prevention of work-related musculoskeletal disorders (MSDs) in dental clinics. Montreal, Quebec, Canada: ASSTSAS. asstsas.qc.ca/_cms/plugins/recherche/view.aspx?xfileid=4846. Accessed March 13, 2010.
Ms. Valachi is a physical therapist, dental ergonomic consultant, and author of the book Practice Dentistry Pain-Free. This article is based on her new educational DVD entitled Positioning for Success in Dentistry. Dentists can earn 2 CE credits with the DVD, which also contains assistant and hygienist positioning techniques. The DVD as well as demo video clips are available at posturedontics.com. Ms. Valachi is CEO of Posturedontics, a company that provides research-based dental ergonomic education, and is clinical instructor of ergonomics at OHSU School of Dentistry in Portland, Ore. She is a member of the National Speakers Association, lectures internationally, and may be reached at [email protected].
Disclosure: Ms. Valachi reports no conflicts of interest.


