


INTRODUCTION
In this article, we will be discussing some soft-tissue uses of the diode laser that can greatly assist the general practitioner (GP) and benefit the patient. Our patients are responsive to the use of the laser as a high-tech tool that is a lot less invasive and scary than a scalpel blade.1
The diode laser used in my practice and discussed here is the NV PRO3 Microlaser (DenMat). Being cordless and very light (approximately the size of a Sharpie marker), it is portable and easily transported from room to room. The laser can be used to cut, coagulate blood vessels, cauterize nerve endings, and sterilize wound edges. The diode laser is made of gallium, aluminum, and arsenic, which create wavelengths in the 810-nm range. It should be noted that some diode lasers work in the 980-nm range. Most lasers operate off a selection of continuous wave or pulsed output.2 “Continuous” means it is giving off the same power output constantly. This would be used for all procedures that require cutting with an initiated tip. This is also where you can heat the tissue and start to see charring (not desirable), which means the area is overheating and the power supply should be reduced to allow cooling. “Pulsed” operation of lasers refers to any laser not classified as continuous wave, meaning the power appears in pulses of some duration at some repetition rate.
 |
 |
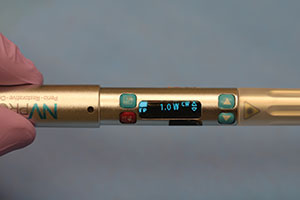
| Figure 1. The NV PRO3 Microlaser (DenMat) was set in continuous wave mode at 1.0 W with an initiated tip. |
Figure 2. Initiation simply chars the tip and is done using cork. |
 |
 |
| Figure 3. The initiated tip was used to laser a trough around the crown preparation. Anesthetic is often not needed. | Figure 4. Using a quality VPS impression material (Splash! [DenMat]), along with a diode laser to trough soft tissue around the preparation, created an accurate (blood-free) master impression. |
Understanding how laser energy works is important for safety. Reflected energy can be harmful to the eyes, and this is why we wear safety glasses during our procedures. Transmitted energy could excessively heat up the underlying tissue, which is not desirable. Scattered energy can be effective for things like bio-stimulation of canker sores and herpetic lesions. Absorbed energy is used for cutting. The diode laser energy is absorbed by hemoglobin, melanin, water, and pigmentation. The darker the pigmentation, the more attraction the laser energy has; this is how the laser works and why it only cuts soft tissue and not bone. The 810-nm lasers are better absorbed by melanin and hemoglobin and have a lower affinity to water. This is why 810-nm lasers work better in a dry field. The 980-nm lasers work better in a wet field, which is the reason why most require irrigation during lasing. Research shows that 810-nm lasers have better coagulation, while 980-nm lasers cut and result in a smaller zone of necrosis.3 The difference is negligible when you are talking about a difference of 1 to 2 cells and is thus not really a selling feature of a 980-nm laser over an 810-nm one (this may be more of a marketing feature). The diode laser works in heating the tissue to the 100° to 150°C range. Blood coagulation is seen early in the process while heating tissue. This is a good point because it shows that, to coagulate, you can power the laser down and do not need to risk unintentional cutting if you are only trying to coagulate an area. When the laser tip contacts soft tissue, the tip must be initiated to concentrate the energy. The laser light is thus turned into heat, creating the photo-thermal reaction. There is localized vaporization around the zone of carbonization. Soft-tissue diode lasers will create minimal tissue charring if used at the correct setting.4
In my practice, the diode laser has allowed me to provide additional procedures, with excellent patient acceptance of this perceived high-tech treatment. In many cases, there is improved access and field of vision and a decreased treatment time. The tool has reduced my use of a scalpel and eliminated my use of electrosurgery. In providing this same-day dentistry, there is minimal bleeding, minimal postoperative discomfort, faster healing, little or no gingival recession, and more precise treatment with no tissue scarring. The diode laser is a photo-thermal device and can be used around metal, dental implants, and crown and bridge work. The zone of necrosis or damage using electrosurgery is 300 to 500 cell layers deep, while it is 3 to 5 cell layers deep when using a laser.
The use of the diode laser in periodontal and hygiene applications is significant. Laser-assisted periodontal therapy is an adjunct to traditional scaling and root planing. Laser energy selectively targets only darker, necrotic tissue and leaves healthy tissues alone, allowing for better healing and results. Other indications include bacterial reduction, sulcular debridement, and desensitization of root structures. It has also been proven to be a helpful tool in treating challenging periodontal conditions with predictable results. The diode laser coagulates and cauterizes the treatment areas, leading to immediate hemostasis, rapid healing, and reduced swelling. In contrast, scalpel incisions leave blood vessels open and sensitive nerve endings on the edges of the wounds. This blood spills into the surgical site, making it difficult to see and often requiring suturing. Nerve ending exposure results in histamine release into the surgical site, causing inflammation and postoperative pain.
Diode Laser Procedures in the General Practice
The use of lasers in dentistry is growing as the number of oral health professionals who understand the practical benefits they offer also grows. There are many uses for the diode laser in our daily dental procedures. Many clinicians are aware of the use of the diode laser to trough around the margin of a crown preparation (Figures 1 to 4 illustrate the use of the diode laser in pre-impression troughing). For optimal master crown and bridge impressions, the diode laser allows the user to trough the soft tissue to create a more accessible preparation margin and, at the same time, to control moisture contamination and bleeding without the use of chemicals and packing cord(s) or the fear of tissue recession. For this procedure, the diode laser is used in the continuous wave mode at 1.0 W with an initiated tip. The final impression was made using a light- and heavy-bodied vinyl polysiloxane (VPS) (Splash! [DenMat]) material. Not only is the use of the laser less invasive with a predictable outcome, but there is also often no need for a local anesthetic. For years, electrocautery was used to eliminate unwanted soft tissue, but this technique was rather uncomfortable to our patients during the procedure and immediately postoperatively. Diode lasers actually incise with a very small zone of necrosis, allowing the dentist to do a number of soft-tissue procedures with little or no discomfort, little to no bleeding, and rapid healing.
 |
 |
| Figure 5. The use of the diode laser (on the continuous wave setting at 1.6 W with an initiated tip) to uncover a buried dental implant creates hemostasis. | Figure 6. A tissue-punch technique is a more traditional method to uncover an implant. |
 |
 |
| Figure 7. There was much bleeding with the punch technique in this case, and local anesthetic was required. | Figure 8. Postoperative healing around the implant healing abutments was excellent, with minimal tissue shrinkage. |
 |
 |
| Figure 9. A mucoseal was identified during a routine oral examination. | Figure 10. The mucoseal was excised by using the diode laser in the continuous wave mode and set at 1.6 W with an initiated tip. The lesion was removed quickly, painlessly, and with no bleeding. |
 |
 |
| Figure 11. Healing progressed in just a few short days. The patient experienced no discomfort following the procedure. | Figure 12. A new herpetic lesion was apparent and painful to this patient. |
 |
| Figure 13. The diode laser was set in the pulsed mode at 1.5 W, and the lesion was treated using a non-intitated tip. The tip was not allowed to touch the lesion, but the laser energy transmitted began a fast healing response. |
Other indications conclude that using the diode laser to create access to Class V composite restorations has been useful; diseased tissue is easily removed, again allowing the clinician to finish the restoration in a bloodless work zone. Soft-tissue recontouring can be done quickly and painlessly with fast healing times, effectively maximizing aesthetic results in the smile zone. Frenectomies can be performed using the diode laser to stop the migration of gingival tissue, and hyperplastic tissue is easily trimmed without the need for a scalpel and sutures.
In addition, the diode laser is especially useful in dental implant uncovering procedures (Figure 5). When epithelium overgrows the buried dental implant, it must be removed to place the impression coping. Traditional methods include anesthetizing the patient again, then using either a scalpel or a tissue punch to remove the crestal tissue. Figures 6 and 7 demonstrate the conventional uncovering of an implant using a tissue punch (Salvin Dental Specialties). To uncover a buried implant using the diode laser, set it in continuous wave mode at 1.6 W with an initiated tip. There is no demonstrated heating or sparking of the implant body. It is clearly demonstrated that there is much bleeding when using the punch (Figure 7), whereas there is minimal to no bleeding when using the diode laser (Figure 5). This allows the clinician to make a final implant-level impression at the time of uncovering, knowing that the tissue response (during the time of abutment and crown fabrication by the dental laboratory team) will be positive (Figure 8).
The diode laser is also effectively used for lesion destruction. We get good hemostasis, a relatively bloodless surgical site, and faster healing with a reduction for potential infection. Figures 9 and 10 demonstrate the use of an initiated tip set at 1.6 W in the continuous wave setting to remove a mucoseal in the mucosal tissue of the lower lip. The lesion was easily excised without the use of a scalpel. Figure 11 demonstrates the complete healing that had taken place in only a few days. The patient experienced no discomfort following the procedure.
Patients will often present with herpetic lesions, which are both embarrassing to them and rather painful (Figure 12). When the lesion presents to us early in the process, the diode laser provides an excellent tool to expedite healing and minimize the discomfort the patient experiences during the 7 to 10 days of the active sore (Figures 13 and 14). A second patient with an early herpetic sore on the lower lip is treated noninvasively with the diode laser (Figure 15). This is a non-contact procedure with a non-initiated tip in the pulse mode at 1.5 W (Figures 16 and 17). It is totally noninvasive. The tissue response of the patient was astounding (Figure 18). Both patients here stated that the pain was gone, and the healing progressed rapidly. Both thought that marketing this laser procedure would be a boon to the practice.
 |
 |
| Figure 14. A 4-day post-op photo indicated a complete healing of the herpetic lesion and a very happy patient. | Figure 15. A second patient presented with an active and painful herpetic lesion on his lower lip. |
 |
 |
| Figure 16. The laser was set at 1.5 W in a pulsed mode and was used with a non-initiated tip. | Figure 17. Again, there is no contact made between the non-initiated tip and the lesion. |
 |
 |
| Figure 18. The 4-day post-op follow-up showed complete healing at the site. | Figure 19. A periodontal examination reveals pocket depths greater than 3.0 mm and bleeding on probing. |
 |
 |
| Figure 20. The diode laser set in the pulsed mode at 1.5 W using a non-initiated tip was not cutting. The laser was used to debride the site, reducing the bacterial count, and to selectively remove diseased tissue without harming the healthy surrounding tissue. | Figure 21. Healthy tissue was allowed to regenerate, and this 3-week post-op photo illustrates the reduction in pocket depth and the elimination of bleeding upon probing. |
Finally, our hygienists have found the diode laser to be an effective tool in helping to reduce pocket depth and to eliminate bleeding upon probing (Figure 19). This is a non-contact procedure, with the laser set at 1.5 W in pulsed mode, using a non-initiated tip (Figure 20). The technique is an adjunct to the normal periodontal maintenance procedures that can be done quickly and easily with a positive patient response. The patient returned after 3 weeks with a reduced pocket depth with no bleeding on probing (Figure 21).
CLOSING COMMENTS
The diode laser (NV PRO3 Microlaser) has been a convenient, portable, and profitable tool in my practice that we use daily, not only for laser soft-tissue troughing prior to taking master crown and bridge impressions but also in in a variety of other restorative, periodontal, and implant procedures. In the case examples presented herein, it was shown how the diode laser was helpful in the removal of soft tissue during the uncovering of dental implants and the removal of hyperplastic tissue and a mucoseal while promoting fast wound healing with minimal to no bleeding and, as is often the case, without the need for any local anesthetic.
References
- Lomke MA. Clinical applications of dental lasers. Gen Dent. 2009;57:47-59.
- Winter RB. Practical laser applications in general practice. Dent Today. 2017;36:78-83.
- DenMat. NV PRO3 microlaser [user manual]. https://www.denmat.com/servlet/servlet.FileDownload?file=00P3400000xiLinEAE. Accessed April 16, 2018.
- Academy of Laser Dentistry. Dental regulations in the United States. https://laserdentistry.org/index.cfm/professionals/Dental%20Regulations
%20in%20US. Accessed April 16, 2018.
Dr. Kosinski is an affiliated adjunct clinical professor at the University of Detroit Mercy School of Dentistry (Detroit Mercy Dental) and is the associate editor of the AGD journals. He is a past president of the Michigan Academy of General Dentistry. Dr. Kosinski received his DDS from Detroit Mercy Dental and his Mastership in Biochemistry from Wayne State University School of Medicine. He is a Diplomate of the American Board of Oral Implantology/Implant Dentistry, the International Congress of Oral Implantologists, and the American Society of Osseointegration. He is a Fellow of the American Academy of Implant Dentistry and received his Mastership in the AGD. He has received many honors, including Fellowships in the American and International Colleges of Dentists and the Academy of Dentistry International. He is a member of Omicron Kappa Upsilon and the Pierre Fauchard Academy. He was the Detroit Mercy Dental Alumni Association’s Alumnus of the Year, and, in 2009 and 2014, he received the AGD’s Lifelong Learning and Service Recognition award. He has published over 190 articles on the surgical and prosthetic phases of implant dentistry. He can be reached at (248) 646-8651, via email at drkosin@aol.com, or via the website smilecreator.net.
Disclosure: Dr. Kosinski reports no disclosures.
Related Articles
Create an Emergence Profile to Establish Smile Design
Laboratory and Prosthetic Reconstruction
A Simple and Cost-Effective Socket Preservation Technique


