


INTRODUCTION
As I contemplate my 42-year career, I am struck by how much progress has been made in the field of dentistry in general and in dental impressions in particular. Two other observations also strike me: First, it is virtually impossible for younger dentists to fully appreciate just how far the practice of dental impressions has come in the past 70 years. Second, many dentists of all ages are uncertain about the role—and even the very existence—of conventional dental impressions in the era of digital dentistry.
This article is intended to shed what I hope will be some helpful light on the past, present, and future of dental impressions.
BALANCING THE ART, SCIENCE, AND BUSINESS OF DENTAL IMPRESSIONS
Suppose you have read any of my other articles or attended any of my lectures. In that case, you are probably aware of my deep conviction that true success in private practice comes only when the dentist consistently finds the balance between the art, science, and business of dentistry. Metaphorically speaking, I believe that dental success rests on the following “3-legged stool”:
- Art—creating something beautiful
- Science—using an evidence-based approach incorporating the latest research
- Business—being able to affordably reproduce procedures in a timely manner
You can create a beautiful restoration out of different shades of soap, but it won’t last because it’s built on bad science, and it won’t be good business because it will not last. Conversely, you could make a front crown out of solid titanium that will last forever, but it won’t be beautiful, and the patient will not accept it. Or you could do a very quick procedure that will earn you a lot on a per-hour basis, but it wouldn’t be based on sound science or look beautiful and ultimately wouldn’t be acceptable to patients. Only when you can check all 3 boxes—great art, great science, and great business—will you be able to achieve sustained success in your practice. And that maxim is particularly true with dental impressions.
IMPRESSION-TAKING MATERIALS: HOW FAR WE’VE COME
Here’s a brief history of the impression materials our profession has relied on over the last century-and-a-half:
- 1800s—wax or plaster of Paris dominated
- 1940s—alginate materials were introduced
- 1950s—elastomeric impression materials were introduced, featuring silicon-based materials, polyethers, and polysulfides
- 1960s—reversible hydrocolloid impression materials gained popularity due to the major advancement these hydrophilic materials brought in terms of capturing accurate impressions despite the presence of saliva and blood.
- 1970s—a new generation of elastomeric impression materials was introduced, offering more viscosity and elasticity, similar to rubber-based materials, and enabling surface materials to be captured even more accurately.
And, of course, now we have the option of taking digital impressions. Figures 1 and 2 dramatically illustrate just how far we’ve come with dental impression technology.

Figure 1. Copper bands for impression taking.
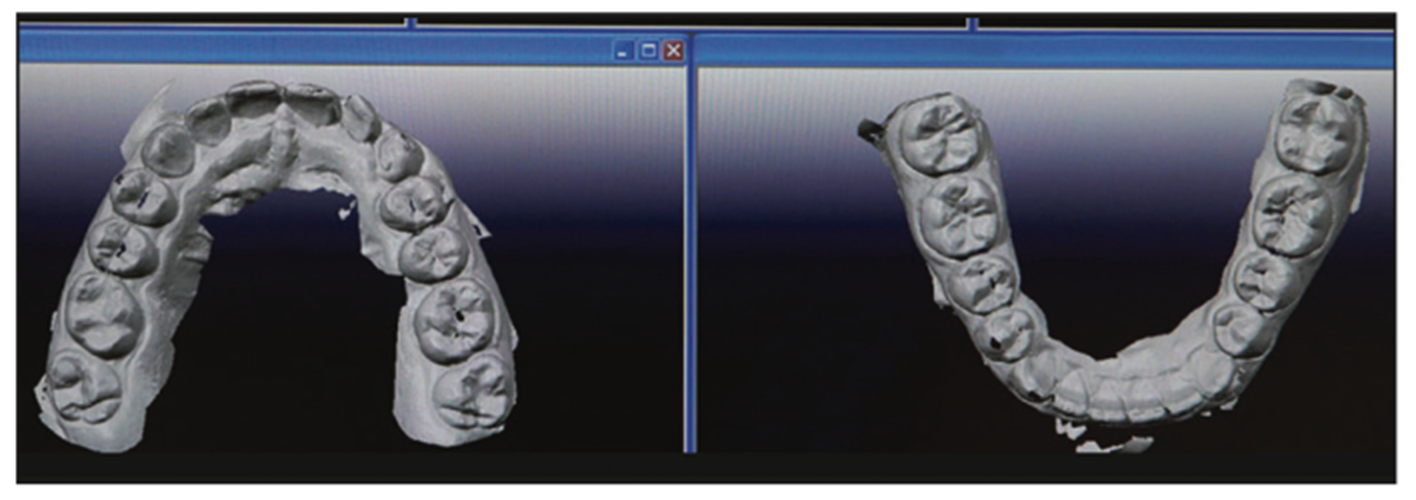
Figure 2. Digital impressions.
The key, as I will discuss below, is to create these analog impressions by:
- Selecting the proper techniques
- Using those techniques precisely the way they are designed to be used, and
- Using the right materials with those techniques.
The fact is that, with the proper technique, it is still possible to use a simple copper band to create a wonderful impression. However, it’s very difficult for the practitioner and very uncomfortable for the patient. In contrast, digital impressions are much easier for both practitioner and patient. But for all the benefits of digital impressions, there are many situations for which analog impressions are not only highly relevant but clearly preferable.
The 3 points above apply not just to impression-taking but to virtually every dental procedure. Unfortunately, they too often aren’t taken to heart by our profession. As dentists, we have no right to criticize the efficacy of a technique when we don’t use it properly.
IMPRESSION TAKING HAS NEVER BEEN EASIER
Remember how difficult your first impression was in dental school? I remember getting materials all over myself and my procedure partner and thinking that I’d never master this skill. Fortunately, dramatic improvements have been made in all the physical aspects of impression materials: wettability, hydrophobic properties, hydrophilic properties, working time, accuracy, maintaining dimensional stability, tear strength, and even the taste of the materials. Moreover, the ability to automatically mix impression materials in guns and cartridges has made them so much easier to handle than mixing them up manually on a pad, which introduces air and other problems to the materials.
When using the right techniques, the right bonding material, and the right composite with the right hue value and chroma and keeping in mind what the occlusion and the anterior guidance should be and doing it in a timely manner, you’ll achieve balance of the art, science, and business of dentistry. Now let’s talk about impression taking for composite restorations.
CROWN AND BRIDGE IMPRESSIONS: 3 TECHNIQUES
The following 3 techniques are frequently in use today. The first 2 are conventional techniques, while the third is unconventional.
1. All-in-one technique:
- A full- or dual-arch impression tray is simultaneously filled with impression material while a light-body flowable wash is squirted around the teeth with a syringe.
- A conventional vinyl polysiloxane (VPS) impression material is typically used.
2. One-step putty wash technique:
- A putty impression is made, and the tray is taken out of the mouth. The light body is squirted into it with a syringe, and the tray is reseated in the mouth.
- Putties from 2 tubs are mixed and used as the impression material.
3. Hydraulic and hydrophobic (H&H) technique:
- The underlying concept is to use hydraulics to push a hydrophobic impression material capable of displacing blood and saliva. A preliminary impression is taken; it’s not relieved and doesn’t use a spacer. It’s then lined with the hydrophobic impression material. The patient is instructed to bite back into the impression, causing the material to be extruded from the impression. The resulting hydraulic pressure forces it into the sulcus laterally and occlusally throughout the entire impression. The tray is never removed from the mouth.
- A high-durometer VPS impression material is required for the initial impression. A light-body impression is used within the initial impression.
Crown and Bridge Impressions: The H&H Technique
Let’s go into more detail about the H&H technique for 3 reasons. First, it’s less well understood than the 2 conventional techniques. Second, in my experience, it’s the most effective technique. And third (full disclosure time), I invented and patented the technique.
I introduced the H&H technique in 1998 to address one of the most frustrating aspects of making final impressions for crowns and bridges: managing finish lines that extend subgingivally. Dentists were having to contend with problems like relapsing gingival tissue that can obstruct the flow of impression material into the sulcus. This was most often managed by packing a retraction cord, which was time-consuming, difficult, and often uncomfortable for the patient.
Dentists were also having to contend with gingival hemorrhaging that could fill the sulcus with blood and interfere with the flow of impression material. This was most often managed with hemostatic agents that could require multiple applications and taste bad. Moreover, hemorrhaging could recur spontaneously or when the cord was removed. And the hemostatic agents used to address the hemorrhaging contained sulfur that could inhibit the setting of VPS impression materials.
Yet another problem was that saliva could flood the field if the assistant was unable to maintain adequate suction and isolation, which was not uncommon for some patients.
Making final impressions of subgingival finish lines can still be a challenge, even under the best of circumstances. Fortunately, the H&H impression technique eliminates the need for retraction of the gingival tissue, the need to apply hemostatic agents, the need for syringe-able retraction clay, and the need for maintaining a dry field. Here’s a quick summary of how to use this technique:
1. Inject a high-durometer VPS (Honigum Pro Putty [DMG America]) onto a plastic or metal triple tray.
2. The patient closes into the high-durometer VPS, which forms a “peripherally sealed custom tray” around the prep area (Figure 3).
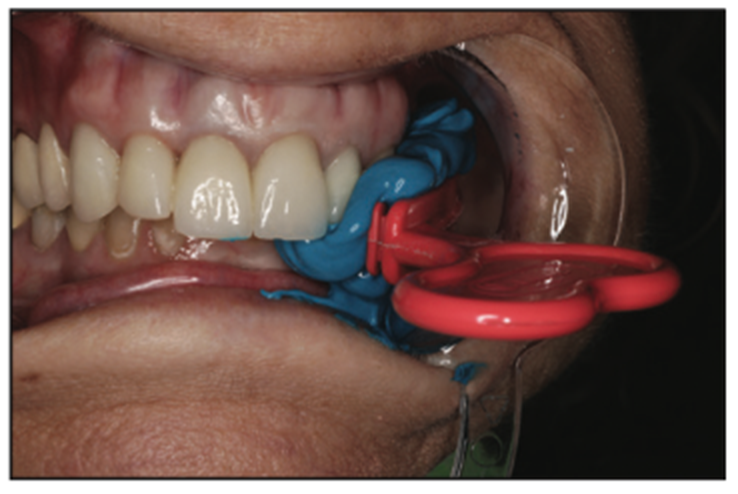
Figure 3. Initial impression with high-durometer VPS (Honigum [DMG America]).

Figure 4. Honigum Pro light body (DMG America) syringed onto VPS while still seated in the mouth (blue).
3. After the high-durometer VPS sets, the patient opens while your fingers retain the impression on the opposing arch. Note that it’s important that the tray remain in the mouth at this point. Do not remove and reseat as this is unnecessary and can lead to reseating errors. The patient must be able to bite back into the impression, and if there are broken pieces or interproximal tags, they must be removed.
4. Spray, wash, and dry the impression surface while in the mouth.
5. Using an auto-mix tip, syringe light-body impression material (Honigum Pro light body [DMG America]) onto the high-durometer VPS in the prep areas and adjacent areas (Figure 4). There’s no need to syringe light-body material directly onto the teeth as that tends to trap bubbles. You only need to syringe the light-body material into the prep area (Figure 5).
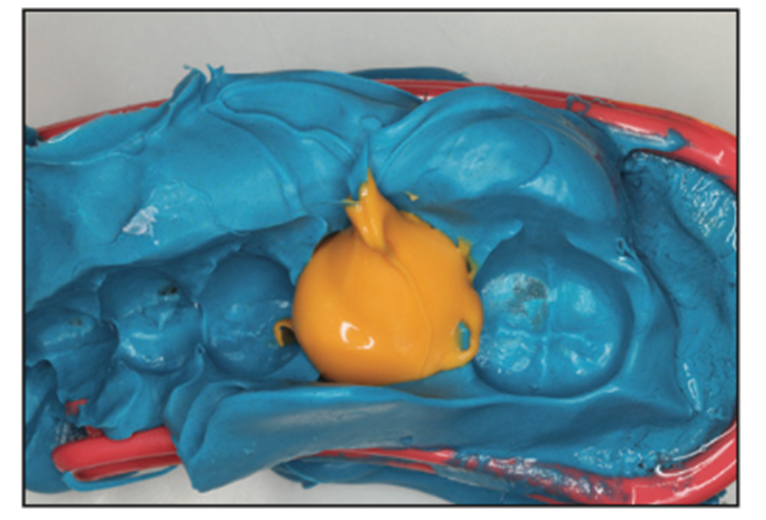
Figure 5. The amount of light body necessary.
6. Instruct the patient to close fully and forcefully, thereby exerting hydraulic force on the light-body impression material, and wait until the material sets on the tip of the gun to remove it. The light body flows and follows the path of least resistance, first flowing subgingivally since the periphery is sealed by the high-durometer VPS. Typically, the light body flows past the margins. The excess then flows out the periphery. Note that it’s ideal to hold your hand on the patient’s chin and masseter muscle while the light body polymerizes to avoid patient movement (Figure 6).
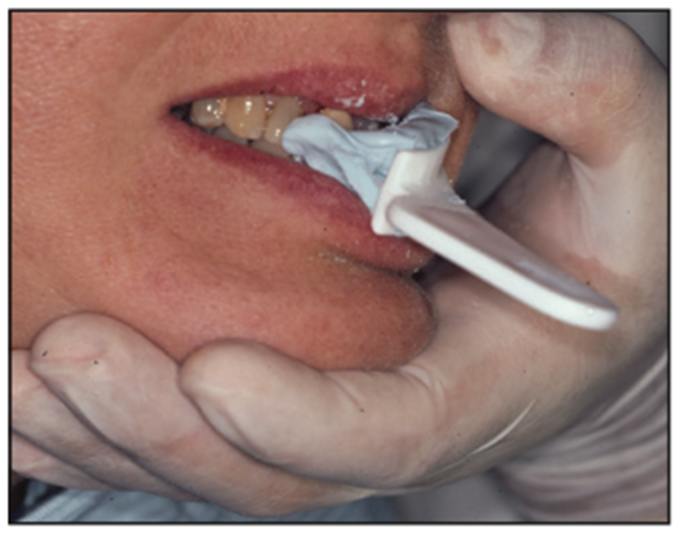
Figure 6. Patient closed (with help).
7. After the initial forceful closure, the patient should remain closed and maintain steady pressure. When the material is set on the tip of the gun, you then can remove and inspect your impression (Figure 7).

Figure 7. Final impression (blue and yellow).
As you can see, the H&H technique doesn’t call for the initial impression tray to be removed from the mouth after the high-durometer VPS has been used, which means the impression never needs to be reseated.
Over the past 24 years, the H&H technique has been used successfully by thousands of dentists and written about in dozens of articles. While most of those articles have been favorable, a few have levied some criticisms. One criticism is that reseating the impression in the mouth often results in a step in the impression. What this criticism fails to understand is that the H&H technique doesn’t call for the impression tray to be removed from the mouth, which means the impression shouldn’t be reseated.
A related criticism from some is that the technique often results in occlusal interferences. The truth is that this will not happen if you check to make sure the tray seats properly when you have the patient re-bite into the tray. Occlusal interferences will be avoided by having the patient (1) bite into the tray; (2) open his or her mouth, leaving the tray resting on the opposite arch; and (3) practice biting back into the tray to make sure he or she does it properly. By the way, if you have any material that breaks off from the interproximals, just carefully move it and/or rinse it away from the underside of the tray.
Another occasional criticism has been that there is an increased risk of the wash not completely bonding to the set putty material due to salivary contamination. The problem is easily avoided if you simply rinse and dry it—as the technique calls for—so there can be no salivary contamination. Some have also complained that hydrostatic pressure can cause a rebound effect. The fact is that if you use a high-durometer preliminary impression material—which, like a typical bite registration material, will be stiff after setting—there will be no rebound effect. Most high-durometer VPS materials, such as DMG’s Honigum Pro line, exhibit the proper stiffness.
FULL DENTURE IMPRESSIONS
The denture impressions technique used by most dentists involves doing a first impression with a stock tray using an alginate impression material. The patient leaves the practice wearing his or her old denture, after which a custom tray is made from the initial impression (Figure 8). The patient then returns a week or so later for the second and final impression using the custom tray.
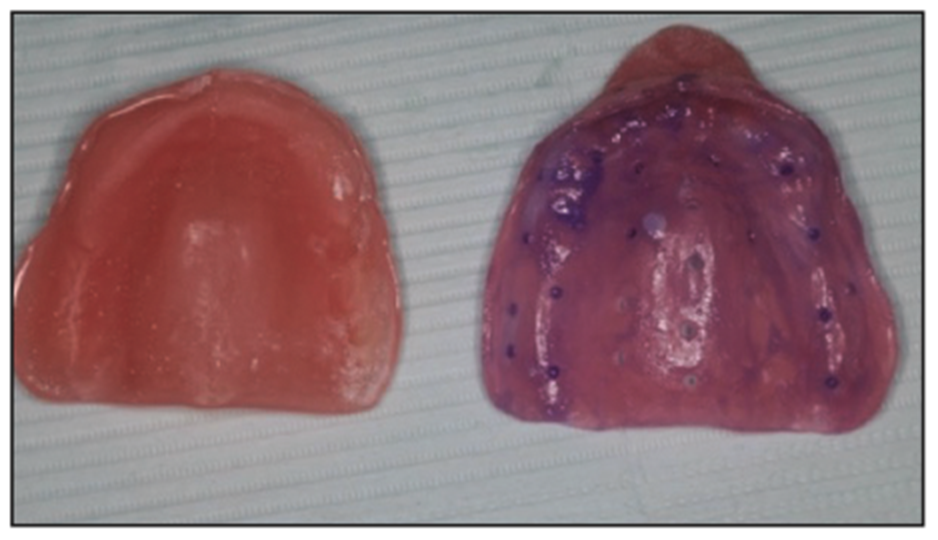
Figure 8. Custom tray mimicking the patient’s old denture.
There is a system called AccuDent System (Ivoclar Vivadent) that allows you to use a specific proprietary stock tray with 2 types of alginates to create a final impression. While some might prefer this option, I would rather not have to create a model in my office before sending it to the dental lab.
My preferred technique for denture impressions involves using a stock edentulous tray with a high-durometer VPS (Honigum Pro), making that stock tray into a custom tray, and then relining it with light-body VPS. This means you can take your final impressions on the patient’s first visit and save him or her a trip to your office. Figure 9 shows a final denture impression created using this technique. Note its ability to reproduce tissue landmarks in great detail.
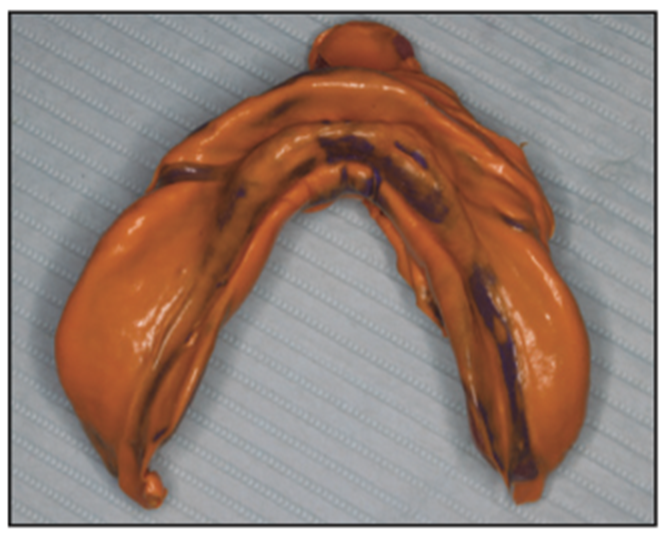
Figure 9. The final denture impression reproduced tissue landmarks in great detail in a single visit.
The patient’s time is valuable, and he or she will greatly appreciate being able to avoid a second visit. What’s more, being able to produce the final impression in a single visit greatly reduces your costs and increases your profit. It’s the classic win-win scenario for patient and practice, and it’s hard to imagine why any practice wouldn’t embrace this single-visit impression technique.
Accurate full denture impressions like the one depicted in Figure 9 allow you to achieve 3 important factors:
1. Stability and retention
2. Soft-tissue and alveolar ridge preservation
3. Patient comfort
PARTIAL DENTURE IMPRESSIONS
In my experience working with complex partial dentures, it’s very difficult to create an accurate major connector and minor connectors and to capture the soft tissue using digital impressions. When using digital denture methods, the try-in is often modified using impression materials and by scanning the impression and sending it over the Internet to the lab for final modifications.
A complex partial denture was clearly required for a patient who kept breaking his partial dentures (Figures 10 to 15). He was very frustrated by teeth breaking off and having to pay for repairs. He succinctly posed his only requirement for his partial denture: “I want to be able to chew bones without my partial breaking.”

Figure 10. Preoperative retracted view.
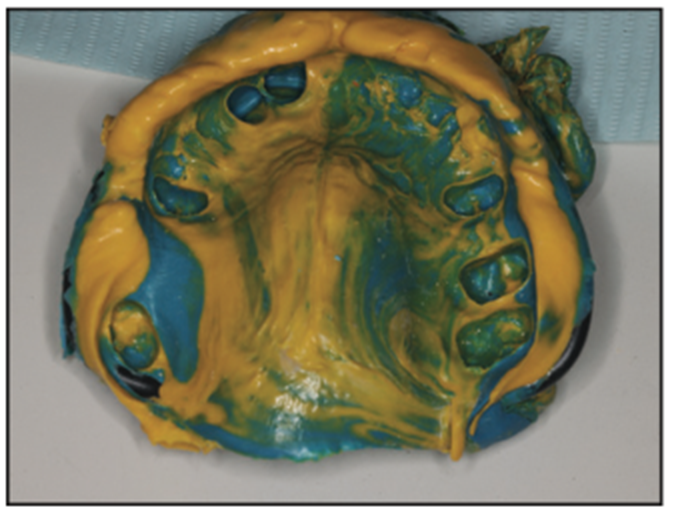
Figure 11. Final impression of a complex partial denture.
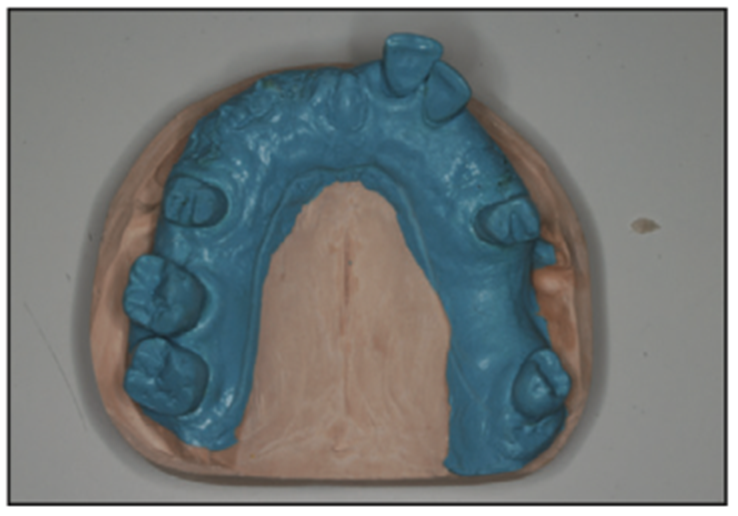
Figure 12. Underside of the complex partial denture model.
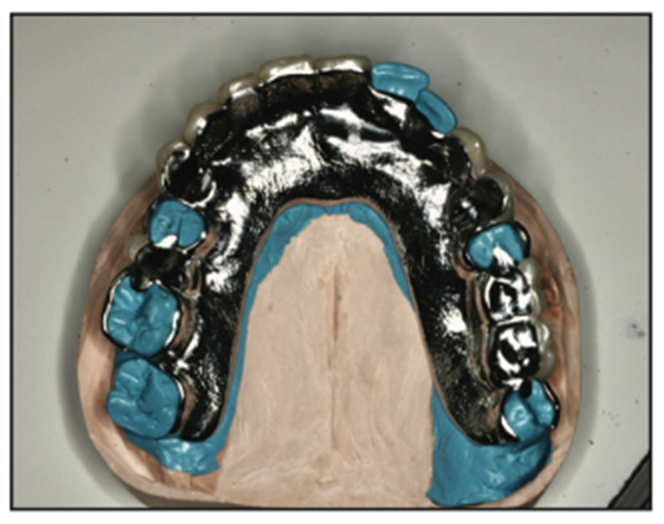
Figure 13. Underside of the model with a major connector.
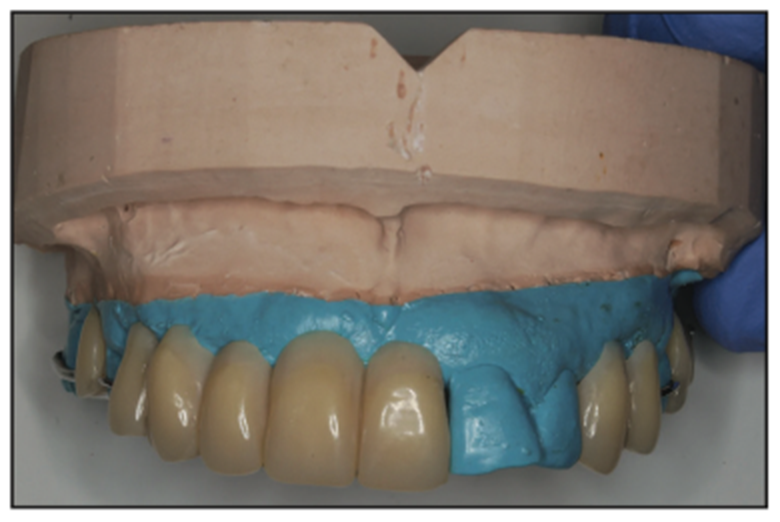
Figure 14. The model with denture teeth in place.
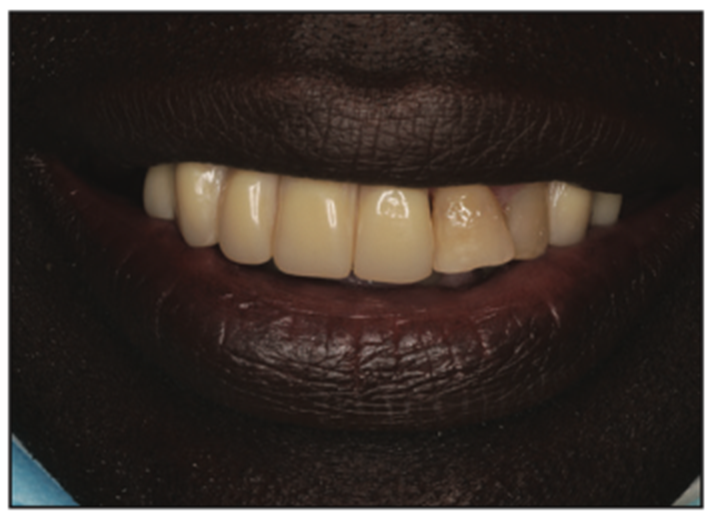
Figure 15. Postoperative view.
This made it necessary to have the partial be metal-supported. The fact that such a partial couldn’t be modified with acrylic meant we would need a degree of accuracy of the soft-tissue pickup that would be very difficult to achieve with digital impressions.
THE BENEFITS OF DIGITAL IMPRESSIONS
There is no question that digital impressions can capture great detail, as is demonstrated in the printed model in Figure 16.
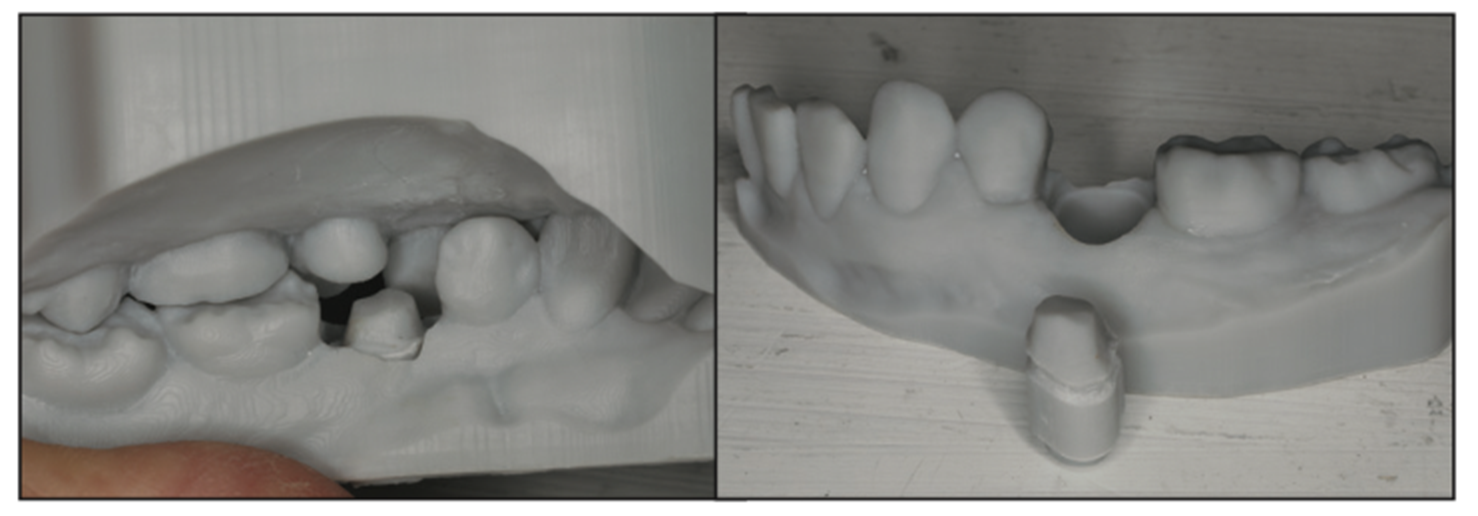
Figure 16. Printed models made from digital impressions.
Another advantage of digital technology as it applies to impression taking is illustrated in Figure 17. The image shows how a bite taken using a digital impression revealed insufficient clearance with the restoration. This enabled a modification to be made before sending the digital file to the laboratory for fabrication of the crown or 3D printing.
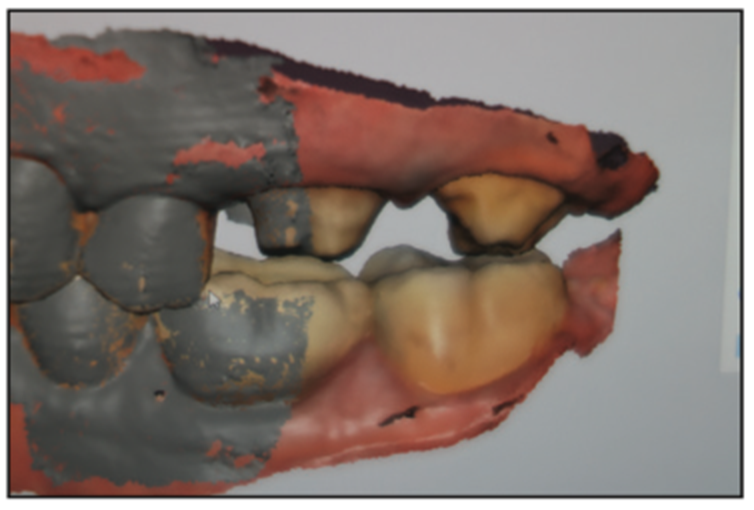
Figure 17. A digital impression reveals insufficient clearance.
While digital technology can offer many advantages in many areas of dentistry, not every dental practice can afford to incorporate all of the digital technology that’s available. Fortunately, the dental laboratories will be able to digitize the impressions the practice makes using conventional impression materials.
THE RELEVANCE OF ANALOG IMPRESSIONS
Whether you own your own digital 3D printer and related digital equipment or you rely on your lab to supply the digital capability, the fact is that any practice dealing with very sophisticated dentistry or treating edentulous patients will still need to rely on analog impression taking.
The effective creation of dental impressions for complex implant restorations requires understanding how impressions are to be taken when doing multiple units. In many cases, analog impressions will be the preferred—or only—option. For example, in implant cases, digital scanning is unable to pick up metal abutments (Figure 18). This requires the use of scan bodies to pick up the relationship of the implants so that a final prosthesis can be manufactured (Figure 19).
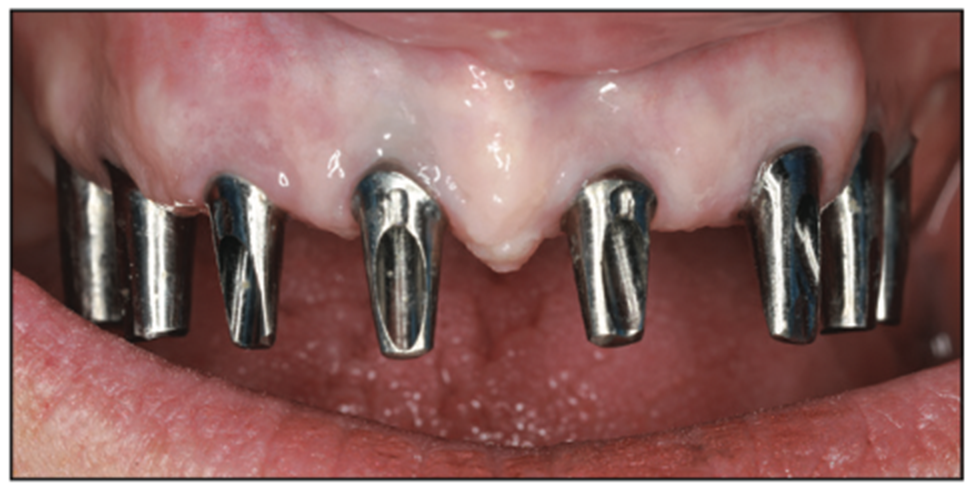
Figure 18. Implant abutments make digital scanning impractical.
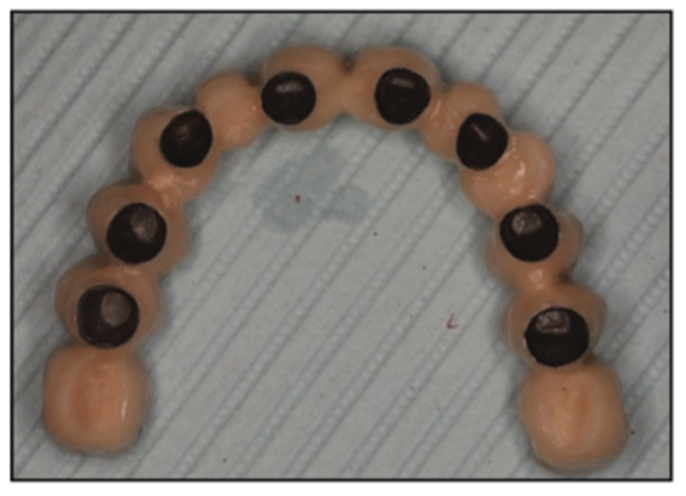
Figure 19. Final implant prosthesis.
A combination case of a partial and a crown would also be very difficult to achieve using digital scanning, making an analog restoration like the one shown in Figure 20 advisable. Figure 21 shows a closeup of the single crown where the margins are critical. A single impression was made for the crown and then “pulled” in the master impression. The relationship of the single crown to the partial requires a good working knowledge of the digital software. Until this process becomes simpler, the traditional analog workflow makes sense for most practitioners.
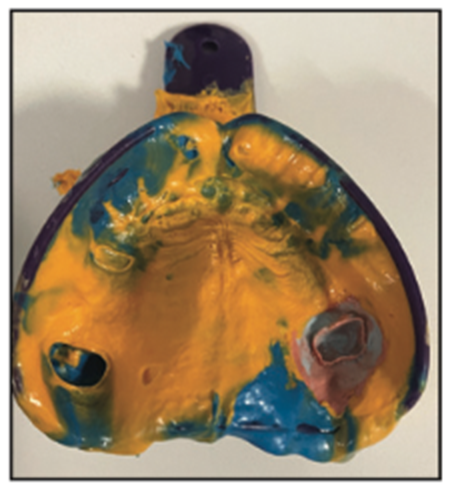
Figure 20. Master impression for a combination case.
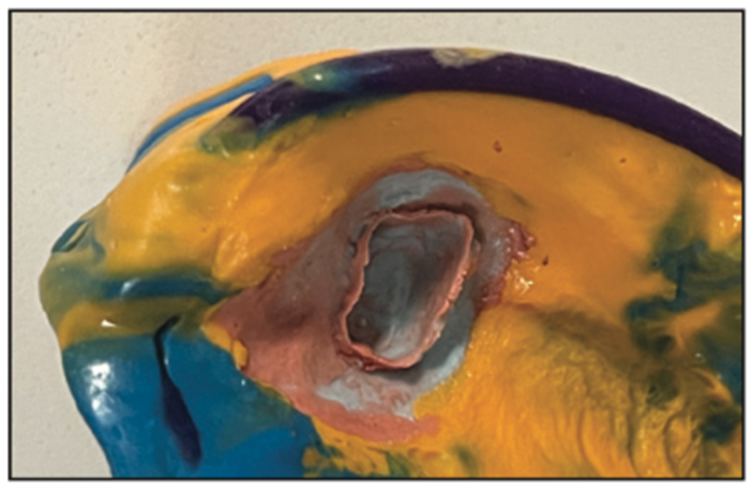
Figure 21. Single-crown impression “pulled” in a master impression.
A single impression was taken for the crown, similar to how a copper band impression is taken, and then a master impression was taken using a high-durometer VPS impression and a light-body impression material to pick up all of the details. Note the detail of the crown preparation first and then the master impression for the major connector framework.
You might want to take a hybrid approach that involves conventional impressions, scanning them, and having your lab use its digital technology to fabricate the prosthesis using printed materials. We’re combining the best of both worlds: analog and digital dentistry.
THE HYBRID APPROACH TO IMPRESSION TAKING
A good example of how analog and digital impression taking can and should coexist was demonstrated with a patient who decided to redo her upper teeth (Figure 22). As can be seen in Figure 23, digital technology made it easy to accurately capture the correct bite.
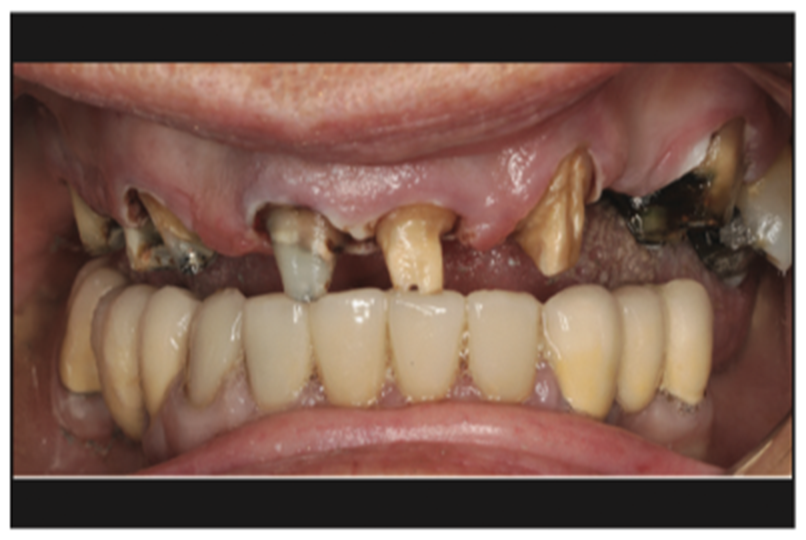
Figure 22. Pre-op view.
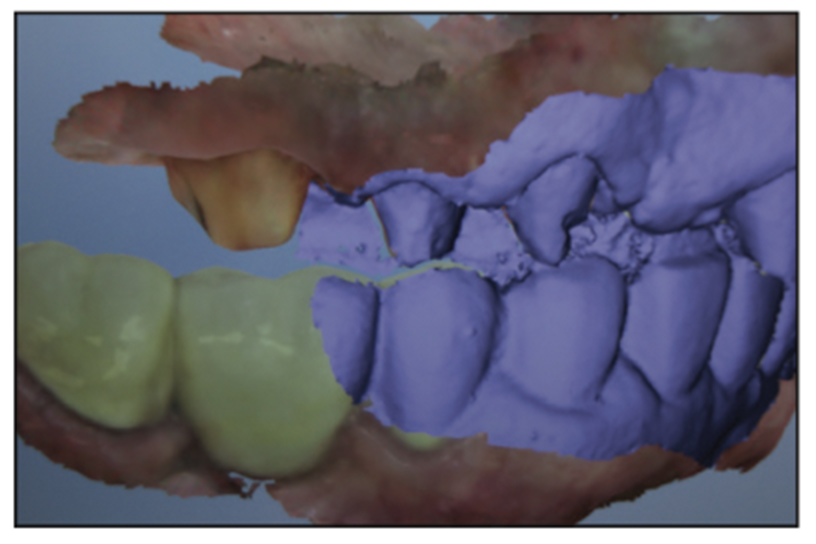
Figure 23. Digital image enabling capture of the correct bite.
I then took both digital (Figure 24) and analog (Figure 25) impressions and took a postoperative photo (Figure 26). I’ll leave it to you to guess whether it was the digital or analog impression that was used to help produce this outcome.
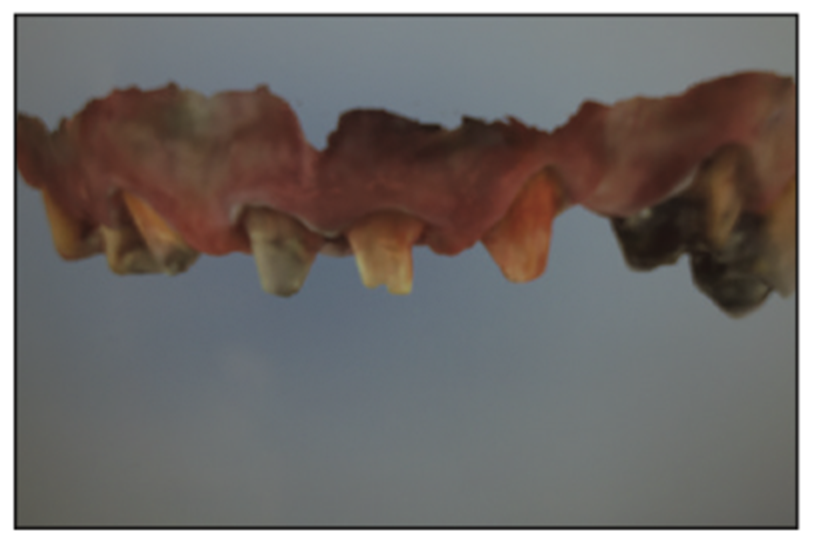
Figure 24. Digital impression.
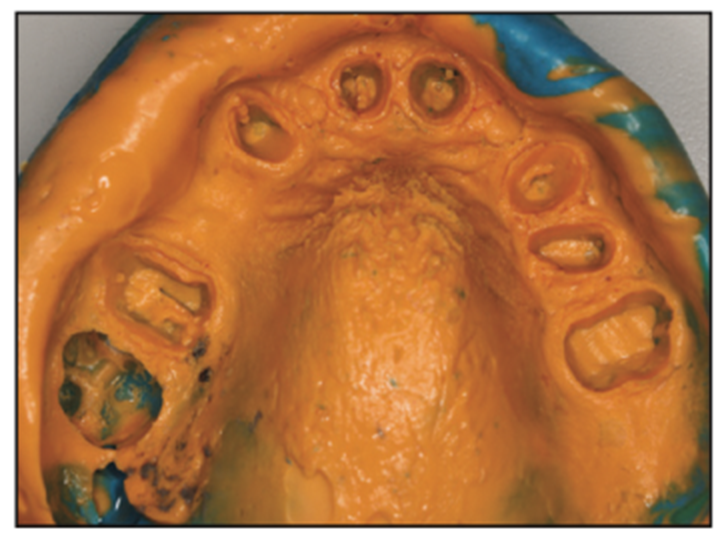
Figure 25. Analog impression.

Figure 26. Post-op view.
WE’RE ONLY TRYING TO GET TO PERFECTION
With the right mindset, materials, and technique, achieving the perfect margins, the perfect contours, the perfect occlusion, and the perfect shade is easy to do.
Its essential that we be able to count on manufacturers to provide us with the highest quality materials and instruments so we can pursue the perfection that always seems to elude us.
To be able to try new, potentially better ways of doing things, you have to be willing to stick your neck out. As president and sole member of the Giraffe Society, I practice this every day, inspired by quotes like these from my hero, Albert Einstein:
- “If you can’t explain it simply, you don’t understand it well enough.”
- “Anyone who has never made a mistake has never tried anything new.”
- “The measure of intelligence is the ability to change.”
- “Everything must be made as simple as possible. But not simpler.”
- “Creativity is intelligence having fun.”
If you’re reading this, you’ve nearly finished the article. Because that tells me you are clearly willing to consider new ideas, I hereby dub thee an honorary member of the Giraffe Society.
CONCLUSION
So can we achieve the balance of art, science, and business of dentistry?
If we use the best materials and methods to create beautiful dentistry based on the most current science related to impression materials, and if we do it in a timely manner so we can earn the highest return on investment for ourselves and our staff, we will absolutely achieve the balance of art, science, and business of dentistry in general, and dental impressions in particular, and approach the ever-elusive goal of perfection.
ACKNOWLEDGMENTS
I must acknowledge the support of my partners and staff for “allowing me to do what I do,” including Murray Kaiser Dental Lab and North Star Dental Lab, but I would not or could not have done any of it without Betsy Smirnoff Hoos, who has been by my side for 50 years. She has been to so many lectures and edited so many articles that “she could do it herself.”
ABOUT THE AUTHOR
Dr. Hoos received his MS degree in biology from the University of Bridgeport, his BA in zoology from Drew University, and his DMD degree from Tufts University School of Dental Medicine. He lectures nationally and internationally on advanced techniques as well as innovative procedures that he’s developed. He maintains a practice, Brush & Floss Dental Center, in Stratford, Conn. He can be reached at jchdmd@gmail.com.
Disclosure: Dr. Hoos reports no disclosures.


