INTRODUCTION
The field of prosthodontics and restorative dentistry commonly deals with complex restorative reconstructions. Alongside an increasing demand for full-mouth rehabilitations because of multifactorial causative elements,1-3 a systematic approach is necessary to ensure proper diagnosis, planning, and treatment execution.4 Historically, conventional methods have achieved successful treatment outcomes.4-6 However, certain drawbacks have been noted with tooth-supported restorations, including extended chairside time, frequent adjustments, and extensive laboratory and patient communication in order to achieve predictable, functional, and aesthetic outcomes.7,8
With the emergence of computer-aided design and computer-aided manufacturing (CAD/CAM) technology, the use of digital technology in the field of dentistry is shifting from the present focus on diagnostic tools to treatment implementation methods.9 Promising improvements have been made through the use of intraoral scanners and rapid prototyping of dental materials in additive or subtractive manufacturing. Digital dentistry has led to efficient prosthesis fabrication, useful communication, and case archiving for potential remakes.10,11
Several publications have investigated digital impression accuracy and fixed prosthesis fabrication, displaying successful clinical reports and reviews for short-span treatments.7,12,13 Yet a fully digital workflow in full-mouth rehabilitation is often costly and still challenging to achieve.14
This article proposes a systematic approach to completing a full-mouth rehabilitation with an efficient and predictable digital workflow.
TECHNIQUE
Here, we describe a protocol for diagnosis and treatment planning in a full-mouth, fixed prosthodontic reconstruction using digital protocols.
Clinical Steps (Diagnosis, Planning, Virtual Smile Design, and Taking Records)
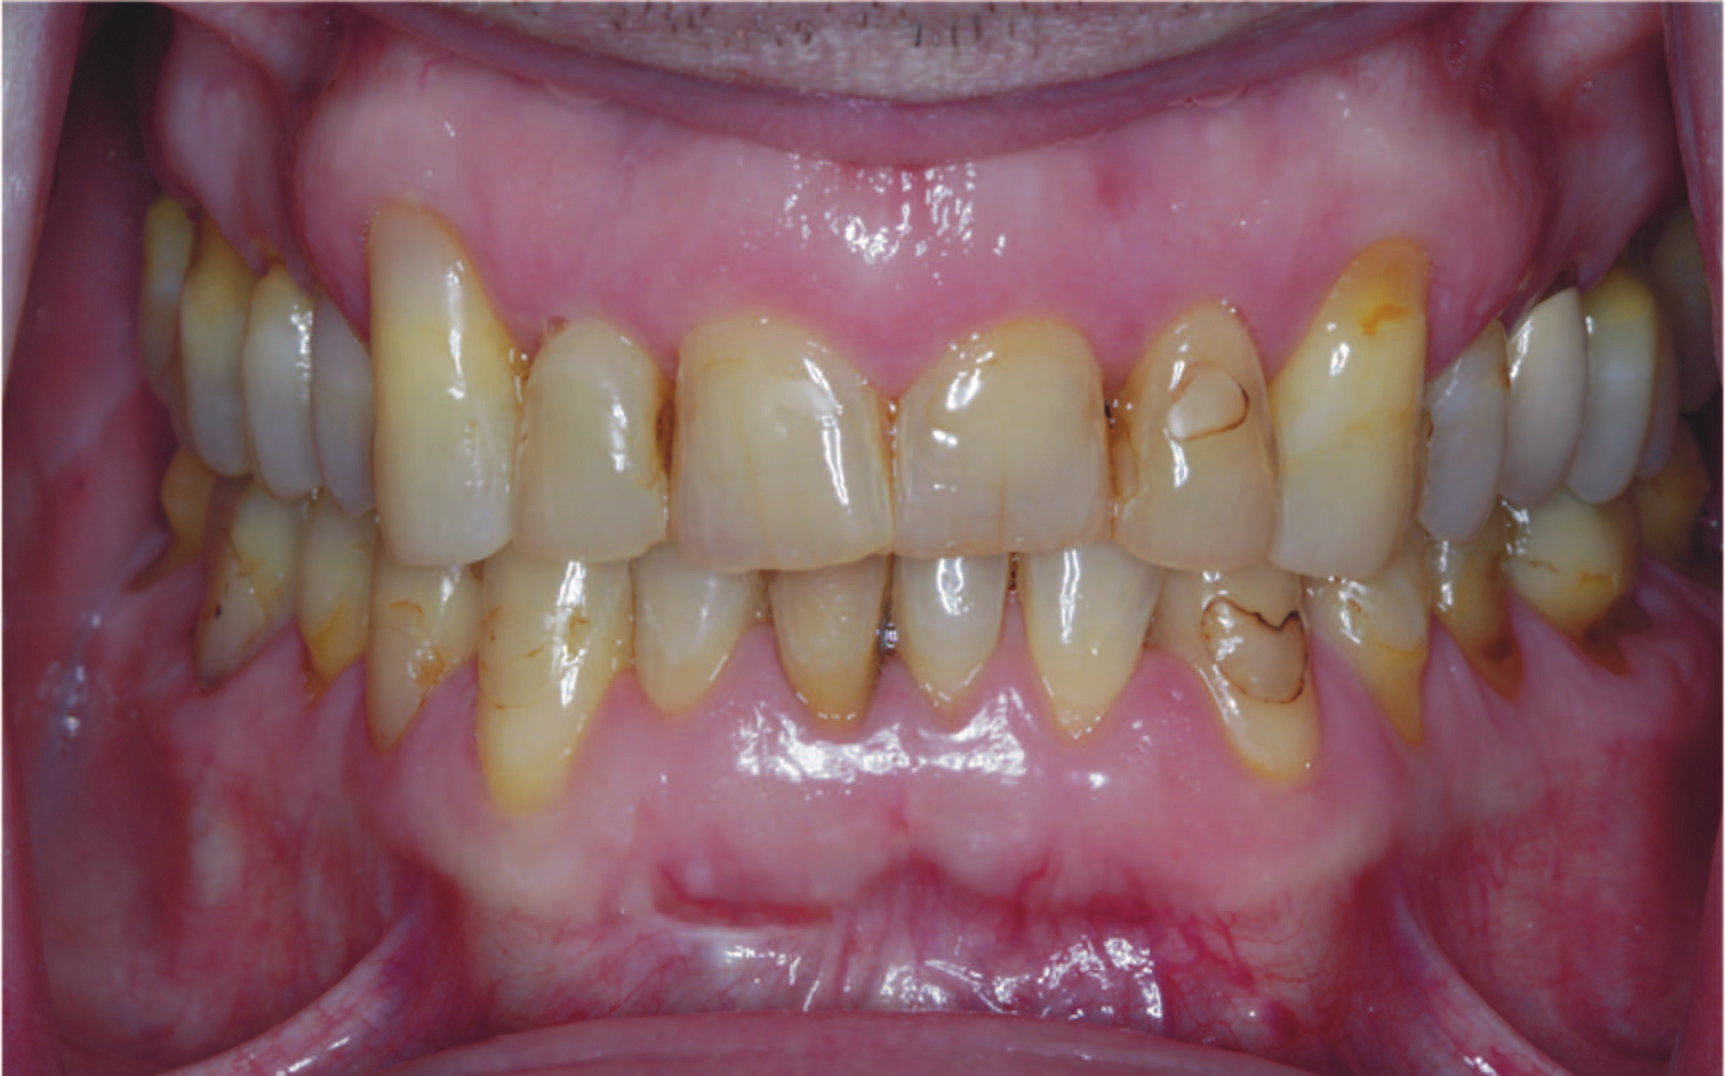
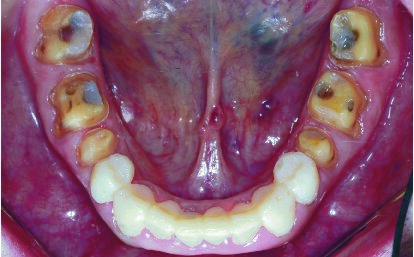
1. Evaluate medical and dental history, intraoral and extraoral tissues, occlusion, temporomandibular joints, radiographic imaging, periodontal health, and disease control of abutment teeth. Assess the smile-line, aesthetic parameters, tooth loss, and occlusal vertical dimension (OVD) to determine the need to reestablish the OVD (Figure 1) or any pre-prosthetic requirements.

2. Take a digital impression (TRIOS [3Shape]) of both arches, including the palate, and perform a digital bite registration following the manufacturer’s recommended scanning protocols. Then take digital photographs and complete a chairside virtual smile design for patient input and feedback (Smile Design [3Shape]) (Figures 2 and 3).

Laboratory Steps (Virtual Wax-up, Reduction Guide, and Provisional Restoration Shells)
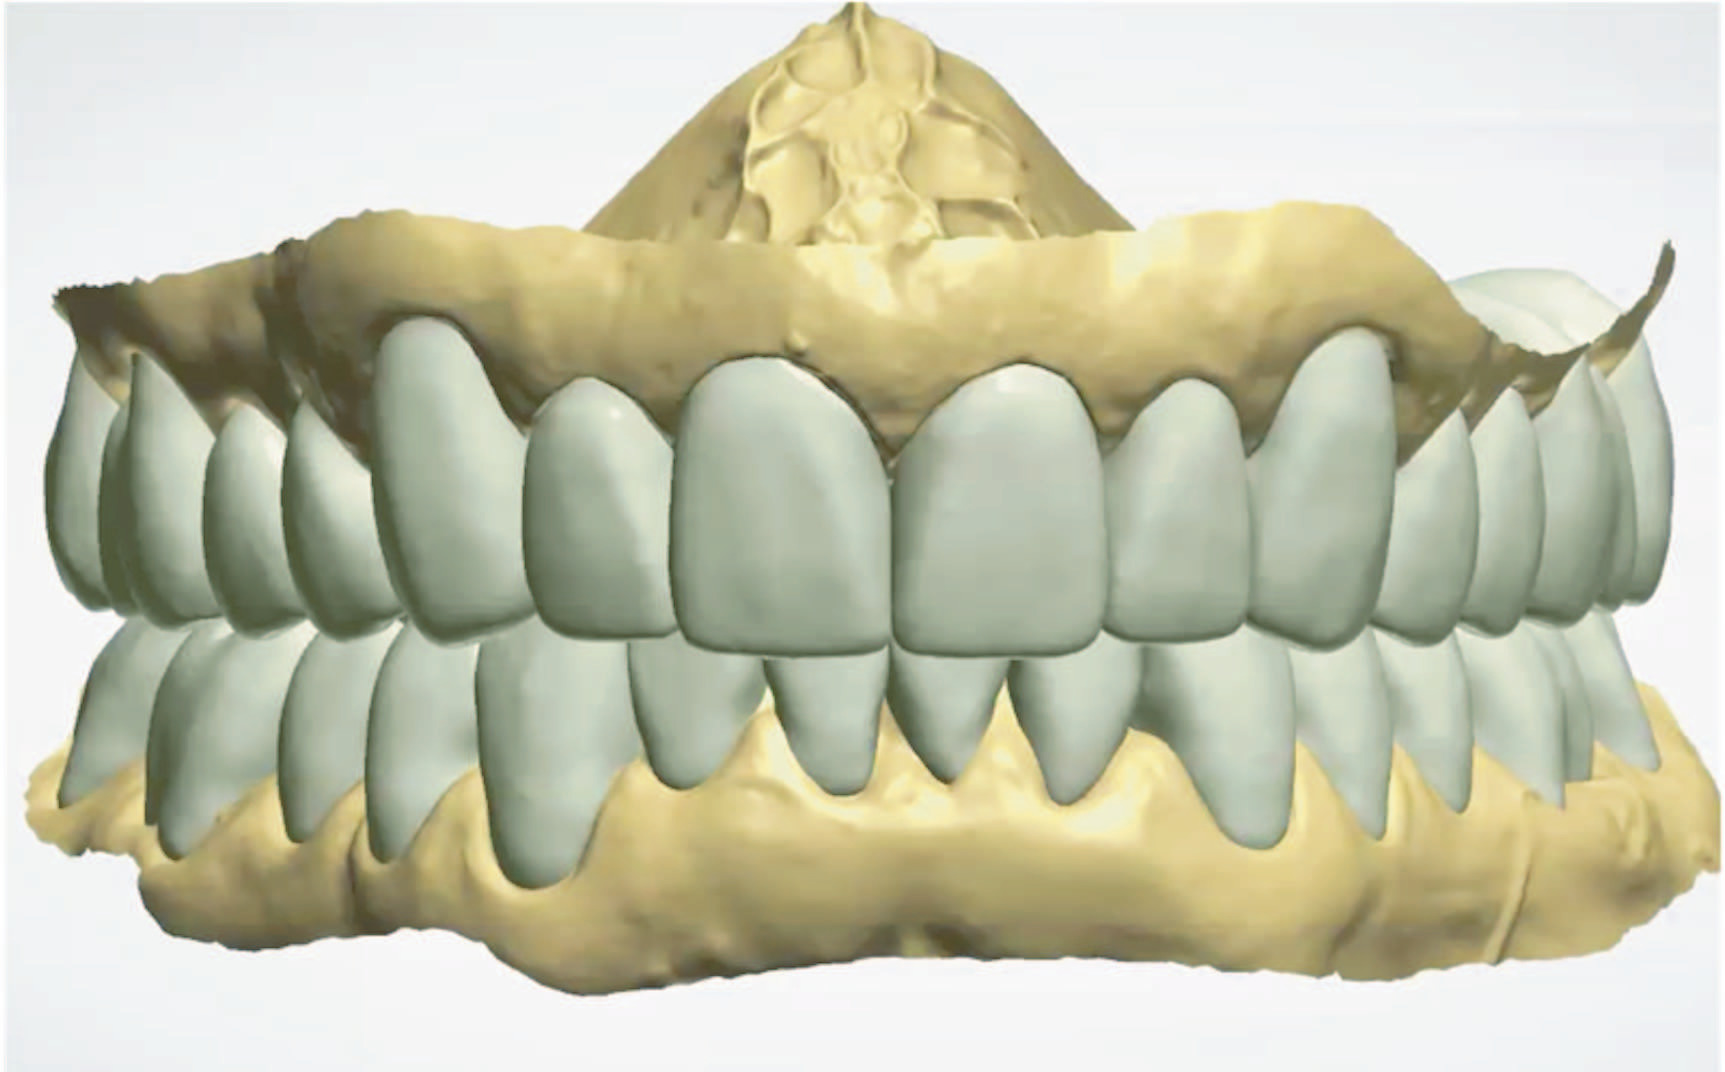
1. Analyze the digital models to assess the restorative space and tooth surface loss. Increase the OVD based on the clinical assessment by raising the incisal pin on the virtual articulator using the average virtual articulator settings. Design software (Dental System [3Shape]) is then used to complete the virtual wax-up at the required OVD (Figures 4 and 5).
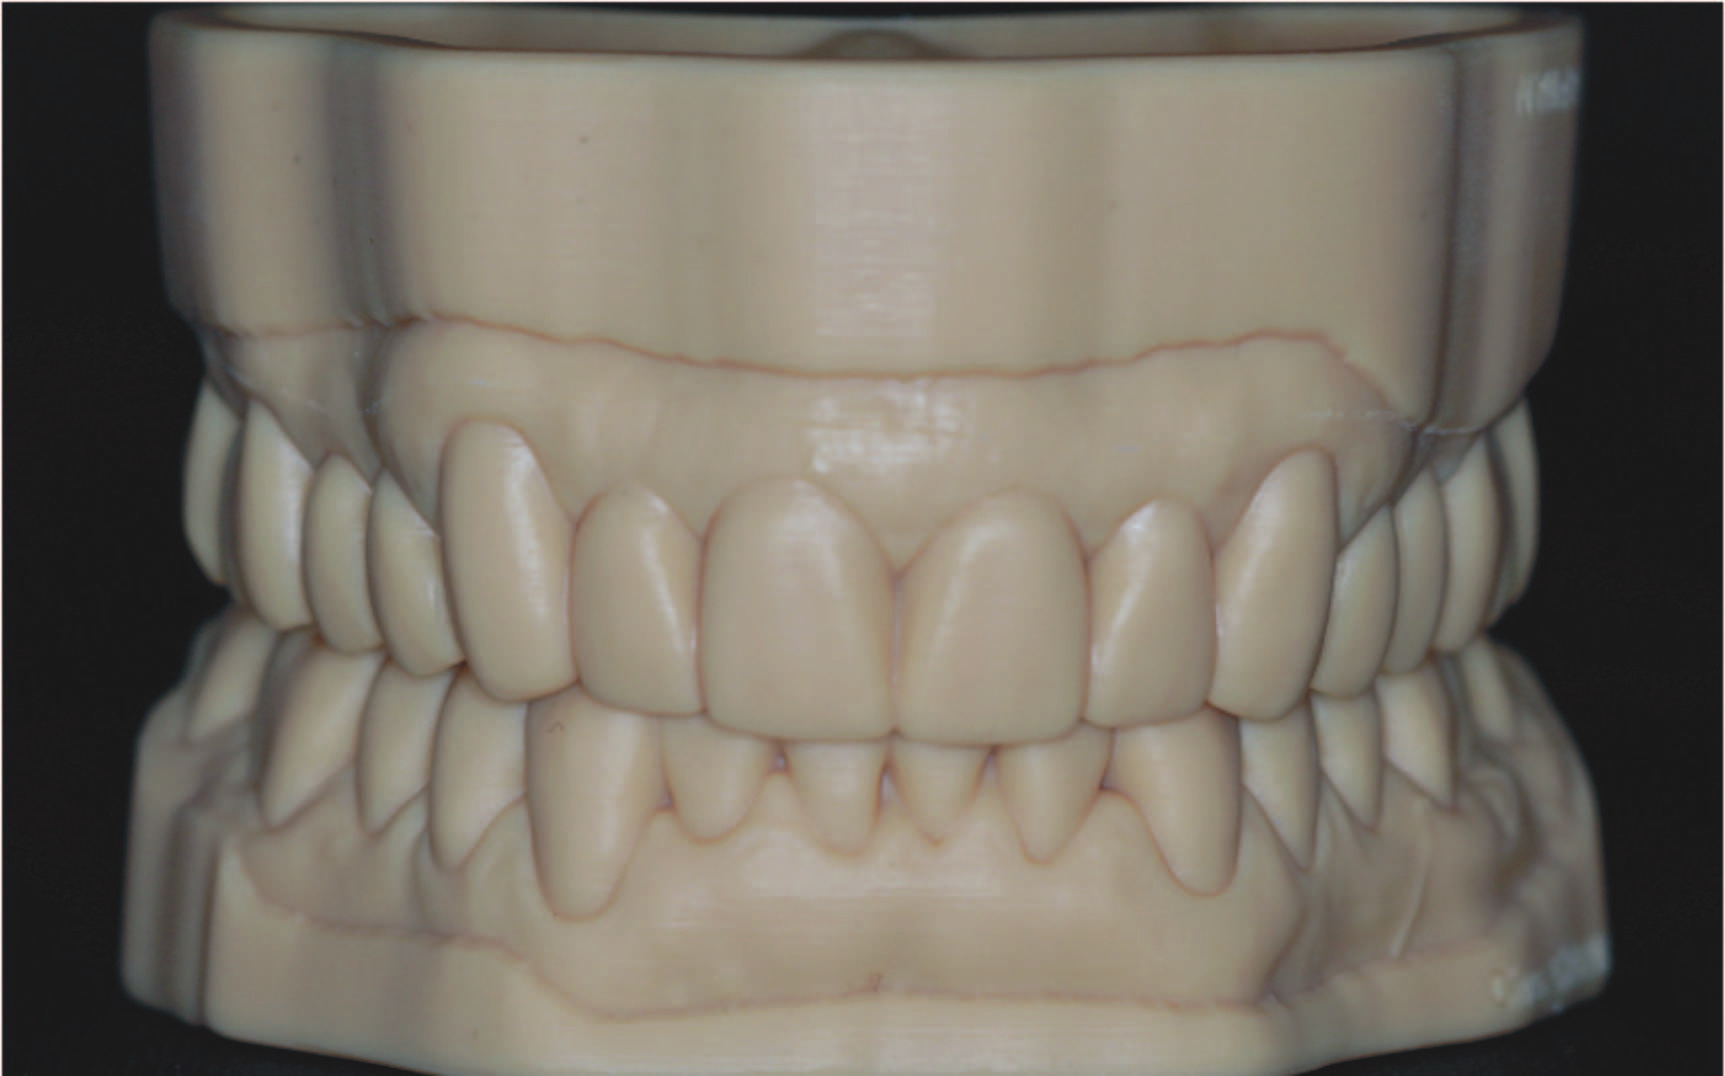
2. Virtually prepare (cut back) all teeth according to the thickness required for the final restorative material. Tooth preparation is performed based on the approved virtual design of the teeth (virtual wax-up). Print 3D resin models (DentaModel [ASIGA]) of the preplanned tooth preparations for the maxillary and mandibular arches (Figures 6 and 7).
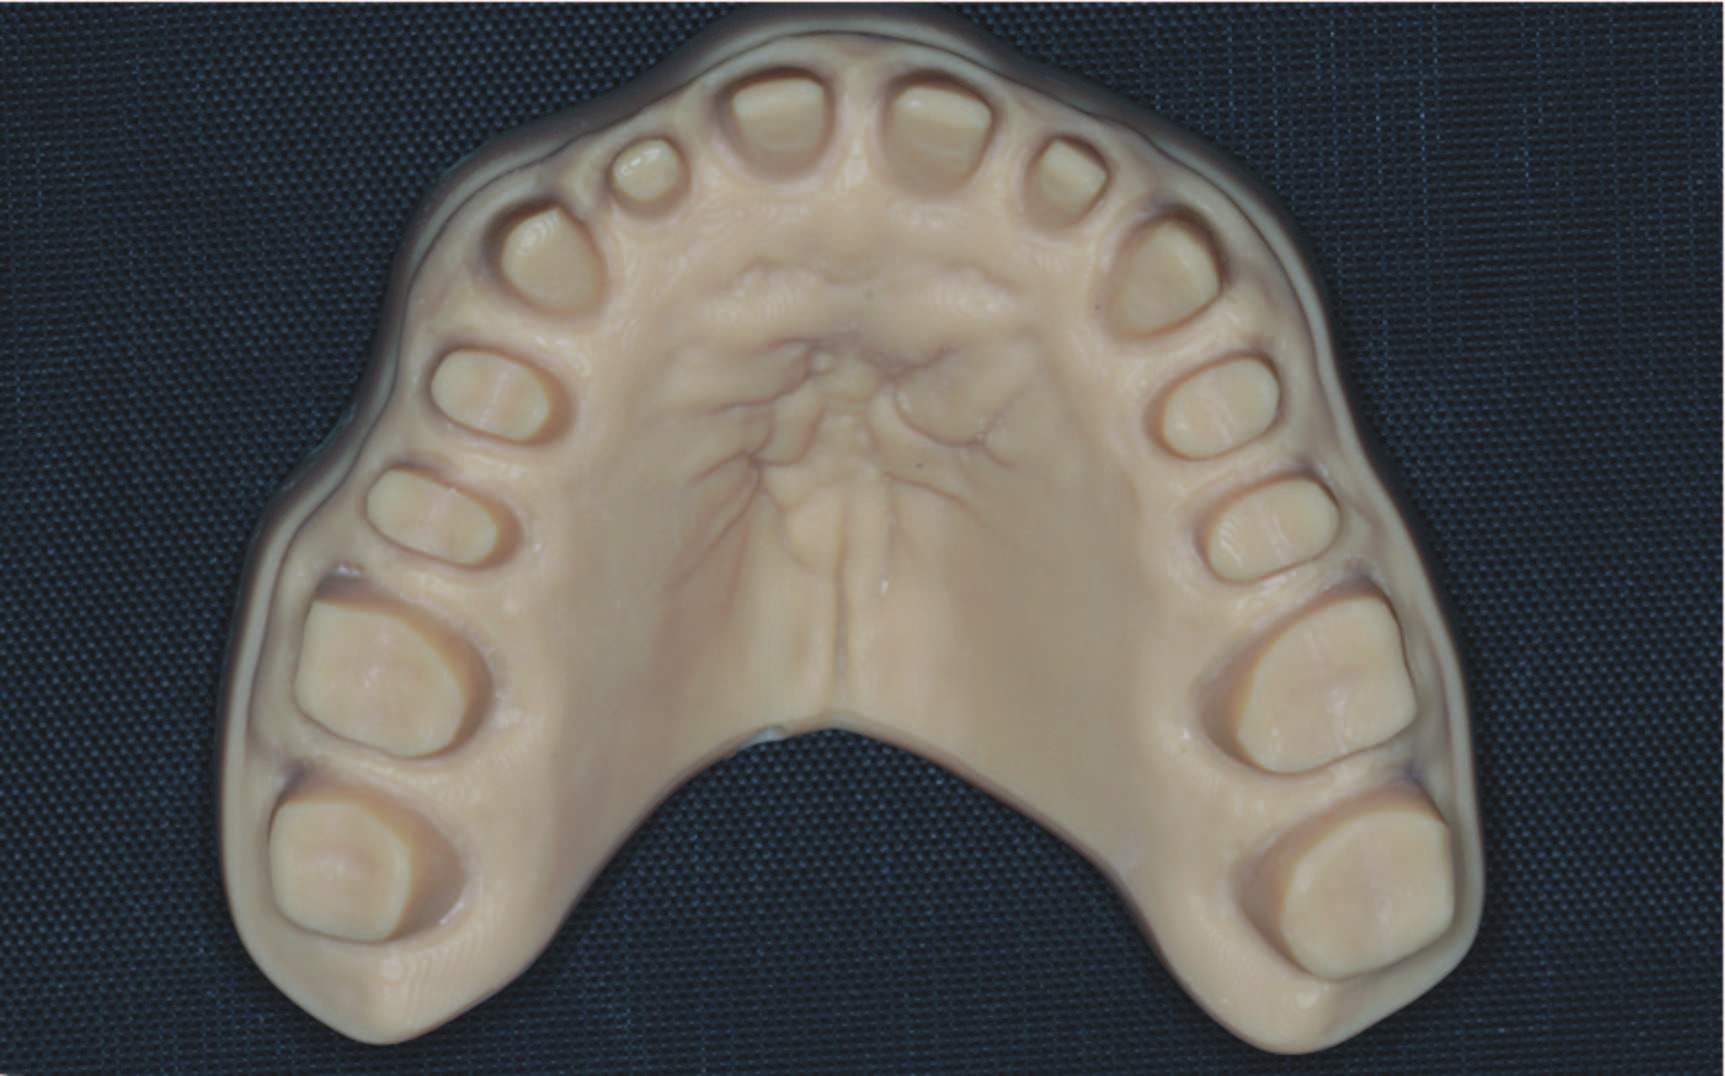

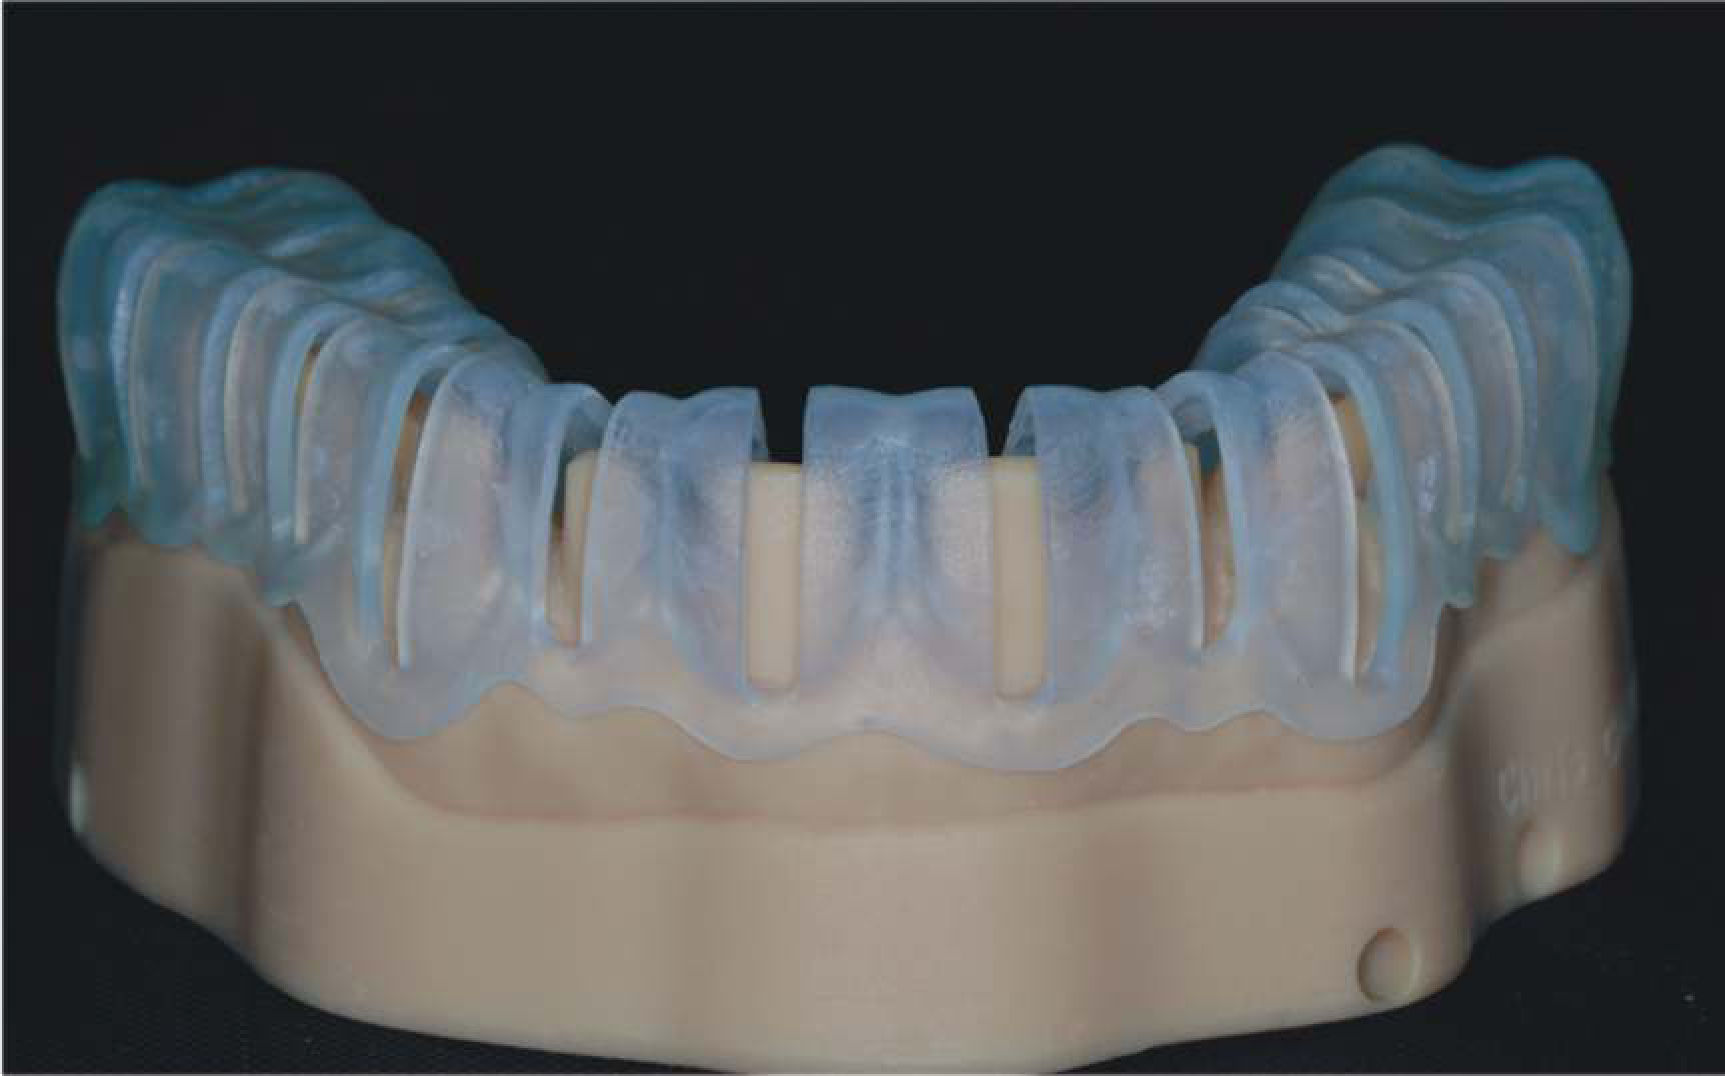
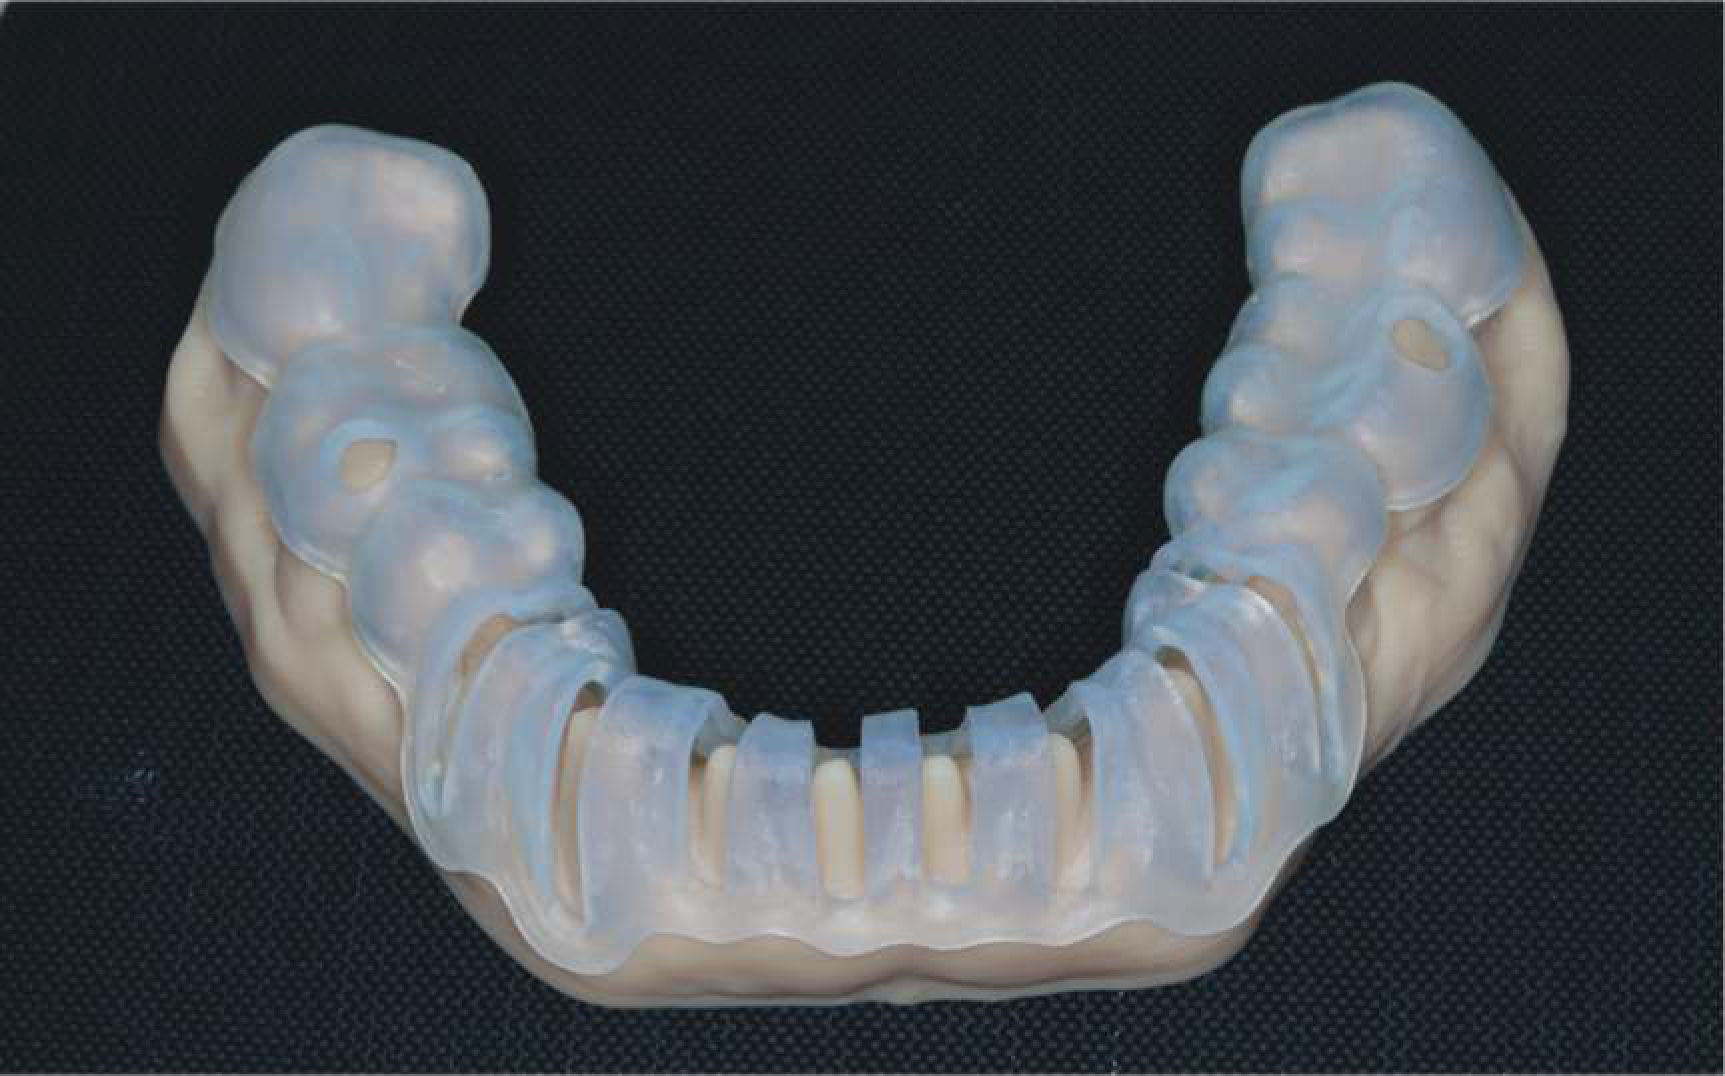
3. Print a 3D models of the virtually designed full-arch and sequential preparation guide based on the approved virtual wax-up to ensure adequate selective preparation of the teeth (Figures 8 and 9).
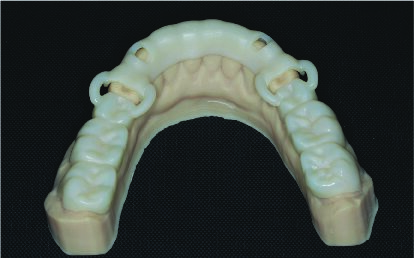
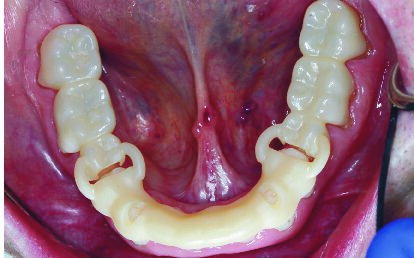
4. Print a 3D model of the provisional restoration shells (DENTCA crown and bridge [DENTCA]) based on the virtual wax-up and prepared teeth simulation. The maxillary provisional shells are designed to have palatal support to ensure that they are relined at the correct OVD and orientation. The mandibular provisional shells are segmented and designed with occlusal/incisal support. Prior to tooth preparation, the mandibular anterior provisional shell is supported on the occlusal surfaces of the existing mandibular posterior teeth, and the mandibular posterior provisional shell is supported on the incisal surfaces of the provisionalized mandibular anterior teeth (to be completed in that sequence) (Figures 10 to 12).


Clinical Steps (Tooth Preparation, Provisional Restorations, and Final impressions)
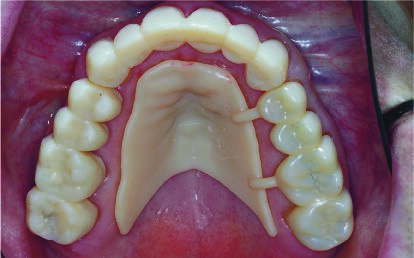
1. Prepare the maxillary arch with verification using the preparation guide in 3 sextants, and temporize each segment of the prepared teeth by relining the provisional restoration shells while maintaining the OVD, incisal cant, and occlusal plane using the palatal support. Once the reline material (temporary crown and bridge acrylic material) has set, carefully section and remove the excess material and palatal supports, and trim the margins to ensure an adequate fit (Figures 13 and 14).

2. Prepare the mandibular anterior teeth with verification using the preparation guide. Reline the mandibular anterior provisional restoration shells while ensuring support on the mandibular posterior occlusal surfaces, and fabricate the provisional restorations using the same protocol discussed above. Then proceed to prepare the mandibular posterior teeth with verification using the preparation guide, and reline the mandibular posterior provisional shells while ensuring support by the mandibular anterior provisional restorations. Trim and finish the provisional restorations using the same protocol discussed above (Figures 15 and 16).
3. Refine occlusion with the provisionals in maximum intercuspation (MIP) and excursive movements as needed. Take an intraoral, “pre-preparation” digital impression of the maxillary and mandibular provisionals.
4. Remove the intraoral provisional restorations except for 2 to 3 opposing provisionals in each arch, which will act as a common landmark. Virtually, trim away the provisionals (except the ones that have been kept as a common landmark) on the intraoral scan for the final preparation scan. Retract the gingival margins around the preparations using preferred protocols and complete an intraoral final digital impression of the preparations, ensuring adequate registration of all margins and preparation surfaces. Clinically, remove the provisionals that were kept in place and trim them from the scan. Retract the gingival margins and scan the remaining tooth preparations in each arch.
5. Reinsert the provisionals on the anterior and left posterior teeth and verify the occlusion and OVD. Take a digital bite scan for the right-side posterior preparations at the set OVD and jaw relationship. Place the right-side posterior provisionals and remove those on the left side. Verify the occlusion and OVD and take a digital bite scan for the left side over the left-side posterior preparations at the set OVD and jaw relationship.
6. Take a conventional polyvinyl siloxane (PVS) final impression to verify the margins, which would also assist the technician during final ceramic layering (optional). Cement the provisional restorations and verify the occlusion, function, and aesthetics.
Laboratory Steps (Definitive Crown Fabrication)
CAD/CAM is used to fabricate the final restorations based on the approved design and the occlusal relationship of the provisionals using the digital master models. In the example case provided, zirconia restorations were cut back, and the facial surface was layered with feldspathic porcelain (Figure 17).

Clinical Steps (Definitive Crown Insertions)
1. Remove the provisionals and try in the crowns based on the preferred sequence. Verify the adequate marginal adaptation, proximal contacts, occlusion, phonetics, and aesthetics and adjust accordingly.
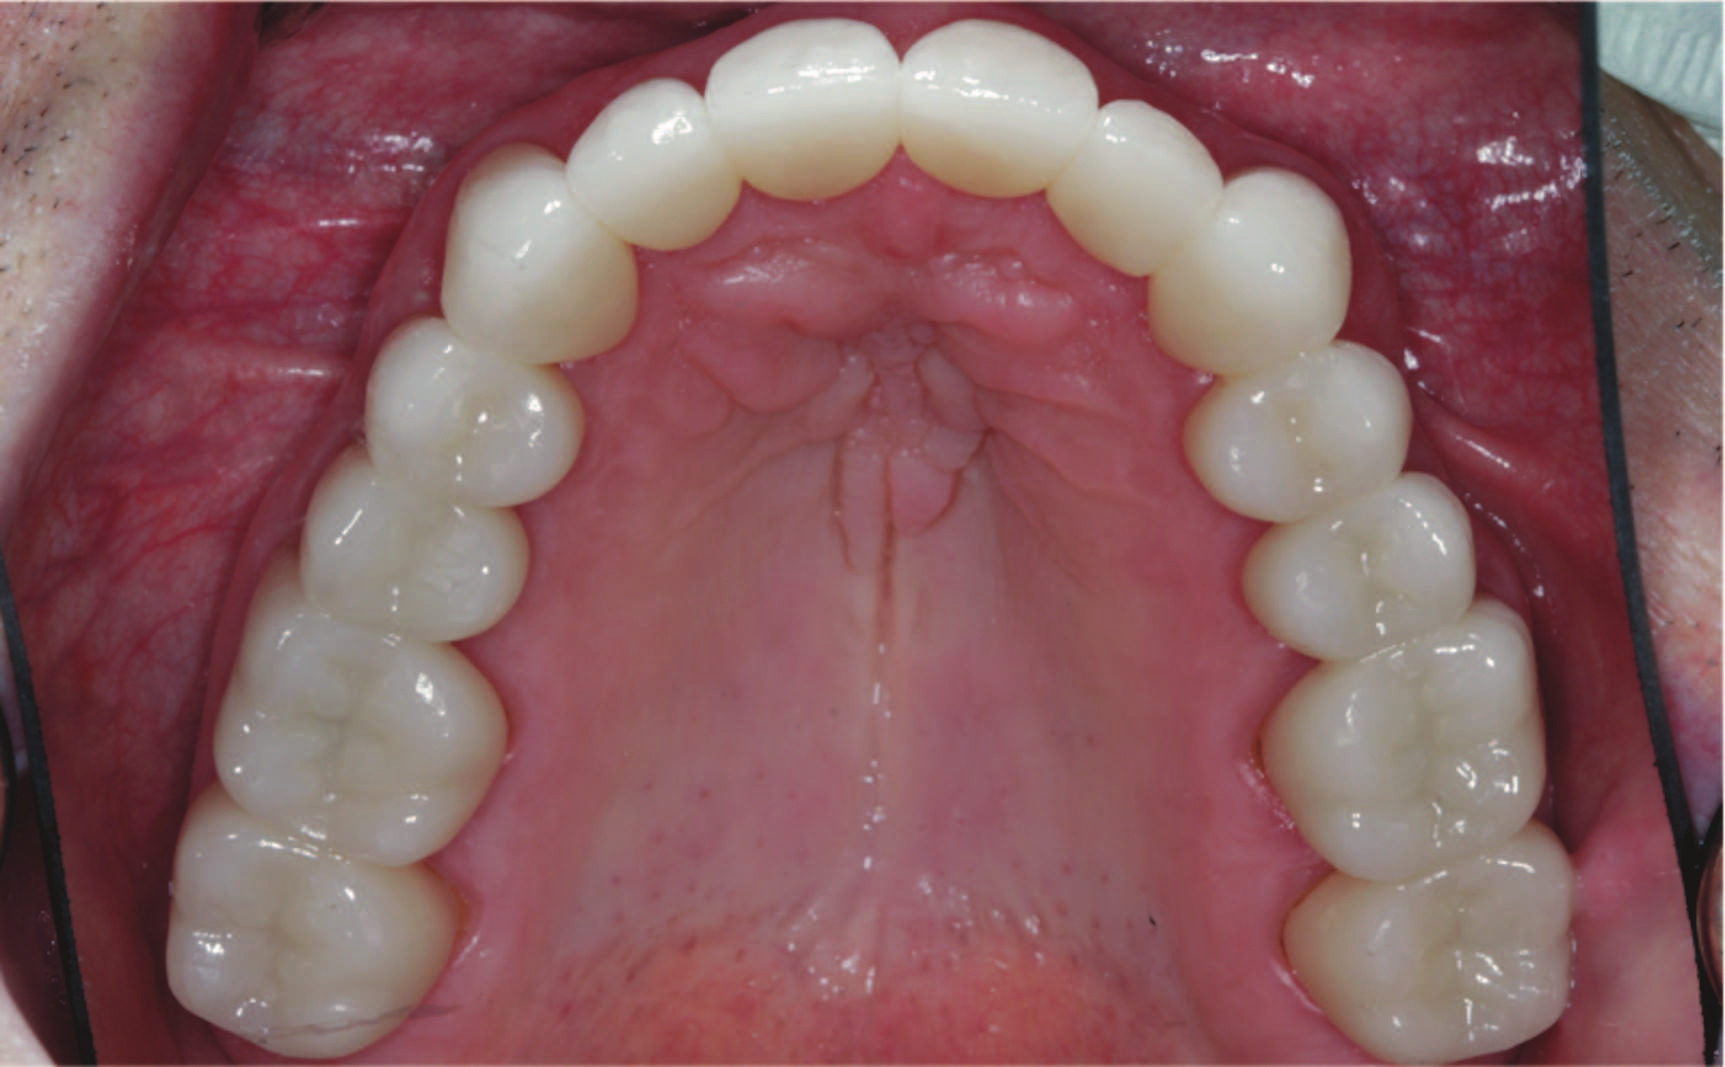
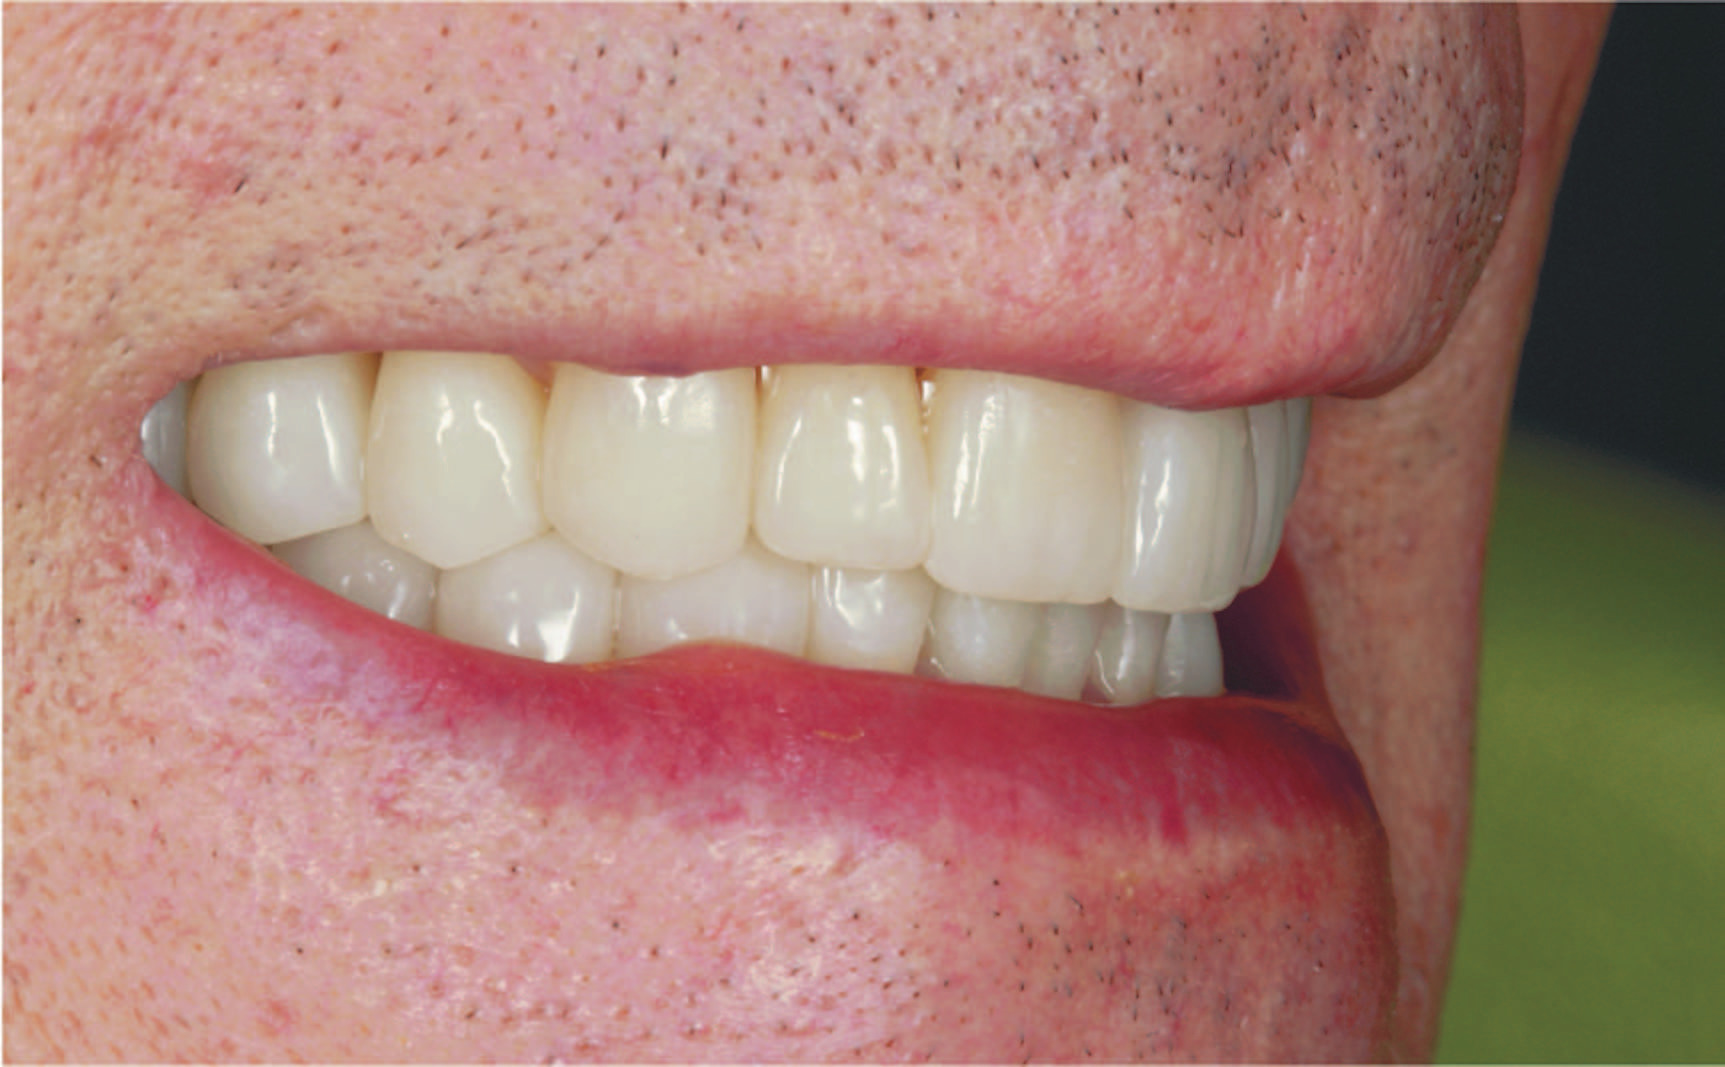
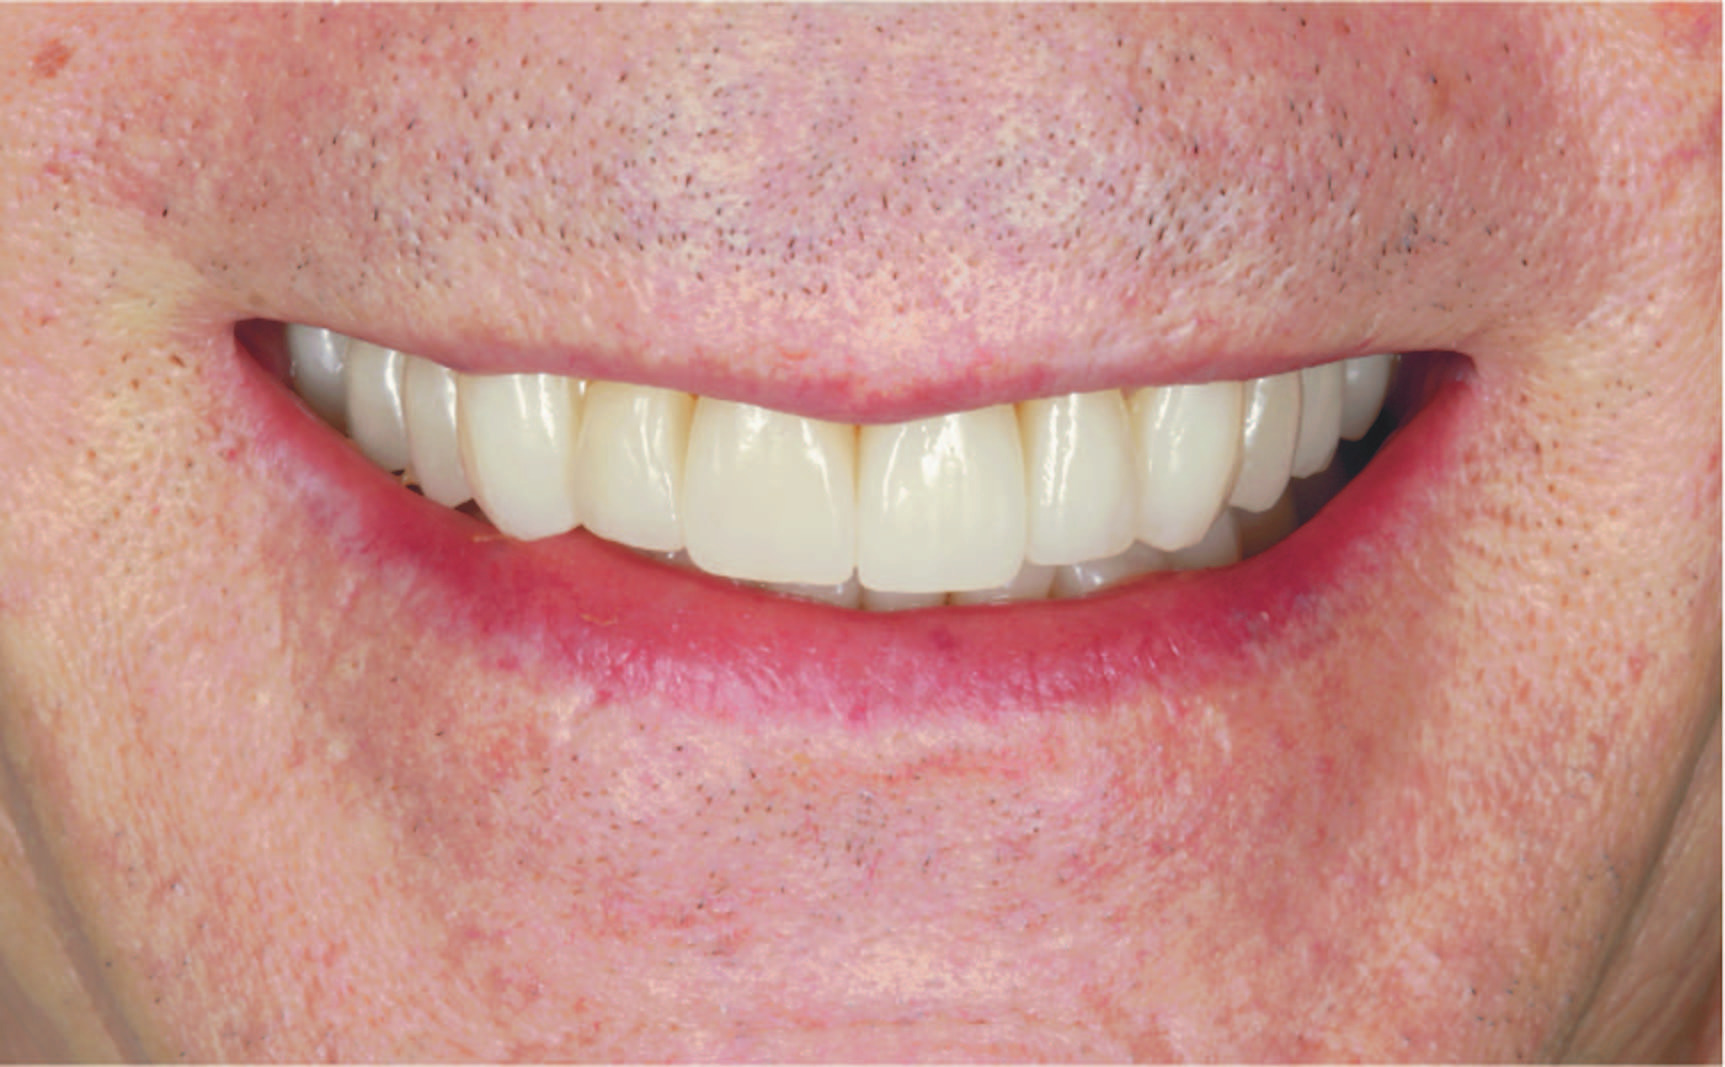
2. Once approved, follow standard cementation protocols to complete the insertion of the definitive crowns (Figures 17 to 20). Verify and refine occlusion as needed in MIP and excursive movements. Followup and maintenance should be performed as needed.
DISCUSSION
With dentistry increasingly moving toward digital manufacturing, the presented protocol demonstrates how digital workflows and virtual planning can enhance predictability and efficiency while also eliminating wastage of material, such as wax, dental stone, or putty silicones. A recognized drawback in restorative reconstruction is overprepared or underprepared supporting teeth,15,16 which may result from subjective tooth preparations.
Conventionally, analog techniques can be used to evaluate adequate reductions and preparations using reduction guides based on a wax-up. However, these methods are usually limited to short-span evaluations, provide information mainly after adequate reductions are achieved, and may require duplicate diagnostic casts with initial preparations performed by technicians.17-19 The technique discussed in this paper has addressed some of these concerns because it can be used for an extended span of the dental arch or for a full arch.
The tooth preparations are based on the digital wax-up and are completed more efficiently. With the use of an intraoral scanner, the restorative space between the preparation and the opposing tooth can be analyzed to provide an interocclusal space color map and suggest areas that may require further adjustments.
These technologies, in addition to a minimally invasive tooth preparation method, using a 3D-printed and virtually planned reduction guide, allow for fulfilling the fundamental tooth preparation and crown fabrication principles by only reducing what is necessary.20
This helps in preserving the tooth structure and achieving the structural durability needed for the restorative material.
Provisionalization is a crucial step to consider during restorative treatment and often exacting when used to maintain or alter the OVD in full-mouth rehabilitation and, thus, should always be preplanned. The tempshells with palatal and occlusal supports used in this digital approach offer an additional stable reference to maintain the OVD during the fabrication of the provisionals while also reducing chair time.
With the diverse methods currently available for CAD/CAM, data collection, and implementation, there is yet to be a standardized digital workflow for all restorative procedures.14 This suggested workflow depends on the clinician’s experience with digital scanning and the lab technician’s competency with CAD/CAM technology. The authors suggest taking an additional PVS final impression as an elective step to further verify the digital impression if needed.
Tooth-supported oral reconstructions have variable complexity, and the management of each case could differ in the number of appointments needed based on the provider’s skill or the patient’s tolerance and compliance. In cases involving an increase in OVD, several appointments are often required to verify and modify the provisional restorations to evaluate orofacial tissue adaptation and maintain the new OVD while recording each adjustment. Digital technology offers the advantage of data archiving and superimposition, resulting in efficient impression capturing, treatment plan alterations, and case monitoring, which can be modified in the virtual plan.11
If the proposed changes to the vertical dimension are large, assessing and testing the OVD with provisionals for 6 to 8 weeks is recommended to ensure physiological adaptation and patient comfort. For the novice clinician, or even an experienced clinician who is a new adopter of digital technology, it is recommended to start with simple restorative cases prior to implementing a fully digital workflow in a full-mouth rehabilitation and to focus more on the treatment outcomes and less on the associated timelines.
Another challenge that may arise when adapting to new technology is digital acquisition speed since prolonged periods of scanning can lead to longer processing time; more stitching inaccuracy; and, eventually, overheating the intraoral scanner.21 However, one study addressed the learning curve and suggested that repeated digital scanning experience can reduce the number of images and total scan time for a digital impression,21 which might also reduce the chairside time, and improve scanning efficiency and accuracy.
Nonetheless, seeking solutions that may improve treatment outcomes and patient satisfaction can only be achieved by practicing clinical judgment and considering evidence-based dentistry. Further investigation in rapid prototyping and a fully digital workflow is required to support this constantly evolving field.
SUMMARY
An innovative, fully digital workflow for a fixed, tooth-supported full-mouth reconstruction was described for the virtual application of smile design, increase in OVD, wax-up, teeth preparation, and CAD/CAM provisional and definitive restoration fabrication. This digital implementation technique can improve case analysis, treatment planning, chairside time, objective treatment, and data archiving for future efficiency in restorative treatment outcomes.
ACKNOWLEDGEMENTS
The authors would like to thank Jae Won Sim and Paul Ro Lab in Vancouver, Canada, for their technical and laboratory support on this case.
REFERENCES
1. Liebermann A, Edelhoff D, Güth JF, et al. Oral health-related impact profile in full-mouth restored patients with two different tooth-colored restoration materials. Clin Oral Investig. 2019;23(4):1625-1634. doi:10.1007/s00784-018-2580-1
2. Shah P, Razavi S, Bartlett DW. The prevalence of cervical tooth wear in patients with bruxism and other causes of wear. J Prosthodont. 2009;18(5):450–4. doi:10.1111/j.1532-849X.2009.00456.x
3. Wetselaar P, Lobbezoo F. The tooth wear evaluation system: a modular clinical guideline for the diagnosis and management planning of worn dentitions. J Oral Rehabil. 2016;43(1):69-80. doi:10.1111/joor.12340
4. Binkley TK, Binkley CJ. A practical approach to full mouth rehabilitation. J Prosthet Dent. 1987;57(3):261–6. doi:10.1016/0022-3913(87)90293-9
5. Song MY, Park JM, Park EJ. Full mouth rehabilitation of the patient with severely worn dentition: a case report. J Adv Prosthodont. 2010;2(3):106–10. doi:10.4047/jap.2010.2.3.106
6. Moslehifard E, Nikzad S, Geraminpanah F, et al. Full-mouth rehabilitation of a patient with severely worn dentition and uneven occlusal plane: a clinical report. J Prosthodont. 2012;21(1):56-64. doi:10.1111/j.1532-849X.2011.00765.x
7. Park JS, Lim YJ, Kim B, et al. Clinical evaluation of time efficiency and fit accuracy of lithium disilicate single crowns between conventional and digital impression. Materials (Basel). 2020;13(23):5467. doi:10.3390/ma13235467
8. Garcia PP, da Costa RG, Calgaro M, et al. Digital smile design and mock-up technique for esthetic treatment planning with porcelain laminate veneers. J Conserv Dent. 2018;21(4):455-458. doi:10.4103/JCD.JCD_172_18
9. van Noort R. The future of dental devices is digital. Dent Mater. 2012 Jan;28(1):3-12. doi:10.1016/j.dental.2011.10.014
10. Kim SY, Kim MJ, Han JS, et al. Accuracy of dies captured by an intraoral digital impression system using parallel confocal imaging. Int J Prosthodont. 2013;26(2):161–3. doi:10.11607/ijp.3014
11. Rekow ED. Digital dentistry: The new state of the art – Is it disruptive or destructive? Dent Mater. 2020;36(1):9-24. doi:10.1016/j.dental.2019.08.103
12. Chochlidakis KM, Papaspyridakos P, Geminiani A, et al. Digital versus conventional impressions for fixed prosthodontics: A systematic review and meta-analysis. J Prosthet Dent. 2016;116(2):184-190.e12. doi:10.1016/j.prosdent.2015.12.017
13. Ahlholm P, Sipilä K, Vallittu P, et al. Digital versus conventional impressions in fixed prosthodontics: a review. J Prosthodont. 2018;27(1):35-41. doi:10.1111/jopr.12527
14. Fung L, Brisebois P. Implementing digital dentistry into your esthetic dental practice. Dent Clin North Am. 2020;64(4):645–57. doi:10.1016/j.cden.2020.07.003
15. Al-Dwairi ZN, Al-Hiyasat AS, Aboud H. Standards of teeth preparations for anterior resin bonded all-ceramic crowns in private dental practice in Jordan. J Appl Oral Sci. 2011;19(4):370–7. doi:10.1590/s1678-77572011005000012
16. Christensen GJ. Frequently encountered errors in tooth preparations for crowns. J Am Dent Assoc. 2007;138(10):1373–5. doi:10.14219/jada.archive.2007.0055
17. Oh KC, Kim JH. Digital preparation-evaluation tool. J Prosthet Dent. 2020;124(6):816–17. doi:10.1016/j.prosdent.2020.02.009
18. Lee JH. Chairside fabrication of a tooth reduction guide to ensure adequate occlusal clearance. J Prosthet Dent. 2020:S0022-3913(20)30664-8. doi:10.1016/j.prosdent.2020.08.048
19. Yu A, Lee H. A wax guide to measure the amount of occlusal reduction during tooth preparation in fixed prosthodontics. J Prosthet Dent. 2010;103(4):256–7. doi:10.1016/S0022-3913(10)60041-8
20. S.F. Rosenstiel SF, Land MF, Fujimoto J. Principles of tooth preparation: contemporary fixed prosthodontics (4th). Mosby; 2016.
21. Róth I, Czigola A, Joós-Kovács GL, et al. Learning curve of digital intraoral scanning—an in vivo study. BMC Oral Health. 2020;20(1):287. doi:10.1186/s12903-020-01278-1
ABOUT THE AUTHORS
Dr. Edher is a specialist in prosthodontics focused on cosmetic transformations and implant reconstructions using advanced digital technology. Dr. Edher is the director of the Digital Dentistry Institute, a global educational organization that conducts comprehensive training programs in digital dentistry and implant dentistry. He is also a clinical assistant professor and guest lecturer at the University of British Columbia. He can be reached at [email protected].
Dr. Alabdullah is a board-certified prosthodontic specialist practicing fixed and removable full mouth rehabilitation at the Security Forces Hospital in Riyadh, Saudi Arabia, where she is also leading the Implant Development Unit. She is also a clinical prosthodontist in private practice. She can be reached via email at [email protected].
Disclosure: The authors report no disclosures.