
INTRODUCTION
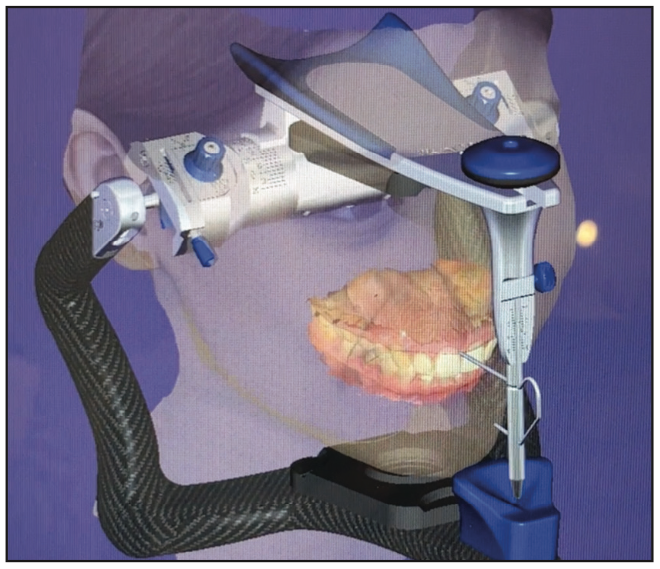
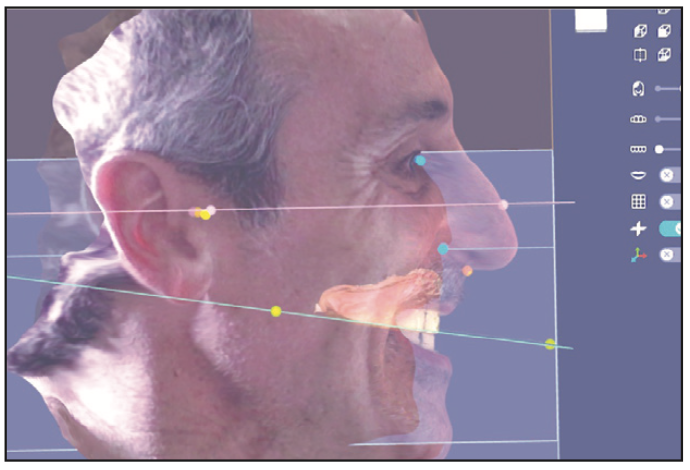
Three-dimensional facial scanning began its evolution in the facial-recognition fields of government and the civil authority sector.1-4 As dental professionals, we know the value of having the laboratory see the patient up close and personal. The current digital data capture of 3D facial scanning and artificial intelligence (AI) is the reality of how we can successfully treat our patients with a variety of applications. Three-dimensional facial scanning is an OBJ file that can now be used for diagnosis and treatment planning for any dental treatment involving replacing anterior and posterior teeth. By creating a “virtual patient,” or “dental avatar,” the clinician can transfer accurate data to the laboratory, allowing the software to simulate ideal treatment planning for replacing teeth.5,6 Utilizing the central incisor position as a linear outline of the 6 anterior teeth, all data sets can be merged accurately. This will allow the accurate transfer of each data file as it is merged instantaneously through the AI that is inherent in this new software. Using this technology will surely increase the precision of many treatments involving the anterior teeth for facial and dental aesthetics, posterior teeth, the plane of occlusion, and morphology. This can be transferred very accurately (Figure 1).
METHODS AND TECHNIQUES
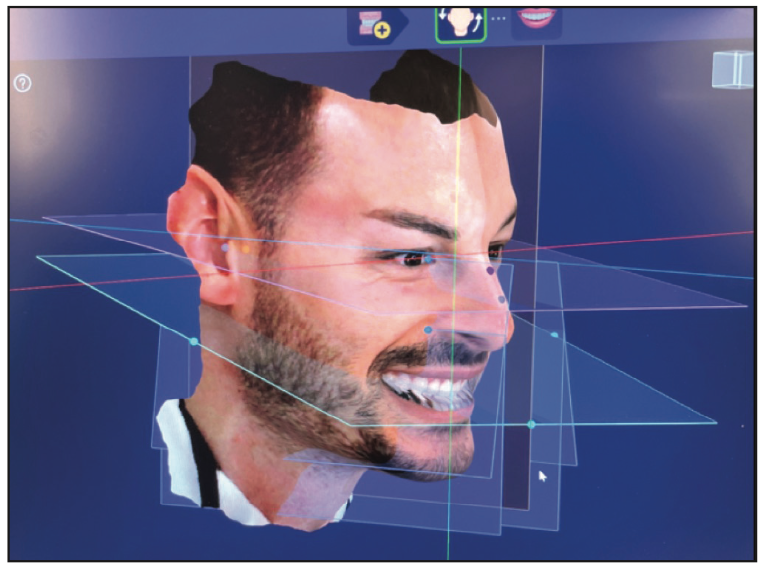
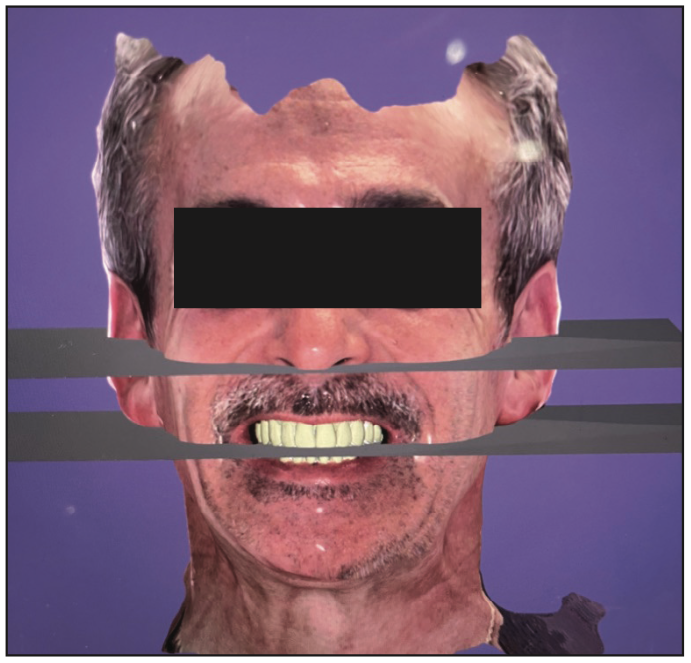
Patients were randomly selected that needed one of 3 types of treatments: complete denture, All-on-X implant therapy, or smile-makeover treatment. The digital data sets of information were taken at the consultation visit and seamlessly merged together through incisal edge position software and AI (Figure 2). First, an intraoral scan of maxillary and mandibular arches (IOS STL file) and a CBCT scan of the hard structures of both jaws (DICOM file) were made. Additional intraoral and extraoral photographs were also taken (JPG files). Secondly, the 3D facial scan (OBJ file) was made using RAYFace (Ray America). This machine has 6 dedicated cameras with a structured, built-in light. The 6 cameras extend more than 180° of the patient’s face. They align with a “big smile” view of the patient’s lips and teeth and get facially aligned in less than 5 seconds. All patients were asked to pull back their hair over their ears to allow the facial planes to be viewed. All headwear or obstructive facial jewelry must be removed to ensure accuracy. Multiple images can be taken in rapid succession, and the most natural-looking smile can be selected from all the images taken. After this capture process is successful, the AI of data merging begins. This software allows the importing of all data files to be seamlessly merged with one click. Each part of the patient’s data sets is imported into the RAYFace AI integrated software. Finally, the last step is the alignment of all x-, y-, and z-axes; facial planes; and all horizontal planes and accurate positioning of the data sets. Automatic plane and landmark detection technology (AI application) assist the user in reorienting the patient axis lines to achieve natural head position and detect the presence of canting on the occlusal plane or maxillary jaw discrepancies. All other facial planes, such as the ala-Tragus Line, Frankfort horizontal line, and occlusal plane lines, can also be viewed with just one click. This is performed by aligning the incisal edge position outline of the IOS scan with the CBCT scan.
Once the accuracy and merging are confirmed, the alignment is checked for the ideal position. At this point, all the data sets are confirmed and merged. When this step is completed, the clinician can choose an ideal anterior smile design from a library of various shapes and sizes of anterior teeth to visualize the ideal smile position for the 3D facial scan. The next step is to download all the data sets into one complete file to be sent online or through the cloud server to the lab of your choice. This software also has a cloud-based data-sharing platform, enabling secure and efficient scan data management. At the laboratory, a variety of digital software can be used to create any treatment necessary for each patient. In these patient treatments, exocad software was utilized. The dentist, laboratory, and surgeon can now communicate to achieve the ideal tooth position with a dental avatar on their screens to discuss and plan all facial parameters and aesthetic needs, implants, surgical guides, and complete dentures for each patient.
CASE REPORTS
Case 1: Denture Protocol
Visit 1: Complete upper and lower preliminary impressions and a custom tray and final impression are made. All data sets of diagnosis are taken, a CBCT scan and a 3D facial scan are made, and the ideal tooth position in the frontal plane is designed (Figure 3).
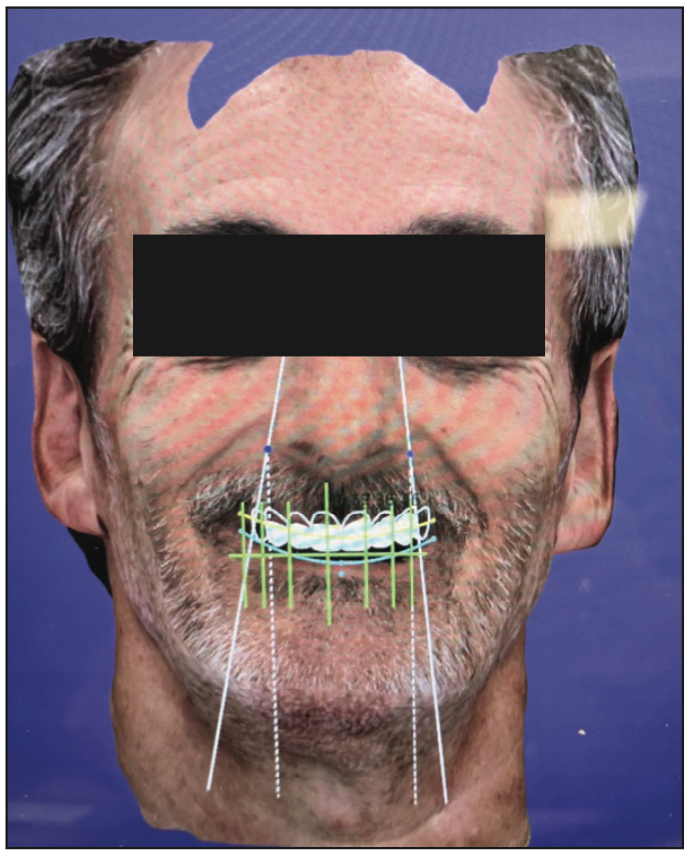
Visit 2: At the second visit, the occlusal rim is fabricated using yellow wax. This is a paradigm shift because most laboratories use pink wax for this step. Yellow wax has a better contrast for the 3D facial scanner with all the black markings that will be made. The markings include facial midline, canine-to-canine lines from the inner canthus position, and the incisal edge of the occlusal rim. Once the parameters and Fox-plane analysis are completed and the OVD has been confirmed, a 3D facial scan is taken with the patient using all facial muscles to achieve a full, high smile (Figure 4). An IOS scan of the occlusal rim of the external surface and the intaglio surface is also made. Relining the occlusal rim with PVS material is highly recommended. A CBCT scan of the occlusal rim is made with fiducial markers on the occlusal rim to relate the CBCT scan to the occlusal rim.7,8 All these data sets are instantly merged together with the software. The ideal facial and horizontal lines are viewed and aligned (Figure 5). All of the data sets are merged and packaged together and sent to the laboratory through the cloud-based data-sharing platform. The clinician, laboratory, and patient should also discuss and choose the best shade option for the patient.
Laboratory Steps: The laboratory imports all the data sets into exocad software (or any other planning software). The technicians design the tooth position, incisal edge, shape, width and length, alignment, buccal corridor extension, and occlusal plane (Figure 6).
This is also a paradigm shift. The current protocol for tooth selection is done by the clinician with various tooth-form guides and shapes utilizing pink wax. Usually, this resulted in many try-in and check-bite visits because this is a subjective choice based on vague ruler measurements and approximation. Many clinicians and laboratory technicians spend hours and days waxing the perfect set of denture teeth. This is a major step that will be eliminated if designs and records are taken digitally and enhanced virtually. Using the 3D facial scan and having the patient’s face with the occlusal rim in a digital format, the dentist and technician can better choose the ideal central incisor length, width, tooth form, and gingival zeniths. This allows easy manipulation of the design to achieve an ideal smile and tooth position in all 3D aspects. The laboratory technician can design this step, which can then be confirmed or edited by the clinician for the ideal position, length, and width through the email portal.
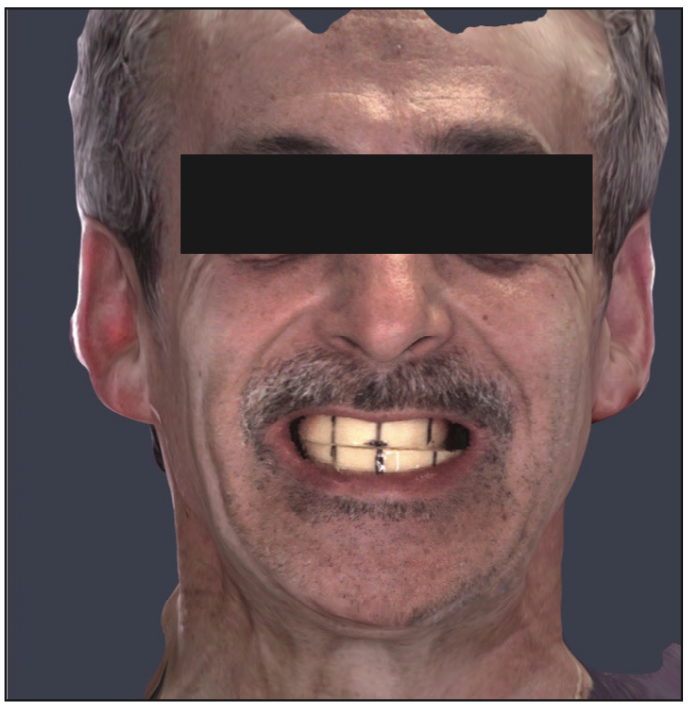
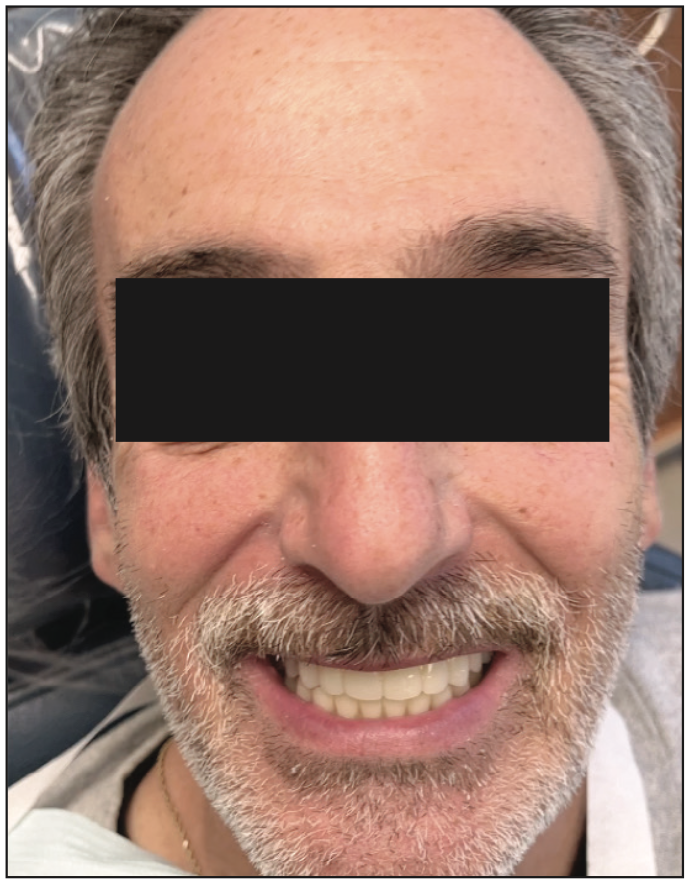
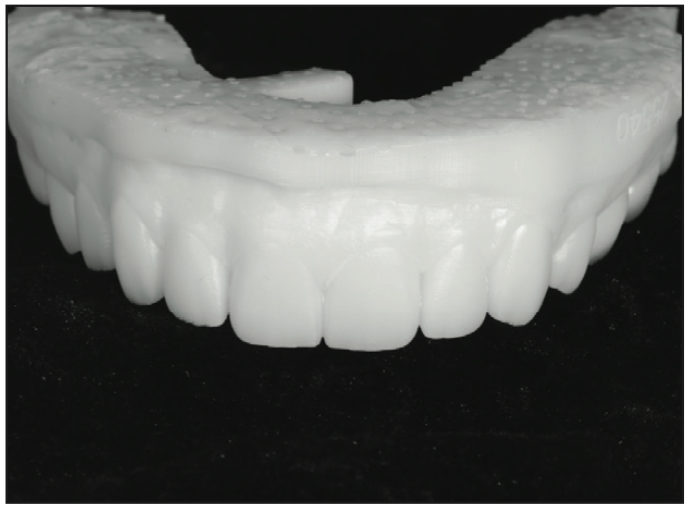
Visit 3: The laboratory delivers a complete upper denture PMMA (printed) prototype to be evaluated for tissue fit, tooth position, occlusion relationship, the maxillary incisal edge, and shade (Figure 7). Seven complete denture patients were treated, and all 7 prototypes needed minor to no occlusal adjustments. Two of the 7 denture treatments needed more buccal corridor additions. During evaluation, all 7 denture treatments had perfect midline positions from upper to lower dentures and facial midline views. One of the 7 denture treatments needed a slight shade change. All 7 patients reported and evaluated their smiles as ideal or close to ideal for what they expected. The dentist prescribed the minor changes necessary to the technician, and all changes were made in the exocad design software and then translated to the final denture fabrication and insertion visit (Figure 8).
Visit 4: All 7 final complete upper and lower dentures were processed (IvoBase Injection System [Ivoclar]) and delivered on the fourth visit. The clinician evaluated dentures for tissue fit, tooth position, occlusion relationship, the maxillary incisal edge, and shade. All 7 were acceptable from a clinical perspective and patient evaluation. A fit check of all tissue intaglio surfaces was performed. Occlusion contact and bilateral balanced occlusion were evaluated for ideal position and movement. Videos of the patients’ chewing cycles were made. Documentation and cataloging of all patient treatments was also made. Three- and 6-month recalls were scheduled to evaluate the fit and function of the treatments (Figure 9).
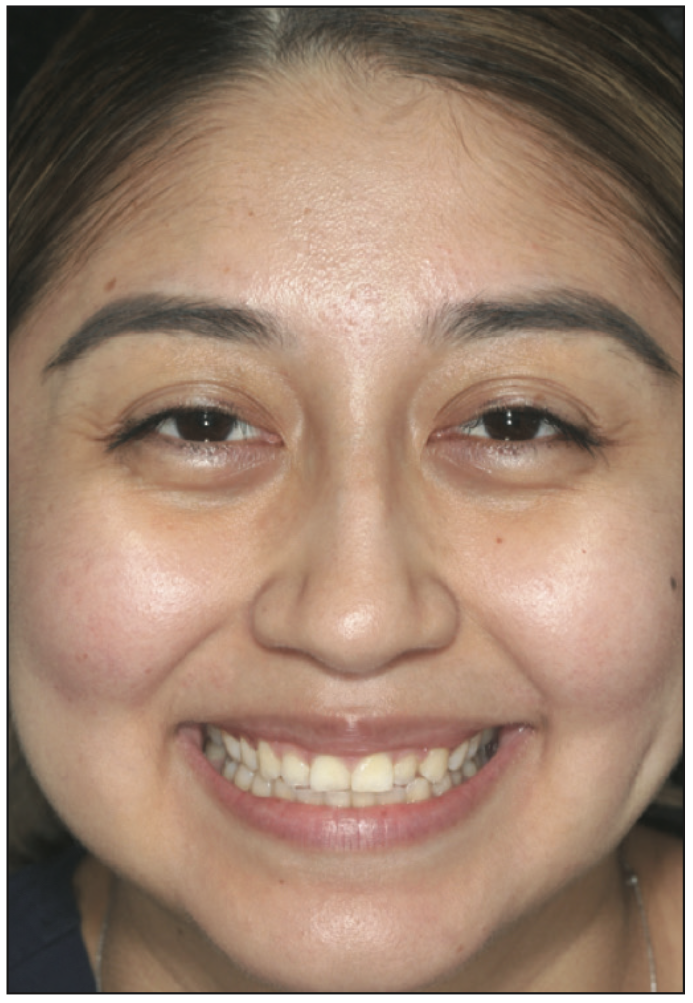
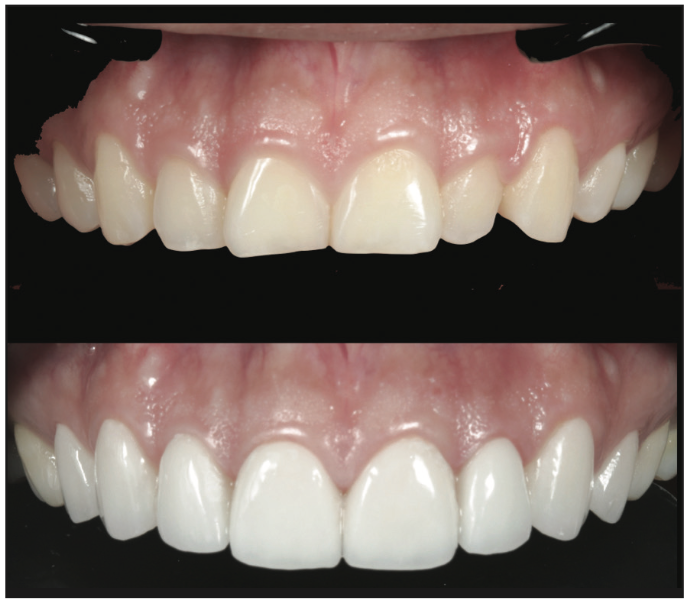
Case 2: Smile Makeover
Visit 1: Complete upper and lower arches were scanned with an IOS (TRIOS [3Shape]) and CBCT scanner (RayAmerica). In addition, full-facial photos and videos were made to complete the aesthetic protocol of smile design. Files are imported into RAYFace software. A RAYFace 3D facial scan is captured. A simple smile design is made in the existing RAYface software and then exported to exocad software for ideal design (Figures 10 to 12).

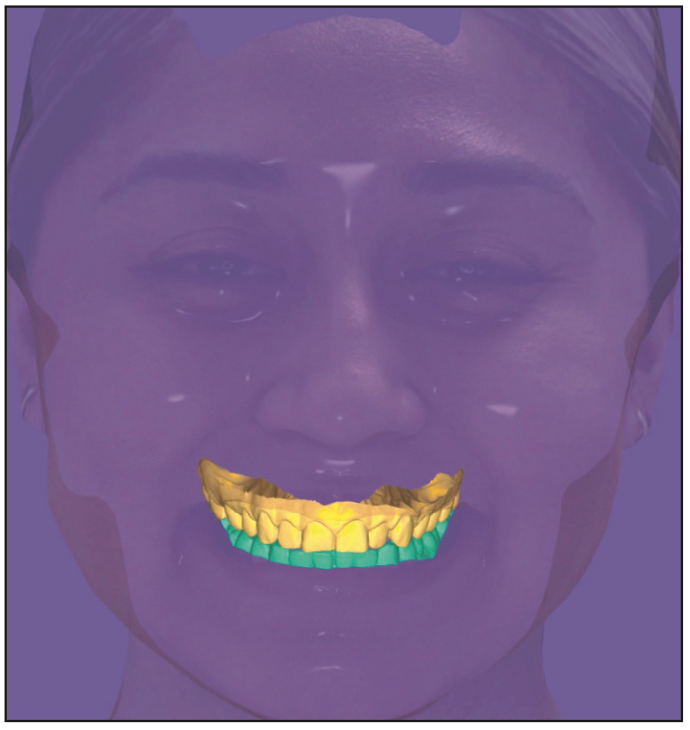
Laboratory Steps: The ideal smile design is proposed using all the raw facial data merged through the incisal edge position and the IOS scans. The evaluation and quality control are up to the clinician to verify, change, or edit as needed. This will ensure ideal positions are viewed by the clinician and technician. Once the design is approved, the lab will send the clinician a printed model of the ideal design with a putty matrix or vacuum form to fabricate provisionals for the smile makeover (Figures 13 and 14).
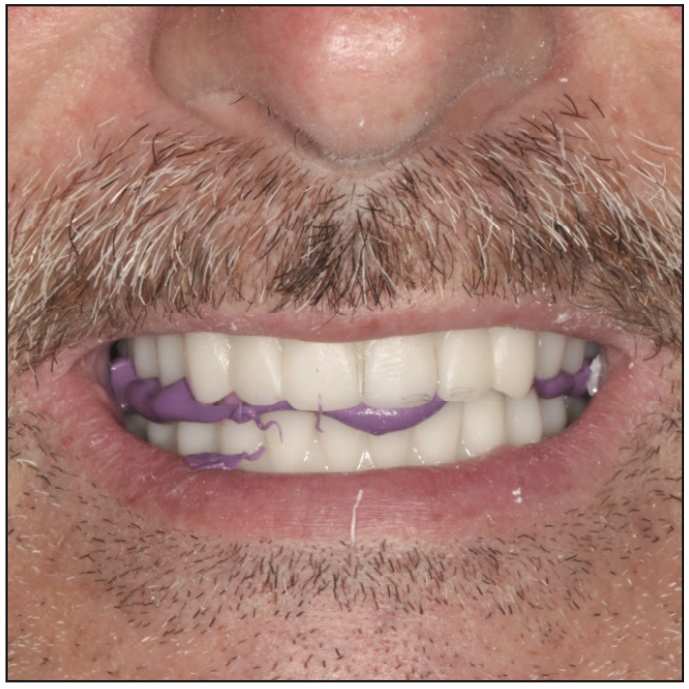
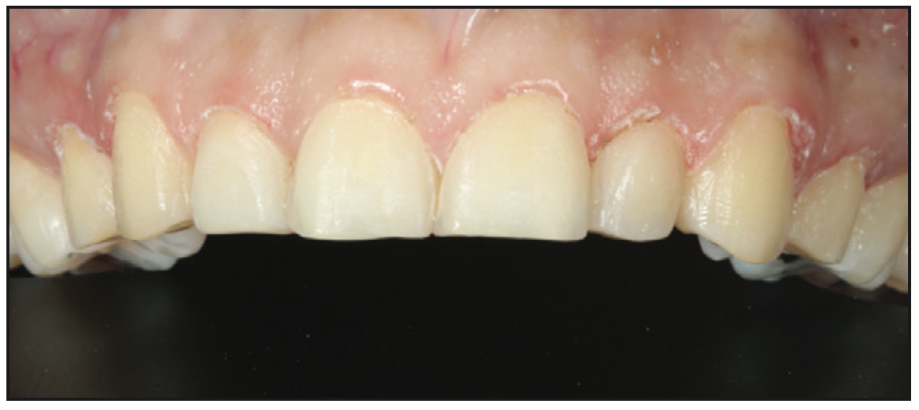
Visit 2: Teeth are prepared for crowns or veneers with all ideal parameters: facial reduction, occlusion reduction, and color reduction for minimal prep cases. The matrix or vacuum form is filled with auto-polymerizing bis-acrylic material (Luxatemp [DMG]) with a specific shade chosen. It is allowed to set in 1 minute, and then it is removed, trimmed, and ready for insertion. The dentin shade photo is taken. A final impression is made for teeth prepared for the specific arch, and provisionals are luted, trimmed, and polished.
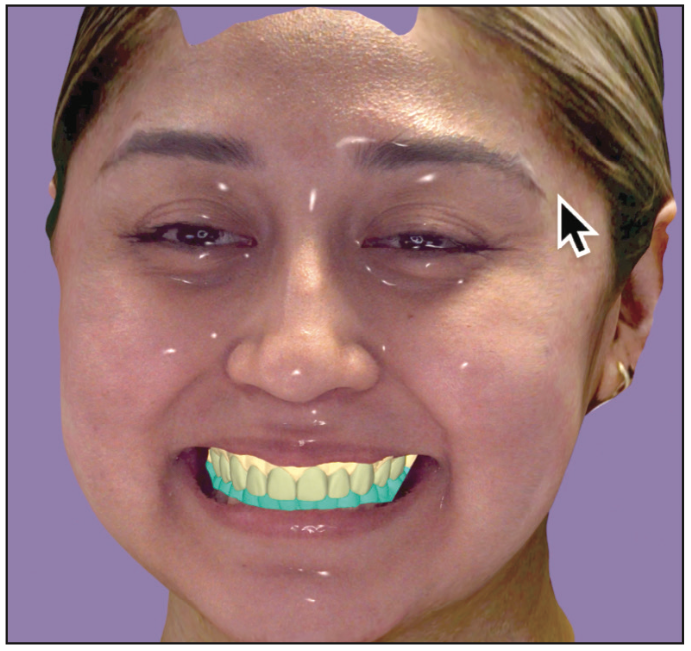
A final view and photographs are taken to evaluate the provisional smile makeover. Since the ideal smile design has been created with the 3D Facial scanner, this step should be very close to the ideal incisal edge, occlusion, position, labial extension, and buccal corridor alignment. The patient is scheduled for final adjustment 1 to 2 days after preparation to finalize aesthetics and specific patient input, speech, facial smile analysis, and lip support.
A final 3D Facial scan with RAYFace is made and sent to the lab for fabrication of final crowns or veneers (Figures 15 to 17).

Laboratory Steps: Final fabrication of crowns or veneers are done with a specific material and shade chosen.
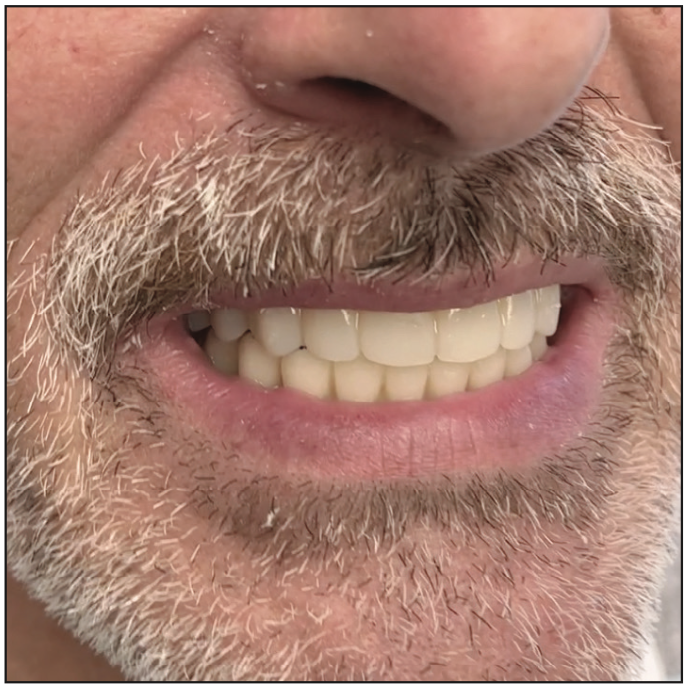
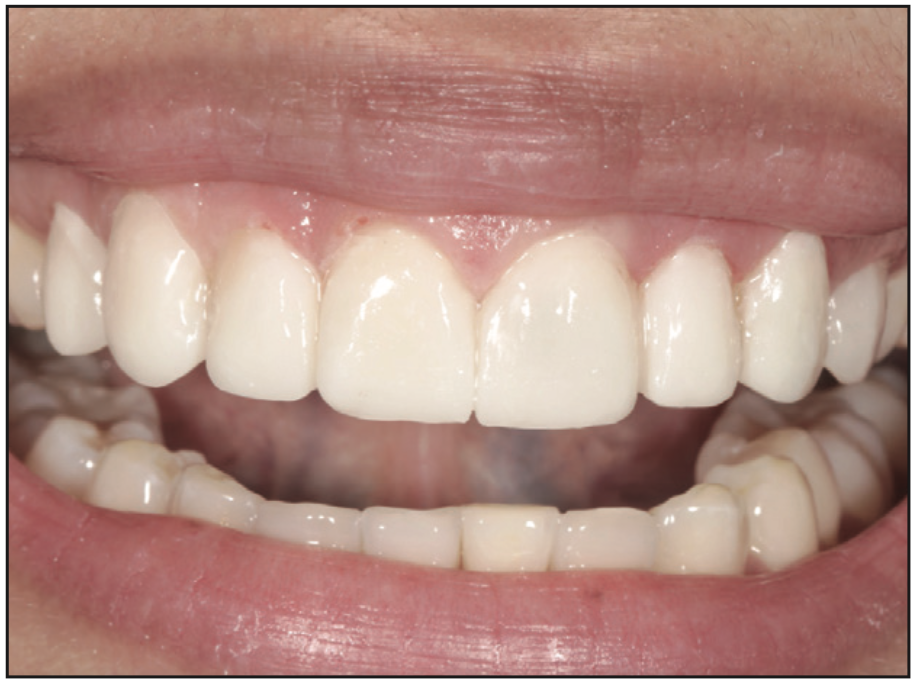
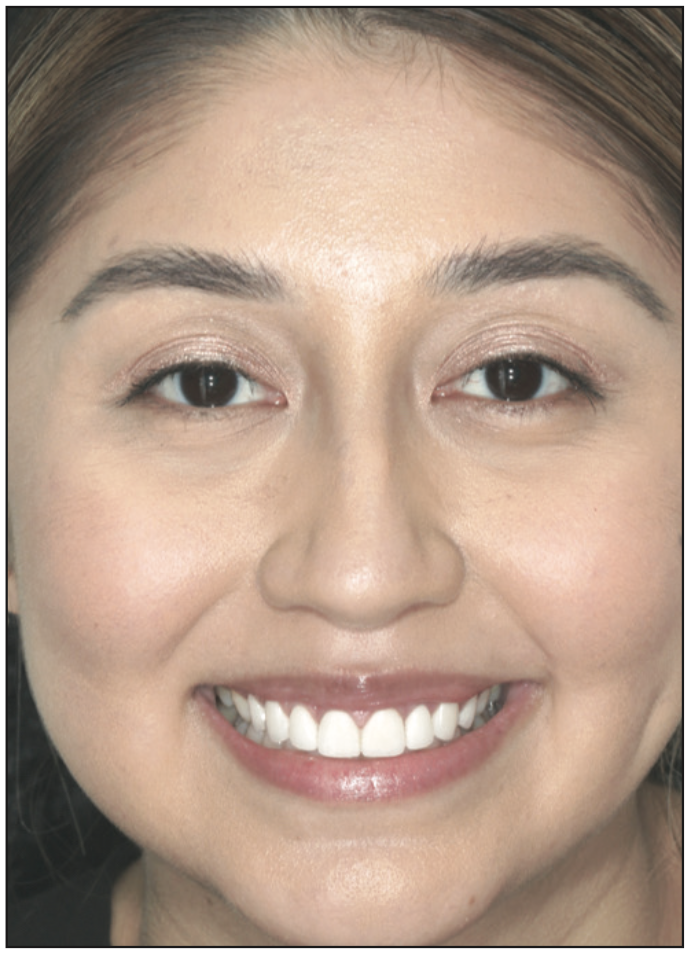
Visit 3: The insertion and cementation of crowns is done, or veneers are placed (Figures 18 to 20).

DISCUSSION
The 3D facial scanner RAYFace was used to capture a facial replica of each patient. The software was used to import all data sets for diagnostic evaluation of tooth position and analysis of facial planes using AI and software enhancements to create a “virtual patient” in the laboratory: a dental avatar. The accuracy seen at the delivery of the denture, smile makeover, and All-on-X treatments show promising results. More research with more clinicians using this software is necessary. This has become a useful daily diagnostic tool for replacing anterior and posterior teeth in our practice. The time and effort of the laboratory technician and dentist have dramatically decreased in all of these patient treatments. The educational model of our dental schools and educators must seek this technology to help our profession save time and money for our patients and simplify the procedures.
Additional uses for 3D facial scanners include, but are not limited to, full-arch provisional and final restorations, orthognathic planning treatments, orthodontics, and digital aligners, using the facial scan to complete the clinical check of the final movement. All of these existing digital programs and software can be used in conjunction with 3D facial scanner files to create the virtual patient called the “dental avatar.” This software includes an artificial intelligence component that can help both the clinician and laboratory technician in infinite ways and means to create the ideal tooth size, position, occlusion, and facial merging of data sets to enhance and expedite the final designs of many treatments in seconds.
CONCLUSION
The paradigm shift for using 3D facial scanning to enhance and deliver accurate tooth positions and occlusion shows much promise for our profession. Continued research and documented patient treatments will reveal the true value of this technology in the next few years. This is likely to become as important as radiographs for many treatments as a diagnostic tool, similar to CBCT in the past 10 years. The educational model of our dental schools and educators must seek this technology to help our profession save time and money for our patients, dental students, and dental community. We are hopeful that the adoption of this technology will be swift and diligent. The NSU College of Dental Medicine in Davie, Fla—the first to take this bold step—is currently using 3D facial scanning for undergraduate education, and is the first prosthodontics advanced education program to adopt this technology. We hope others will follow and begin to change the protocols of the past.
REFERENCES
1. Breitbarth A, Schardt T, Kind C, et al. Measurement accuracy and dependence on external influences of the iPhone X TrueDepth sensor. Photonics Educ Meas Sci. 2019;11144:27-33. doi:10.1117/12.2530544
2. Thurzo A, Strunga M, Havlínová R, et al. Smartphone-based facial scanning as a viable tool for facially driven orthodontics? Sensors (Basel). 2022;22(20):7752. doi:10.3390/s22207752
3. Bynum JH, Mirelez JA. 3D facial scanning: dual-arch fixed prostheses from diagnosis to delivery. Compend Contin Educ Dent. 2021;42(5):230–5.
4. Li J, Chen Z, Decker AM, et al. Trueness and precision of economical smartphone-based virtual facebow records. J Prosthodont. 2022;31(1):22–9. doi:10.1111/jopr.13366
5. Lee JD, Nguyen O, Lin Y-C, et al. Facial scanners in dentistry: an overview. Prosthesis. 2022;4(4):664-678. doi:10.3390/prosthesis4040053
6. Karatas OH, Toy E. Three-dimensional imaging techniques: A literature review. Eur J Dent. 2014;8(1):132–40. doi:10.4103/1305-7456.126269
7. Hong C, Choi K, Kachroo Y, et al. Evaluation of the 3dMDface system as a tool for soft tissue analysis. Orthod Craniofac Res. 2017;20 Suppl 1(Suppl 1):119–24. doi:10.1111/ocr.12178
8. Joda T, Brägger U, Gallucci G. Systematic literature review of digital three-dimensional superimposition techniques to create virtual dental patients. Int J Oral Maxillofac Implants. 2015;30(2):330–7. doi:10.11607/jomi.3852
ABOUT THE AUTHOR
Dr. Vafiadis received his dental degree and prosthodontic specialty training at the New York University (NYU) College of Dentistry. He is currently an associate professor of prosthodontics and the director of the Full-Mouth Rehabilitation CE course at the NYU College of Dentistry. He is an adjunct professor of prosthodontics at Nova Southeastern University College of Dental Medicine and is a Fellow of the American Academy of Esthetic Dentistry. He lectures nationally and internationally for the NYU Continuing Education department. Dr. Vafiadis has been published and has lectured on various topics, such as aesthetics, implant designs, computer restorations, ceramic materials, and occlusion. He is the founder of the New York Smile Institute in New York City. He can be reached at [email protected].
Disclosure: Dr Vafiadis is a consultant and KOL for RayAMERICA, Ritter Implants, and Clinician’s Choice.

