Imagine this scene: You are previewing tomorrow’s office treatment day and an endodontic patient is scheduled for 10:00 am. The tooth is the maxillary right first premolar. From your review of the number of probable canals, you know there is an 85% chance of 2 canals.1 Which canal should you treat first? Does it matter? How do you coordinate the cleaning, shaping, conefit, and obturation sequence between the 2 canals if there are only 2 canals? After all, 6% of maxillary first premolars do have 3 canals. What cleaning, shaping, and packing mechanics are used where and when?
As with any goal, the first step is to have a plan that will produce the outcome we want. While different clinicians may choose different plans, the one chosen should be the one that is the most efficient and effective. This article is designed to make you think about your own current plan and to evaluate if it is the proper one for the patient at 10:00 am on your schedule.
I always teach “cleaning and shaping” as simple in concept, although deft skill is required in execution. I break the cleaning and shaping into what I call the “3 Fs:” namely: “Find, Follow, and Finish.”2
|
|
||
|
CASE REPORT: TECHNIQUE
First F: “Finding” the Canals
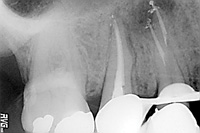
Step No. 1: Take 3 different horizontal accurate periapical radiographs to learn as much as possible about the root canal system anatomy (Figure 1). In addition, I always take a bite-wing in order to evaluate the chamber anatomy. After anesthesia, place a rubber dam so tooth No. 5 is centered in the rubber dam and the rubber dam is flossed mesial and distal to prevent saliva leakage into the access cavity and endodontic irrigant leakage into the oral cavity.
Step No. 2: If the tooth does not already have cuspal coverage, reduce occlusion similar to cuspal reduction for the eventually required cuspal protection. This step prevents fracture prior to accomplishing restorative treatment, prevents unnecessary pressure to the attachment apparatus during chewing after the endodontic visit, and gives the dentist right angle occlusal surface canal length control reference.
Step No. 3: Prepare the access cavity using an organized access kit (Figure 2). Use concept of “penetrate and flare” with No. 2 round bur and peel off chamber roof.3 Smooth walls with tapered diamond, ensuring straight line access to canal orifi while taking care not to remove any dentin wall structure than is absolutely needed to preserve dentin for a ferrule. Care should be taken not to gouge the walls. Orifi should be visible and dentinal triangles should be removed with Gates Glidden drills or a single combination Gates Glidden drills (such as the X-Gates found in the Access Kit [DENTSPLY]) (Figure 3).
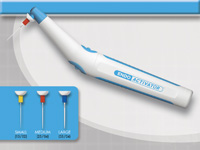
Step No. 4: Irrigate with full-strength sodium hypochlorite and agitate with the EndoActivator (DENTSPLY Tulsa) (Figure 4) in order to thoroughly clean the endodontic access chamber. Do not be in a hurry to “get your length of tooth,” as most dental students were taught during dental school. This is a time to slow down, explore, and experience any “booby traps” such as dense root canal system collagen, calcifications, necrotic debris, purulence, tortuous turns, or simply any anatomic information that you need to know. Eighty-five percent of the time, you will encounter 2 canals for tooth No. 5, as was the case with Nathan, our Read and Watch video series patient.
Second F: “Following” the Canals
 |
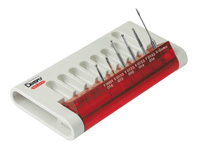 |
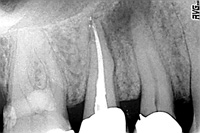
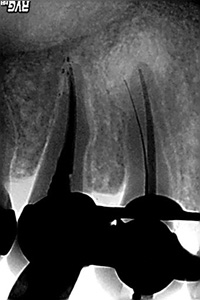
| Figure 1. Pretreatment Image of tooth No. 5. In order to accurately assess chamber and root canal system anatomy, always take a bite-wing and perpendicular, mesial, and distal periapical images. | Figure 2. Access Kit (DENTSPLY Tulsa Dental) is made of the essential endodontic burs. |
 |
 |
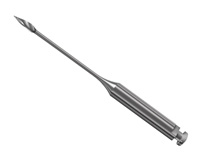
| Figure 3. “X” gates. This Gates Glidden bur efficiently combines Gates Glidden sizes Nos. 1 to 4. | Figure 4. Endo Acitvator (DENTSPLY Tulsa Dental). This simple device enhances cleaning of the root canal system and increases the number of portals of exit cleaned and sealed. |
 |
 |
|
Figure 5. This apex locater (Root ZX [J Morita]) can be directly applied to rotary files to determine the physiologic constriction. |
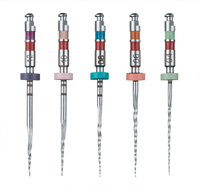
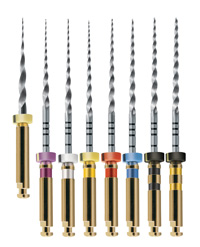
Figure 6. The full line of the ProTaper Rotary Universal files (DENTSPLY Tulsa Dental), from left to right, they are SX, S1, S2, F1, F2, F3, F4, F5. Usually only 2 shapers and 2 finishers are needed to create proper funnel shape preparations. |
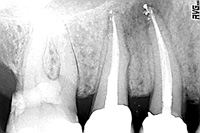
Step No. 5: Choose the easiest and straightest canal to clean and shape first. Typically, the palatal canal in the maxillary first premolar is the easiest and straightest. Precurve a No. 10 file with cotton pliers and set the rubber stop to the anticipated length. Gently, and yet intentionally, follow the No. 10 file to the anticipated reference, test with the Root ZX apex locator (J. Morita USA) (Figure 5) and verify with a radiograph. The goal is to “slip and slide” to the radiographic terminus (RT) (Figure 6). If the No. 10 file does not easily follow to the RT, recurve the file and follow again, since the curvature of the file and canal may not match. If the file does not follow deeper again, then restrictive dentin may be the cause. You have 2 choices: use a file with a narrower shaft such as a No. 8, or remove the restrictive dentin coronal to the No. 10 file depth with a rotary file such as the ProTaper S1 Shaper file and perhaps ProTaper S2 in the ProTaper technology (Figure 7). The ProTaper Shaping files (DENTSPLY Tulsa), because of their progressive taper, are extremely efficient and effective for removing restrictive dentin. This strategy is sometimes referred to in the endodontic literature as “early coronal enlargement.”
Step No. 6: Having followed the No. 10 file to the RT, which is validated by an accurate radiographic image and/or the apex locator, carefully reproduce the path by making small amplitude out and in vertical strokes of one mm. Continue until the No. 10 file can easily slip and slide in and out at greater and greater amplitudes up to greater than one-half of the canal length. This technique begins the “glide path” preparation. The glide path is defined as a smooth tunnel from orifice to the RT which is anatomically beyond the physiologic terminus (PT). This tunnel may be short, long, straight, curved, narrow, or wide. The key is that the walls are smooth in order to safely accept rotary shaping. A novice at glide path preparation may want to consider following the No. 10 file with a No. 15 file, which will create a slightly larger and safer glide path. Remember, however, that the No. 15 tip diameter is 50% wider than a No. 10 file. This jump in size increases the possibility of inadvertently producing a shelf that is undesirable with rotary since the rotary metallurgy does not easily flow over shelves. When using a No. 15 in a smooth No. 10 glide path, the safest and most efficient manual motion is the balanced force.
Third F: “Finishing” the Canals
 |
 |
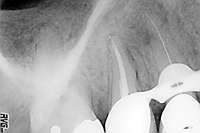
| Figure 7. Palatal first instrument to the radiographic terminus. It is important to have this radiographic evidence before continuing with cleaning and shaping. |
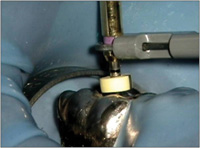
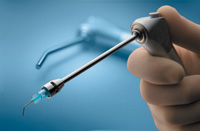
Figure 8. Stropko Endodontic Irrigator (Obtura/Spartan, Vista). This novel and essential endodontic delivery system easliy fits onto triplex syringe. Water or air can be safely and efficiently directed. |
 |
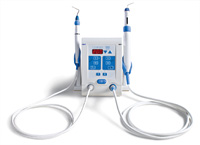 |
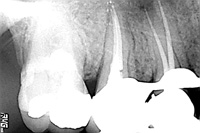
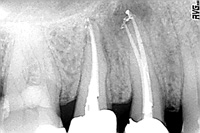
| Figure 9. Negative image of first instrument and conefit. By sequencing properly, 2 pieces of information can be ascertained in the same image. | Figure 10. Calamus Dual (DENTSPLY Tulsa Dental). This newly introduced device enables the dentist to both pack and backpack with the same unit. |
 |
 |
| Figure 11. Palatal and buccal conefit. The conefit film for all canals improves proper cone cutback. |
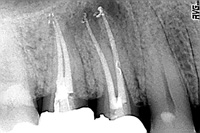
Figure 12. Downpack. This image is useful in measuring if more or deeper packing is required after the downpack. |
 |
 |
|
Figure 13. Backpack. Before access is repaired, the dentist should evaluate solid obturation. |
Figure 14. Perpendicular Pack film. |
 |
| Figure 15. Oblique Pack film. Multiple finish views allow dentist to “discover the anatomy.” |
Step No. 7: Once the glide path is finished for the palatal canal, then rotary files can connect the dots between the minimum apical diameter and the orifice, which should be no wider than one-third of the root, in order to preserve maximum ferrule. When rotary shaping is complete (ProTaper technology is demonstrated in the Read and Watch video on cleaning and shaping sequencing and strategy found at dentistrytoday.com), irrigate thoroughly with the Endodontic Irrigator (Stropko) (Figure 8), which efficiently and effectively flushes away debris with sterile water. Then the palatal conefit is made. (Again, you can review the Read and Watch video for details.) Follow the buccal canal with a No. 10 file again to the RT. Place the palatal gutta-percha cone and take a radiograph with the palatal cone and No. 10 file in the buccal (Figure 9). If perfect, remove the palatal cone and place it safely onto a 2×2 gauze. Clean and shape the buccal canal, fit the cone, and then save it on a 2×2 gauze separate from the palatal cone. Then, check the fit of both palatal and buccal gutta-percha cones. Cut off the coronal surplus gutta-percha for reference reproduction and also make a plateau for cotton pliers to follow the gutta-percha cone to place with sealer when packing. Fit gutta-percha cone one-half to one millimeter short of the RT using the apex locator for additional guidance. In straighter, shorter, and wider canals, fit the gutta-percha cone farther from the RT or physiologic terminus if the apex locator identifies the foraminal constriction is shorter than you thought.
In more curved, longer, and narrower canals, fit the gutta-percha cone closer to the RT since apical movement and molding in this type of canal is less than in straighter, shorter, and wider canals. Regarding irrigation, use full-strength sodium hypochlorite while making the glide path. The sodium hypochlorite removes detached pulpal tissue, necrotic debris, biofilm, and kills bacteria. Change to 17% EDTA while shaping with rotary in order to remove the smear layer and facilitate carving dentin due to chelator. Be sure to use the EndoActivator as directed (refer to the Read and Watch video) in order to achieve 3-dimensional (3-D) cleaning.4
In maxillary molars, it is important to locate all orifi before proceeding with cleaning and shaping any particular canal. Some clinicians believe in the “divide and conquer” strategy of treating the easiest canal to the most difficult. The downside of this approach is, first, a narrow canal cannot actually benefit from the chamber irrigation until some of the restrictive dentin is removed, and second, leaving the more challenging canal to the end is typically a time when most dentists (and patients and dental assistants) are often running lower on energy. A strategic approach is to follow these canals (typically the mesionpalatal for maxillary molars) early on so that the cleaning and shaping irrigants truly facilitate cleaning these narrower and more tortuous canals.
Some master endodontic clinicians actually intentionally treat the most difficult canals first. Personally, I usually begin the glide path for all canals before cleaning and shaping any canal in particular. I achieve knowledge about the anatomy, gain confidence because I have evidence that I can follow all the canals, and I immediately adjust my approach to achieve the early glide path when restrictive dentin, for example, is present. I begin to plan my sequence and strategy so the endodontic mechanics are efficient, effective, and intentional.
Step No. 8: Flood the root canal system using maximum-proof alcohol and agitate with EndoActivator. Place paper points, then air dry with Stropko Irrigator. Prefit Calamus pluggers as demonstrated in Read and Watch video. Thinly coat palatal cone with canal sealer (Kerr Pulp Canal Sealer [Kerr]) and follow the cone to place. Remove surplus at orifice (Calamus Dual Obturation System in the Read and Watch video for details of SingleWave and MultiWave vertical compacton of warm gutta-percha technique) (Figure 10). After palatal canal surplus is removed, follow buccal gutta-percha cone to place in case there is cross-bridging between the palatal and buccal systems, in which case packing the palatal before buccal cone placement could result in gutta-percha and sealer flowing into the buccal network and prevent placement of the buccal cone (Figure 11). Using “Dual” cutaway buccal gutta-percha above the buccal orifice, pack palatal then buccal and take “downpack” film (Figure 12). Back pack using Calamus Dual (DENTSPLY Tulsa), create coronal seal to prevent future possible coronal microleakage, and take final finishing Pack films (Figures 13 to 15). If carrier-based obturation is desired, use canal size verifiers or use the last ProTaper rotary file that cut apical funnel taper shape as the verifier. Set the ProTaper Carrier one mm (plus or minus, depending on canal size and length as noted above), heat obturator and follow to place for 3-D seal.
References
- West J. Endodontic predictability—“Restore or remove: how do I choose?” In: Cohen M, ed. Interdisciplinary Treatment Planning: Principles, Design, Implementation. Hanover Park, Ill: Quintessence Publishing; 2008:123-164.
- West J. Endodontic update 2006. J Esthet Restor Dent. 2006;18:280-300.
- Levin HJ. Access cavities. Dent Clin North Am. 1967;Nov:701-710.
- Ruddle C. Hydrodynamic disinfection: tsunami endodontics. Dent Today. 2007;26:110-117.
Dr. West is the founder and director of the Center for Endodontics and continues to be recognized as one of the premier educators in clinical and interdisciplinary endodontics. He is president of the American Academy of Microscope Enhanced Dentistry (AMED) and past president of the American Academy of Aesthetic Dentistry (AAED). He received his DDS from the University of Washington in 1971, where he is affiliate associate professor. He then received his MSD in endodontics at Boston University Henry M. Goldman School of Dental Medicine in 1975 where he is a clinical instructor. Dr. West has presented more than 400 days of continuing education internationally while maintaining a private practice in Tacoma, Wash. He coauthored Obturation of the Radicular Space with Dr. John Ingle in 1994 and 2002 editions of Endodontics and was senior author of Cleaning and Shaping the Root Canal System in Cohen and Burns’ 1994 and 1998 Pathways of the Pulp. Dr. West is a thought leader for Kodak Digital Dental Systems and serves on the editorial advisory boards of: the Journal of Advanced Esthetics and Interdisciplinary Dentistry, the Journal of Esthetic and Restorative Dentistry, Practical Procedures and Aesthetic Dentistry, and the Journal of Microscope Enhanced Dentistry. He can be reached at (800) 900-7668 or via e-mail at johnwest@centerforendodontics.com.
Disclosure: Dr. West is a co-developer of ProTaper and Calamus endodontic technology, DENTSPLY Tulsa Dental.