


Your capacity to produce results that are visually beautiful rests on your ability to see the things that aren’t perfect. Having the confidence and talent to successfully treat the patient depends on that ability.
No matter how much your patient loves what you accomplish, no result will ever be perfect to the practitioner who sees every imperfection. Regardless, our goal is to do the best we can within our ability on all cases, including the ones where near perfection is not possible. As our eye becomes better, so too do our results.
When it comes to color, you can look at your results and the results of others and learn to see differences in hue, chroma, and value. Reproducing those dimensions of color using various composite materials takes practice on patients. There is a learning curve when placing and layering composites, and every time I switch from one brand to another, there is another learning curve because their handling and color properties change.
Unfortunately, looking at photos of results does not teach contour. Learning to develop proper contour is essential for successful chairside bonds. Aesthetically, nothing is more challenging to perform than a complex direct bonding case, yet nothing you can do aesthetically offers you more opportunity to learn and become a more accomplished and confident aesthetic dentist.
The Role of Planning
Taking the time to plan and wax your own cases is the shortcut to success (Figure 1). It’s not glamorous, and, for most, it’s not fun. But waxing up cases teaches you to see detail and evaluate space and proportion in a way that looking at other people’s wax-ups never can. Simply put, it makes you better by training you to see. Taking your wax efforts from the lab and recreating them as beautiful composite restorations in the mouth provides an extraordinary feeling of satisfaction and accomplishment (Figure 2).
I take study models and wax up any case in which I plan to change the size, position, or occlusion of any anterior tooth. This is true for all cases, including the ceramic ones. However, I give my greatest scrutiny and care to cases that are likely to be chairside bonds for the simple reason that the material has less strength and is less forgiving than bonded ceramic restorations.
Notwithstanding the many concerns I may have about the aesthetics of any case, the first question I always ask is if the occlusion will allow it to work. The second question is what I can do to increase the likelihood of success.
I always look at the lower and upper incisal edges on the study models first. I need to get a feel about where and how aggressively patients move their mandible.
As our patients age and their incisal edges wear away, the envelope of function becomes less restrictive. The patient’s muscles may get used to the new anterior movement. I have found that reconstructing an older person with the same incisal edge position that they had two, three, or four decades earlier can be a recipe for trouble, especially when lengthening a tooth with new composite incisal edges rather than ceramic ones.
Generally, the incisal third of most central incisors curves back. I am much more likely to replace that same incisal edge position in ceramic than in composite, especially if the patient has had moderate to severe wear over many years.
Every patient is different. But if I’m lengthening an older tooth with composite, I try to move the incisal edge a little forward. How much? I generally eliminate the curve back toward the palatal if it doesn’t encroach upon the wet-dry line of the lower lip and have less unsupported composite than I would consider in ceramic.
When patients tell me that it feels like it’s in the way, I take them at their word. Sometimes, it just isn’t reasonable to lengthe
 |
 |
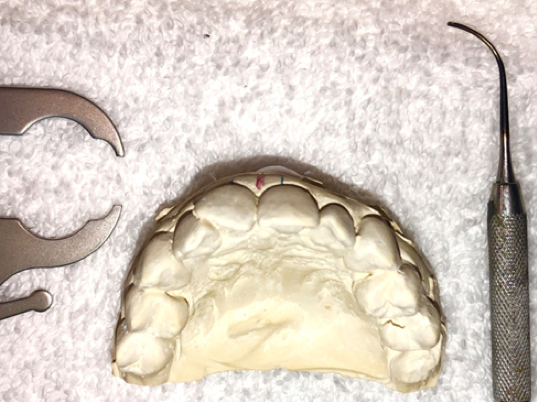
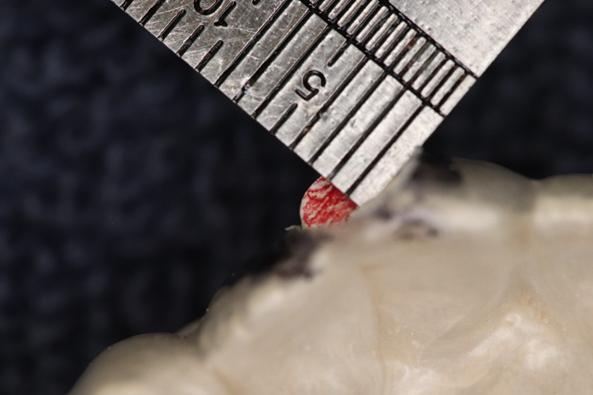
| Figure 2. Stone models of the teeth that show the bite and give you the opportunity to see and measure everything are a must. | Figure 3. Margrit had severe caries, large broken-down composites, and large areas of wet contaminated dentin between the labial and palatal plates of enamel. |
 |
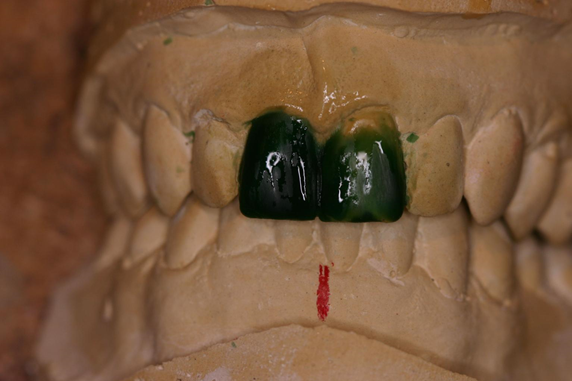 |
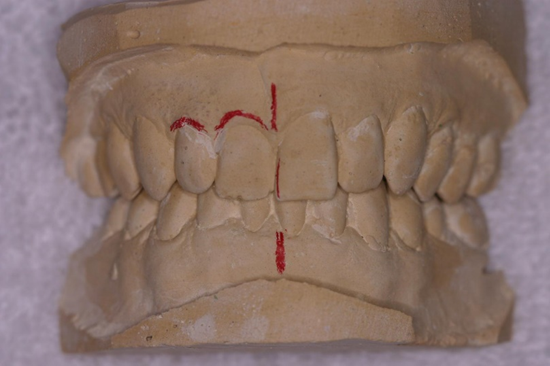
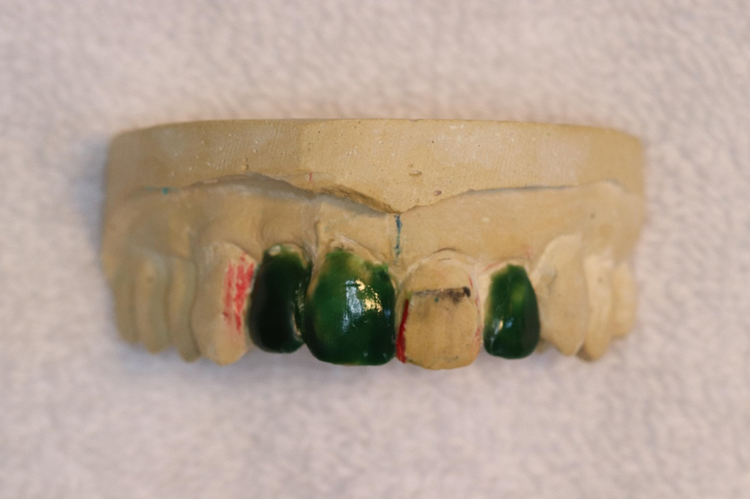
| Figure 4. Measuring the width of the centrals, it was clear that reducing the overlap between the central incisors would create a much narrower looking left central. | Figure 5. In the wax-up, I tried to minimize the disparity between the tooth widths by moving the height of contour on the left central a little further from the midline. |
 |
 |
| Figure 6. I treated this case as efficiently as possible. I set aside three hours to treat it, and I needed every minute. I hadn’t layered at all except the gingival of No. 9 to hide the gray color. You do not make money treating a case like this. The value is in the skills and confidence you develop in the process. The patient’s reaction after is the real reward. | Figure 7. Generally, composite bonding reduces the need to sacrifice tooth structure. But sometimes bonding along with aggressive tooth reduction allows us to perform treatment that cannot be attempted any other way. Planning is the key. |
n a badly worn maxillary incisor with composite and expect it to hold up in the long term. But bonding an incisal edge is a wonderful diagnostic tool that can help you choose a material and location for a more permanent restoration.
Much of what we do in the way of direct anterior bonding can be done with little or no anesthesia. It is reasonable to get feedback from the patient.
Case #1: Margrit
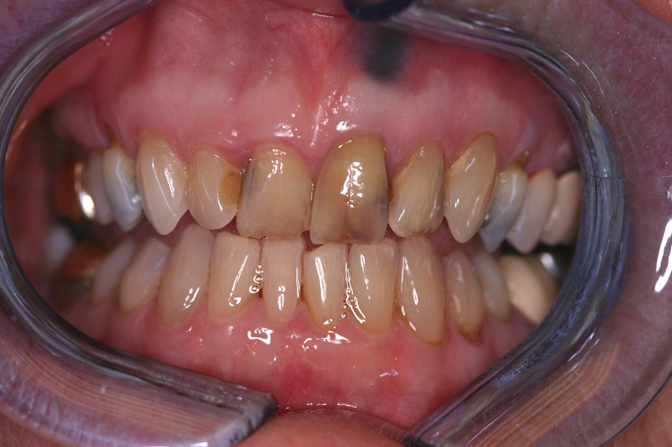
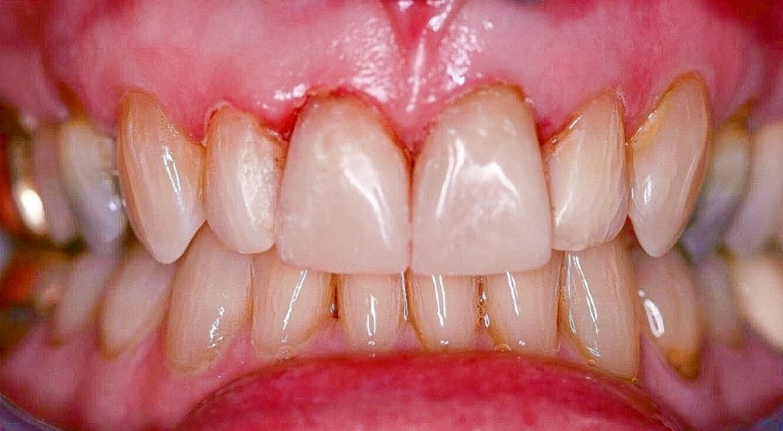
Margrit, who is 85 years old, came to me under the assumption that there was little that could be done about her front teeth except remove them and get a partial denture. The photos reveal a host of problems (Figure 3). All four maxillary incisors had extensive caries and failing old composites that extended subgingivally. The left central had a decades old silver point endodontic treatment that was stable but had stained both the tooth and the bone.
The discolored left central overlapped the right central by about 1 mm, and the right lateral overlapped the right central by about 0.5 mm. The gingival heights were dramatically different.
Yet when you looked at the incisal edges of all the anterior teeth, there was virtually no wear except on the edge of the right central, which had been pushed palatally.
Obviously, Margrit’s occlusion was not very stressful to her very fragile teeth. Once the labial surface of the right central was built out labially, there was no reason to believe extensive bonds wouldn’t be successful. The only question was how to distribute the space and what contour worked best to our advantage.
The symmetry of the central incisors is paramount for the success of any case. Creating two symmetrical central incisors in the mouth, by hand, using composite material in a reasonable amount of time takes practice. In cases where the centrals cannot be perfectly symmetrical, they need to appear as close to it as possible.
When the existing teeth to be bonded are not in alignment, developing the appearance of symmetry can best be achieved by experimenting with wax in the lab. What we see of the patient’s anterior teeth by looking at them from our dental chair gives us just a fraction of the information compared to observing study models from many different angles (Figure 4).
The opportunity to remove stone and experiment with wax leads to a much greater understanding of position, size, and angles. Seeing these things and having to deal with them in wax makes treatment in the mouth far more efficient and, therefore, less time consuming.
Even cases that seem relatively straightforward, such as closing a diastema between central incisors, can be surprisingly difficult if the teeth are a little out of alignment, and they usually are. Taking a few minutes to wax these cases lets you see possible problems. To those who feel it’s simpler and quicker to just treat the patient and skip the planning, my advice would be to eat a good breakfast.
 |
 |
| Figure 8. I try to see and consider everything. The red areas required very substantial tooth reduction. | Figure 9. The wax-up of the right central was waxed to resemble the left after reduction on the stone model. A suck-down shell was made from this wax-up to produce a reduction coping to be used in the mouth. |
 |
 |
| Figure 10. With the reduction coping in place, you could see the extensive reduction necessary near the middle third of the tooth. | Figure 11. The final wax-up showed the likely distribution of space with the longer right lateral incisor. |
 |
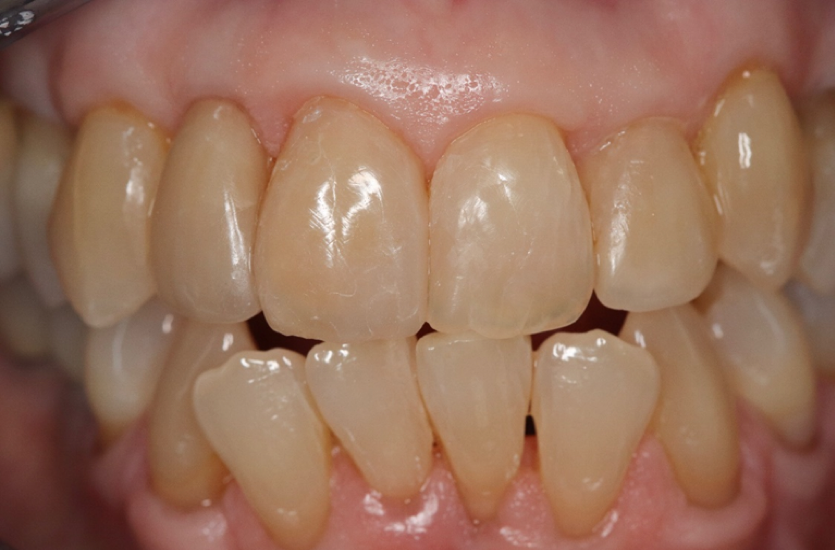 |
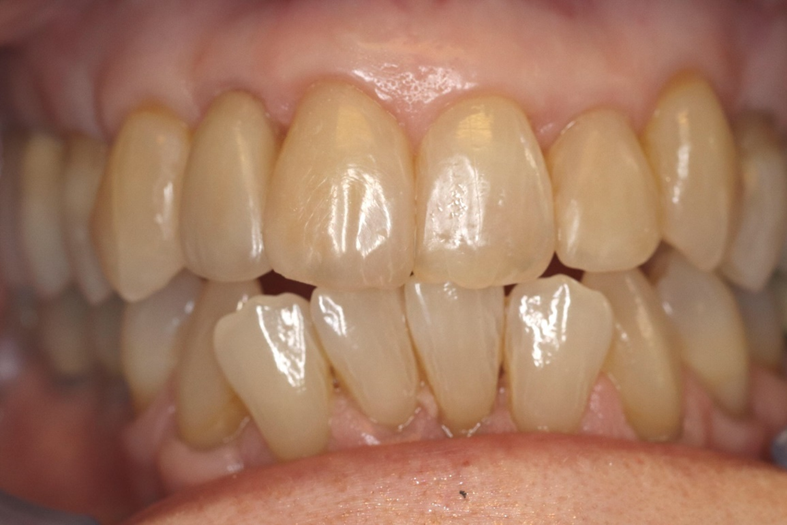
| Figure 12. The final bonds on teeth Nos. 8 and 10 and the porcelain veneer on No. 7 show that the mesial reduction on the left central eliminated much of the mesial lobe, making the two centrals seem less symmetrical. | Figure 13. The post-op photo was taken at one year. The patient allowed me to restore the mesial lobe on the left lateral to improve the overall symmetry. |
I prefer to start all cases of crowding and spacing with consideration of the midline. At first glance, measuring the width of the centrals, the space for tooth No. 8 was much narrower than No. 9 by 1.5 mm due to the overlap of No. 7 and No. 9. To establish a more labially placed No. 8 and straighten the midline, I recontoured and reduced the mesial overlap and contact area of No. 9 on the stone model. This immediately made teeth No. 8 and No. 9 roughly the same width. The difference in gingival heights, however, made tooth No. 9 look much narrower.
In addition, we needed to remove the overlap of the right lateral over the right central. This also increased the visual disparity and made tooth No. 8 nearly 1 mm wider than No. 9. I could easily increase the gingival height somewhat above No. 8. But it was clear I would need to increase the distal width of the left central if I wanted the taller tooth to seem symmetrical to the shorter right central.
I have no problem sacrificing the width of any lateral incisor to help make centrals look symmetrical. In this case, I had taken about 0.5 mm tooth of structure away from the mesial of the left lateral to increase the width of the left central incisor.
My personal preference when contouring teeth is to try to mimic the shape that nature gave the original teeth I’m treating. But in cases where I’m shaping teeth that aren’t going to be the same size, I try to use shape to help control their appearance.
Looking down from the incisal edge of Margrit’s teeth prior to treatment, I observed that the labial surfaces were slightly convex. I did not duplicate that convexity in my wax-up. I waxed the two central incisors with labial surfaces, which were not convex, and I tried to create mesial, distal, and gingival heights of contour that help define the width and length visually with reflected light. Moving those mesial and distal heights of contour toward or away from the contacts could help change the visual appearance of the width of the teeth (Figure 5).
The direct chairside bonding of teeth Nos. 7 through 10 was a three-hour treatment. Removing the caries and discolored gingival tooth structure of tooth No. 9 produced a very gray gingival area near the silver point. The gingival of No. 9 was covered with a thin layer of white opaque composite, which then received a little ochre tint to recreate the more brownish hue at the gingival third. Tokuyama Dental’s Estelite Omega dentin shade A2 was then used throughout. The dark underlying tooth structure created enough color variation.
Case #2: Nancy
I asked my patient Nancy (Figures 6 and 7) if she had ever considered orthodontic treatment. She said that several of her previous dentists had suggested it and she was sorry she hadn’t done it at an earlier age. At her current age of 74, she wasn’t about to start. She commented that she hated her smile and rarely did smile because her teeth were so crooked.
I told her that there might be something I could do by grinding some tooth away and bonding tooth colored material, but I wasn’t sure unless I could make models of her teeth to study. She was up for anything.
Radiographs of her teeth indicated a normal vital pulp canal that, over the years, had receded well into the gingival third of her tooth. The width of Nancy’s central incisors was 9 mm. At the level of her pulp chamber, the width was about 7 mm.
I took PVS impressions and made several copies of her maxillary teeth. I hoped to do chairside bonds on the right central incisor and the left lateral incisor. I would treat the recessed right lateral with a porcelain veneer. I hoped to avoid treatment of the left central incisor altogether.
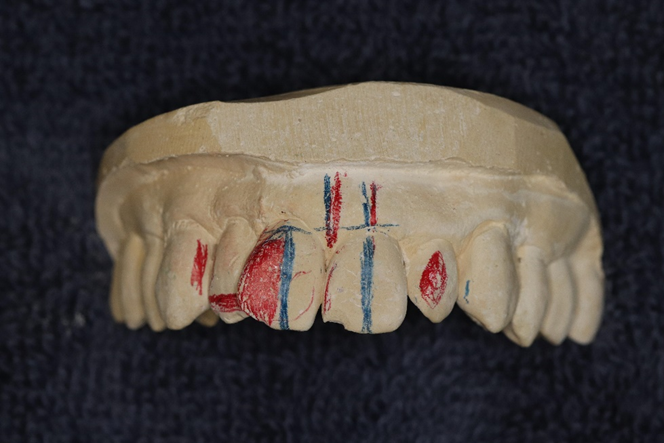
Nancy had very little overbite, so the occlusion was not a factor. Clearly, there needed to be very aggressive reduction on the right central, but my first consideration was still the midline. In this case, there was a small tilt toward the right central that occurred due to the rotation of that tooth. My first step was to make a tentative plan marking the areas I obviously needed to reduce in red and straightening the midline (Figures 7 and 8).
This deviation can be taken care of with some interproximal reduction on the mesial surface of the left central incisor, which remained in the enamel. The reduction straightened the midline, narrowed tooth No. 9 a small amount, and made the treatment of the right central more ideal.
I next removed all the stone I needed to reduce to be able to wax a labial surface on the right central, which was not more prominent and roughly matched the contour of the left central incisor. I realized that I couldn’t change the gingival contour of the right central due to the rotation. Therefore, the two centrals could never be the same at the gingival.
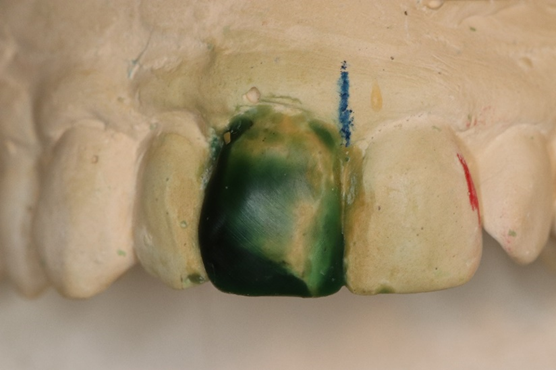
Once I had my wax-up of No. 8, I took an impression to create a stone model of it. Using .020 plastic, I made a vacuum suck-down, which I then used to make a reduction coping to be used in the mouth (Figure 9).
It was apparent looking at the coping on the right central that I needed to remove the entire distal corner of the tooth at the incisal third and reduce about 2.5 mm in the middle third of the tooth. This is not something one could do safely on a young person, but on this patient, it would pose little problem. At the level of the nerve canal, the gingival third, the reduction was about 1 mm.
With my reduction coping, I could plan and wax the future bond on the right central incisor. The reduction on the stone model was extensive but did not yield much more space for the right lateral veneer. I also planned to take a little enamel off the mesial of the right cuspid. The veneer on the right lateral would be narrower than the bond on the left lateral. I planned no treatment for the left central beyond the reduction of the mesial to line up the midline.
Once my gross reduction was completed on tooth No. 8, using the reduction coping, I made additional 0.5-mm depth cuts over the entire surface to create room for the final layer of composite. I then increased the reduction in the middle third of the right central to about 3 mm. The reduction on the labial of the left lateral was much less and mostly at the incisal half of the tooth.
My models and wax-ups were roadmaps of the treatment (Figures 10 and 11). I didn’t concern myself with nice models. It was about information. The areas marked in red, the mesial of No. 6 and the mesial of No. 9, were areas where I removed stone. They were areas I reduced in the mouth. The right lateral veneer ended up looking longer and narrower than the left lateral. My wax-up gave me the general contour and symmetry that I hoped to achieve. It also showed where I had to compromise with contour, which was less than ideal.
The planning process gave me the opportunity to become extraordinarily familiar with the contour of these teeth. Shaping them in the mouth became far easier, and the time I spent “playing” with this case in my lab gave me my best shot of having something nice to show Nancy after several hours in the dental chair. There was much to consider in the planning, though, and I still overlooked something during treatment.
Some of these models were necessary in the operatory during treatment. There was a lot to remember, and often these cases are treated weeks or months after the planning.
I showed Nancy a nicer model taken of the final wax-up. I also told her of all the possible risks and limitations. She was excited to go ahead with treatment.
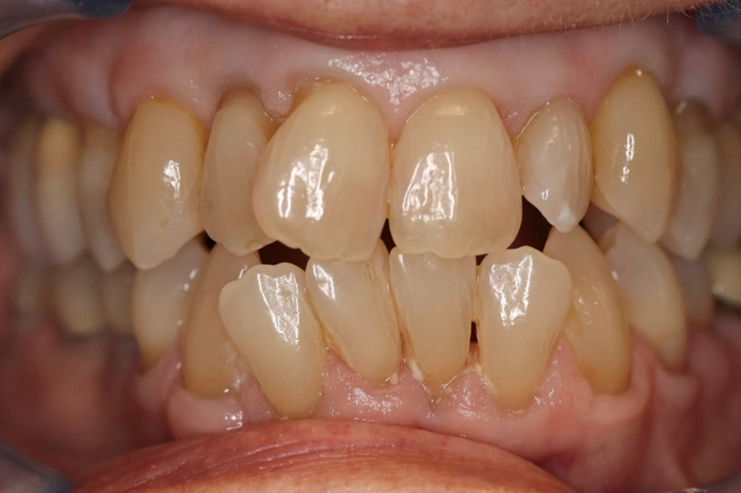
Figure 12 is a dry photo of the final bonds and veneer. It was clear to me that my initial decision to avoid any treatment of tooth No. 9 was a mistake. The small amount of IPR on the mesial surface reduced enough of the mesial lobe to make the two central incisors a little asymmetrical. After evaluating the after photos, I had the patient return to the office to place a small bond on the mesial lobe of the left central incisor.
The dry photo at 12 months post-op (Figure 13) showed a small amount of wear and tear on both the bonds as well as the layered lithium disilicate veneer. The very small addition of composite on the mesial of the left central added greatly to the overall symmetry.
Conclusion
Certainly, these cases are outliers. Most of what we see and treat is not so dramatic. But all cases present challenges that become much easier to handle if we recognize them prior to treatment.
I feel strongly that the office lab is the place to face those aesthetic challenges concerning contour. Even little things like considering the thickness of the wax you have contoured gives you knowledge that helps guide you in the selection of colors when layering. If you can do it in the lab, you can likely do it in the mouth. It may not seem like much of a shortcut, but it is.
Dr. Harmetzpractices general and cosmetic dentistry in San Diego. He is a graduate of the UCLA School of Dentistry and has been in solo practice for 47 years. He can be reached at rharmetz@gmail.com.
Related Articles
Easier and Faster Aesthetic Bonding: The Keys to Success
Correction of Extremely Dark Anterior Teeth
Optimizing a Smile Enhancement: Combining Alignment, Composite Bonding, and Ceramic Resurfacing


