
The initial premise for endodontic treatment seems to be quite simple: Clean out the canals; then fill and seal the space inside the root where the tissue had been. As anyone who has done root canal therapy on a molar can tell you, it is not a simple task to accomplish these goals. This is mainly because the instruments, materials, and devices we currently use are far from the ideal that we would like them to be. This requires the clinician to make up the difference in efficacy and ease of use by being a highly skilled expert in the use of these less-than-ideal materials and devices to achieve the desired end result. Since there is no ideal way to use endodontic instruments and materials, their use becomes open to interpretation and opinion. Demystifying and standardizing the endodontic procedure by taking advantage of the scientific literature will make it much easier for the dentist to achieve the end goals.
Finding Canals Without Perforating the Chamber
After anesthesia, the first difficulty encountered is accessing the pulp chamber and finding the canals. Know what you are up against before picking up the handpiece. Look at the radiograph, then ask yourself 3 quick questions:
1. How big (high) is the chamber?
2. Can I see all the canals and follow them down to the apex?
3. How many roots can I see?
 |
 |
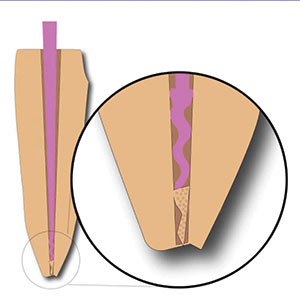
| Figure 1. Place the non-end-cutting diamond on the chamber floor. | Figure 2. Diamond pushing the axial wall out. |
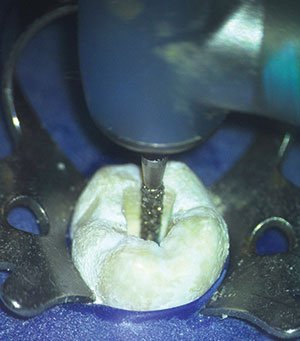
If the chamber is normal height (approximately 2.0 mm), then you will have no problem feeling the drop of the round bur into the pulp chamber. If the chamber is calcified to some extent and/or less than 1.0 mm, you will not get the tactile feel of the bur going through the roof and into the chamber. Starting in 2004, Deutsch et al1-4 authored a series of articles that showed that the distance from the cusp tip of both maxillary and mandibular molars and furcated bicuspids to the ceiling of the chamber is approximately 6.5 mm in a broad sample of people. Seven millimeters will put you in the middle of the pulp chamber or at the level of the floor. You will never perforate into the furcation at a depth of 7.0 mm. This is the first and only quantitative measure we have for gaining access without complications. If the chamber is calcified, the 7.0 mm will put you where the floor of the chamber used to be. This will make it much easier to find the canals at the proper level in the chamber. After you make the gross access outline with a round bur, switch to a non-end-cutting, high-speed, cylindrical, extracoarse diamond bur. The diamond bur is placed on the floor of the chamber and, because it does not have diamond grit on the apical end, it will not damage the floor of the chamber (Figure 1). Once on the floor, the axial walls are pushed back to expose the canal orifices (Figure 2). The bur will create smooth axial walls and allow more light into the access opening, making it easier to see and find the canals.
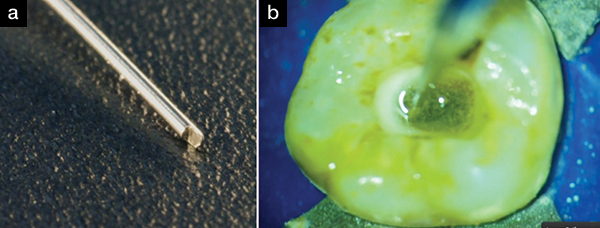
 |
 |
| Figure 3. How wide should you open the apex? | Figure 4. Place hypochlorite in the canal drop-by-drop only. |
 |
| Figure 5. Always keep the access cavity flooded with irrigating solution. |
How to Get a Small-Diameter Instrument to Measurement
Once the canals are found, they must be measured. Whether you are taking a radiograph or using an apex locator (or both), the endodontic instrument must be moved down the canal to approximately where you think the apex is. This is oftentimes a difficult task, but there are several techniques you can use to make this easier. Many times, when the canals are thin or narrow, the coronal end of the canal is thinner than the shaft of the endodontic instrument. As the instrument progresses into the canal, it becomes harder and harder to twist or push the instrument to the apex because the instrument is thicker than the canal. The first technique to help the clinician in this situation is to widen the coronal 3.0 to 5.0 mm of the canal with a Gates Glidden drill. These drills have a nipple at the apical end; thus, they are non-end-cutting, which means they will not perforate apically. This is a version of the crown down technique. The widened coronal aspect of the canal will let the endodontic instrument go down the canal more easily. Secondly, always keep the canal wet when you put an instrument into the canal. Lubrication will reduce friction and allow the instrument to move in the canal more freely. I use 17% EDTA in water (EDTA Plus [Essential Dental Systems; EDS]). Thirdly, always use flat-sided reamers (Safesiders [EDS]) when negotiating to the apex. The cutting edges of reamers are oriented in a more vertical direction than files. Consequently, reamers bind less in the canal and make it much easier to get the instrument to the working length.
 |
| Figure 6. (a) The No. 6 PUI tip (Essential Dental Systems [EDS]). This tip has a paddle shape for extra cavitation of the hypochlorite or any irrigant. (b) The tip down the distal canal, showing the cavitating hypochlorite solution (white bubbles). |
 |
| Figure 7. Back to the filling technique I used 40 years ago. |
 |
 |
| Figure 8. Gently pushing the last instrument to the working length. If it slides easily in place, so will the gutta-percha. | Figure 9. Taper of the canal prep versus the taper of the gutta-percha. |
Obturating Short of the Radiographic Apex to Increase Success
One technique that will definitely increase the success rate is to use a newer generation apex locator to find the working length of
the canals (as compared to using only radiographs). A radiograph can only show you where the radiographic apex is and not the anatomic apex. Research by ElAyouti et al5 showed that the anatomic apex was short of the radiographic apex in a whopping 88% of the canals! They said, “root fillings extending to the radiographic apex are actually over fillings in most of the canals.”5 There are many published articles that show that overfilled canals (canals filled past the anatomic apex) are less successful than canals filled to the anatomic apex.6-12 The anatomic apex is usually zero to 2.0 mm short of the radiographic apex. The only instrument that tells us where the anatomic apex is located is the apex locator. Therefore, for a higher success rate and less postoperative complications/pain, use a newer generation apex locator (MedicNRG [MedicNRG USA] and Root ZX II [J. Morita USA]) to determine the working length and where to end the instrumentation and obturation of the canal. There is a learning curve to using an apex locator. The clinician should expect to take 3 to 4 months of clinical use to become proficient in its use.
Reciprocating Motion Reduces Instrument Breakage
Once you have the working length established, it is time to clean and shape the canal. There are 2 numbers that are important for you to determine: (1) what apical diameter you will want to shape the apex to and (2) what taper you would like in the canal. Currently, the literature suggests widening the apex to at least a No. 30 or No. 35 endodontic instrument (Figure 3).5,13 This size enlargement will generally enlarge the canal past its normal anatomic dimension, consequently removing most of the tissue in the canal. Enlarging the taper to a .04 taper will also help remove most of the tissue in the coronal half of the canal and configure the canal to a shape that is more easily obturated. Some systems will be faster than others, some will break less than others, and you will like the tactile feel of some better than others. I use both the SafeSiders and Tango-Endo (EDS) systems. They are both reciprocating and quick, with much less-to-no breakage. I use the SafeSiders from Nos. 08 to 20 in the reciprocating handpiece to prepare the glide path. Then I use a No. 2 Gates Glidden drill to widen the canal to start the taper. I take the No. 2 Gates Glidden about 3.0 to 5.0 mm into the canal. Then I use the Tango-Endo instruments: first a No. 30/02 stainless steel reciprocating shaper to the working length, and to finish, I use the No. 30/.04 NiTi in reciprocation to the working length. I have now prepared my canal to a No. 30 at the apex with a .04 taper. The Tango-Endo instruments are reamers and cut the canal rather quickly. They cut when the instrument in the reciprocating handpiece is moved up and down in a “pecking” motion. So if you are 1.0 to 2.0 mm short of the apex, do not push the instrument; rather, use it in an up and down pecking motion, and it will quickly (within several “pecks”) get to the apex.
 |
 |
| Figure 10. The unaltered gutta-percha point from the box is placed in the canal until it cannot go any further. It will stop on its own. | Figure 11. The point is measured. It is approximately 1.5 mm. |
 |
 |
| Figure 12. Clip the point at the measurement mark. | Figure 13. Cut the gutta-percha by 1.5 mm so it corresponds to the measurement. |
 |
 |
| Figure 14. Squiggly gutta-percha point. Debris is clogging the apex and preventing the gutta-percha point from fully seating. | Figure 15. Mesiodisto (left) and buccolingual (right) views of the squiggly fitted gutta-percha point. |
Irrigation: The Key to the Debris Following Instrumentation
Unfortunately, no matter what instrumentation system you use, 35% to 50% of the debris will never be touched and will remain in the canal.14,15 So how do we get it out? Irrigation is the answer. You cannot over irrigate! The problem is there is no ideal irrigant, nor is it easy to get the irrigant into the canal, nor easy to get it out. We would like the irrigant to dissolve all the tissue that the endodontic instruments do not reach; the irrigant should kill all the bacteria without destroying the patient’s cells; and lastly, the irrigant should act as a lubricant during instrumentation. The irrigant should do all of this without having any side effects or potential to harm the patient. No one product to date can do all these things. Therefore, we must use a combination of irrigants and techniques to achieve our end goals.
The only substance that we currently use that can dissolve tissue is sodium hypochlorite. Straight out of the bottle, it is a 6% solution, and, at this concentration, it kills many bacterial species but not all of them. The longer it is in contact with the bacteria, the more of them it will kill. It also works better if it is heated. Vista Dental Products makes a syringe heater that will heat the sodium hypochlorite to about 120°F. (This is ideally warm for the job, but not overly hot.) If the solution is expressed past the apex under pressure, it can cause some serious complications. Therefore, when using sodium hypochlorite, place it in the canal drop-by-drop and fill-up the access opening with it during instrumentation (Figures 4 and 5). Do not lean on the plunger and express it in a stream—this is very dangerous! It can easily lead to streaming sodium hypochlorite beyond the apex.
I try to standardize my procedure as much as possible. This makes it easy for my assistant to know where we are in the procedure and what comes next. Therefore, while I am creating the glide path with reciprocating SafeSider stainless steel instruments, I use hypochlorite as the irrigant. When I switch to finishing the instrumentation of the canal with the Tango-Endo reciprocating instruments, I use Irritrol (EDS) as the irrigant. Although Irritrol will not dissolve tissue, it will remove the smear layer and disinfect the canal very quickly. It is a combination of EDTA and chlorhexidine, with other surfactants added for efficacy. Once the canal has been disinfected and completely instrumented, I fill the access opening with sodium hypochlorite and place a few drops of the sodium hypochlorite solution down the canal. Next, I use a passive ultrasonic irrigation (PUI) tip.16-23 The technique is to passively place an ultrasonic tip down the canal, and then apply the ultrasonic energy to the hypochlorite in the canal for approximately 30 seconds per canal. I use the No. 6 PUI tip (EDS) for this purpose. It is shaped like a paddle at its end, and i
t aggressively agitates the irrigating solution in the canal (Figure 6). This causes cavitation and bubbling in the irrigant that kills bacteria and cleans the canal exceedingly well. I especially like this technique for nonvital cases.
One other tip about irrigation is to stop using so many paper points. Several companies sell small endo tips that are hooked up to the high-speed suction. Place the tip in the access opening and suction; most of the canals are dry of irrigating solution within seconds.
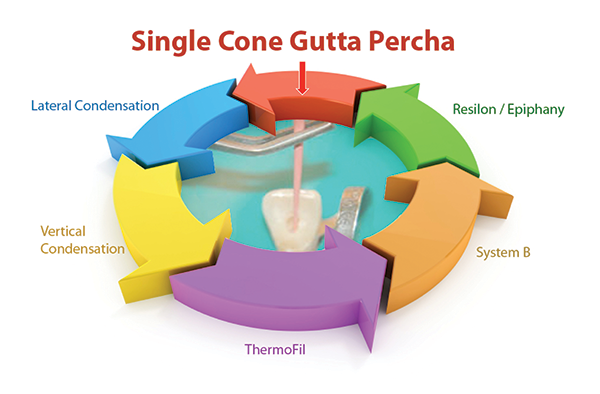
All Obturation Techniques Are About Equally as Successful: Which to Use?
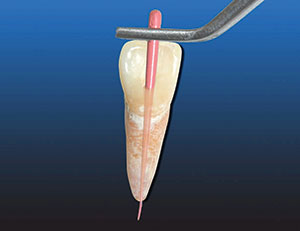
Lastly, I obturate the canals. During my 40-plus year career, I have come full circle. I started with single-point obturation, then went to lateral condensation, vertical condensation, ThermoFil, System B, and Resilon/Epiphany. Now I am back to using single-cone gutta-percha fills (Figure 7). No one technique has been shown to be any more clinically successful than any other technique, so I follow Dr. Gordon Christensen’s guidance: If the success rate is the same, is the technique faster, cheaper, better, and easier than what I am using now? Consequently, I am back to using a single gutta-percha cone and epoxy sealer. Epoxy sealer has a positive track record of use for more than 70 years. If it is expressed past the apex, there usually is very little, if any, postoperative pain. Depending on the formulation, it can be quite resorbable. I use EZ-Fill Xpress (EDS) because it is resorbable, flowable, and highly radiopaque.
The biggest problem in obturation is placing the gutta-percha point to the working length (between the constriction and the anatomic apex) and getting it to stay there. The technique that will be described below will demystify this procedure and give the clinician a predictable and quick way to consistently achieve the treatment objective in every case.
Firstly, the fit of the gutta-percha will depend on your preparation. You need a canal that is patent at the apex, with no debris lodged in the apical end. An easy way to tell if your canal is ready to fill is as follows: Your last apical preparation instrument must be able to be pushed to the apex with light apical pressure using your index finger (Figure 8). If your finger cannot push the instrument to the measurement easily, your gutta-percha will never get there either. You must know 2 measurements:
1. How large was the apex taken to (ie, No. 30, No. 35, etc)?
2. What is the taper of the canal (ie, .04, .06, etc)?
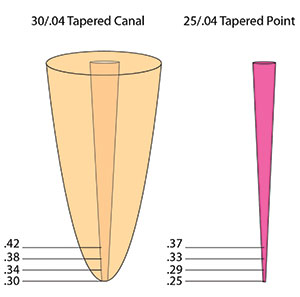
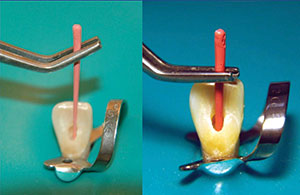
Never use the same size gutta-percha as the preparation; always use a gutta-percha point that is slightly smaller than the preparation. For example, if I prepared a canal to a No. 30 at the apex with a .04 taper, I would not use a 30/.04 gutta-percha point. I would use a slightly smaller 25/.04 gutta-percha point. We are not machinists! It is very difficult to prepare a canal in all dimensions and curves to a standard taper. At places along the canal, the taper will be smaller or larger than the hoped-for standard. Demonstrated in Figure 9 (30/.04 taper canal versus a 25/.04 gutta-percha point) is a preparation of a No. 30 at the apex with a .04 taper. If we place the gutta-percha point that is No. 25 at the apex with a .04 taper into the 30/.04 preparation, it would bind when the .30 diameter of the gutta-percha point is even with the .30 of the preparation. That is approximately 1.0 mm above the tip of the gutta-percha point. In other words, the gutta-percha point will be sticking out of the canal by about 1.0 mm. Now that we know this, the technique is as follows:
1. Pick up a gutta-percha point from the box using locking pliers.
2. Place it in the canal until it can no longer go in any further. Push it a little to make sure it is fully seated. Lock the pliers on the area on the tooth that you will take your measurement from (Figure 10).
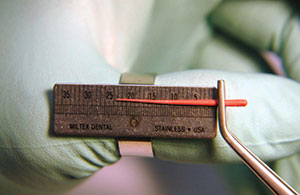
3. Remove the gutta-percha with the pliers and measure it on the ruler (Figure 11).
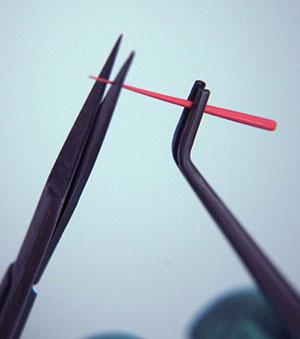
4. If the gutta-percha point is longer than your working measurement, it will be sticking out of the root (Figure 12).
5. Take scissors and cut off the length of gutta-percha that is beyond your measurement (Figure 13).
6. Try it back in and re-measure. It should be at your working length. If it is not, repeat the above steps until it is at the correct working length.
If the measurement is short, it is usually caused by one of 2 problems: (1) there’s not enough taper in the canal or (2) the canal is not patent due to debris lodged at the apex. If there’s not enough taper, I will take a Gates Glidden No. 2 or a larger tapered NiTi instrument and open the canal more. The bottleneck is usually 3.0 to 5.0 mm above the apex. If, when you remove your gutta-percha point, it has a squiggly—or pig’s tail—apex (Figures 14 and 15), this means that there is debris at the apex. When you push gutta-percha into the debris, it bends and curls up upon itself. Go back into the canal with a small instrument, either a No. 10 or No. 15, and pop through the debris. Irrigate and, using the last instrument, re-instrument to the apex to make sure the canal is debris free. Now refit a new gutta-percha point (as in the above procedure).
CLOSING COMMENTS
The lack of ideal materials and methods forces dentists to become more skillful in the use of these materials to achieve the desired result. Once you have mastered these techniques, it should improve your endodontics and make the procedure easier, faster, and more predictable in the future.
References
- Deutsch AS, Musikant BL. Morphological measurements of anatomic landmarks in human maxillary and mandibular molar pulp chambers. J Endod. 2004;30:388-390.
- Deutsch AS, Musikant BL, Gu S, et al. Morphological measurements of anatomic landmarks in pulp chambers of human maxillary furcated bicuspids. J Endod. 2005;31:570-573.
- Lee MM, Rasimick BJ, Turner AM, et al. Morphological measurements of anatomic landmarks in pulp chambers of human anterior teeth. J Endod. 2007;33:129-131.
- Azim AA, Azim KA, Deutsch AS, et al. Acquisition of anatomic parameters concerning molar pulp chamber landmarks using cone-beam computed tomography. J Endod. 2014;40:1298-1302.
- ElAyouti A, Hülber-J M, Judenhofer MS, et al. Apical constriction: location and dimensions in molars—a micro-computed tomography study. J Endod. 2014;40:1095-1099.
- Schaeffer MA, White RR, Walton RE. Determining the optimal obturation length: a meta-analysis of literature. J Endod. 2005;31:271-274.
- Kojima K, Inamoto K, Nagamatsu K, et al. Success rate of endodontic treatment of teeth with vital and nonvital pulps. A meta-analysis. Oral Surg Oral Med Oral Pathol Oral Radiol Endod. 2004;97:95-99.
- Ng YL, Mann V, Rahbaran S, et al. Outcome of primary root canal treatment: systematic review of the literature—Part 2. Influence of clinical factors. Int Endod J. 2008;41:6-31.
- Peak JD, Hayes SJ, Bryant ST, et al. The outcome of root canal treatment. A retrospective study within the armed forces (Royal Air Force). Br Dent J. 2001;190:140-144.
- Chandra A. Discuss the factors that affect the outcome of endodontic treatment. Aust Endod J. 2009;35:98-107.
- Gomes AC, Nejaim Y, Silva AI, et al. Influence of endodontic treatment and coronal restoration on status of periapical tissues: a cone-beam computed tomographic study. J Endod. 2015;41:1614-1618.
- Ricucci D, Russo J, Rutberg M, et al. A prospective cohort study of endodontic treatments of 1,369 root canals: results after 5 years. Oral Surg Oral Med Oral Pathol Oral Radiol Endod. 2011;112:825-842.
- Aminoshariae A, Kulild JC. Master apical file size—smaller or larger: a systematic review of healing outcomes. Int Endod J. 2015;48:639-647.
- Peters OA, Laib AL, Göhring TN, et al. Changes in root canal geometry after preparation assessed by
high-resolution computed tomography. J Endod. 2001;27:1-6. - Vaudt J, Bitter K, Kielbassa AM. Evaluation of rotary root canal instruments in vitro: a review. Endodontic Practice Today. 2007;1:189-203.
- Carver K, Nusstein J, Reader A, et al. In vivo antibacterial efficacy of ultrasound after hand and rotary instrumentation in human mandibular molars. J Endod. 2007;33:1038-1043.
- Malki M, Verhaagen B, Jiang LM, et al. Irrigant flow beyond the insertion depth of an ultrasonically oscillating file in straight and curved root canals: visualization and cleaning efficacy. J Endod. 2012;38:657-661.
- Merino A, Estevez R, de Gregorio C, et al. The effect of different taper preparations on the ability of sonic and passive ultrasonic irrigation to reach the working length in curved canals. Int Endod J. 2013;46:427-433.
- Alves FR, Almeida BM, Neves MA, et al. Disinfecting oval-shaped root canals: effectiveness of different supplementary approaches. J Endod. 2011;37:496-501.
- Plotino G, Pameijer CH, Grande NM, et al. Ultrasonics in endodontics: a review of the literature. J Endod. 2007;33:81-95.
- Paragliola R, Franco V, Fabiani C, et al. Final rinse optimization: influence of different agitation protocols. J Endod. 2010;36:282-285.
- Zehnder M. Root canal irrigants. J Endod. 2006;32:389-398.
- Sabins RA, Johnson JD, Hellstein JW. A comparison of the cleaning efficacy of short-term sonic and ultrasonic passive irrigation after hand instrumentation in molar root canals. J Endod. 2003;29:674-678.
Dr. Deutsch co-operates an endodontic practice in New York City. He holds 18 patents for co-inventing endodontic products for Essential Dental Systems (EDS). He is one of the leading authorities in endodontics, having lectured at more than 150 worldwide locations, and has co-authored more than 200 dental articles. He can be reached at (800) 223-5394, via email at [email protected], or via the website essentialseminars.org.
Disclosure: Dr. Deutsch has a financial interest in Essential Dental Systems.
Related Articles

