


Traditional dental sealants, which have ostensibly become restorative dentistry’s most promoted preventive procedure, have one of dentistry’s highest failure rates. A well-publicized CRA study1 confirmed a 92% failure rate at a 10-year follow-up. Not surprisingly, there is a little joke among microscope clinicians: when you buy your first microscope you have just done your last sealant.
At the inaugural meeting of the Academy of Microscope Enhanced Dentistry, there was unanimous consensus: traditional sealants rendered with no or low magnification are inappropriate in a microscope-centered practice. Many other aspects of sealants were also challenged. The questions are, “How much magnification is enough,” and “What is the microscope and research teaching us about the practical application of sealants?”
FUNDAMENTALS OF CLINICAL MAGNIFICATION
The operating microscope is not just simply higher magnification than oculars (loupes). It is better magnification. Oculars have been very helpful and may always have a role in dentistry, but the optics are crude when compared to the infiniti corrected optics of a stereoscopic microscope (Figures 1 to 4). When combined with the shadowless coaxial light source, they transform the clinician’s potential for accuracy in nearly every aspect of the different disciplines in dentistry.
Think of magnification in terms of television screens: a 21-inch screen has twice the surface area of a 15-inch screen. Dr. Assad Mora, one of the pioneers of full-time microscope utilization in prosthodontics, explains that increasing levels of magnification produce a squared, not linear relationship to visual acuity. In other words, 10x magnification allows the human retina to acquire 100 times more information; 20x allows 400 times the visual information.
Years ago I used 2.5 power loupes for all my restorative procedures. Nine years ago we began to integrate the microscope and now use it full time in our practice. As I use the microscope at 16 power to examine the amalgams I placed years ago at 2.5 power, I am proud of their appearance. The sealants that I so carefully placed at 2.5 power, however, are often an embarrassment. We find that composite and porcelain require significantly higher levels of magnification due to the difficult handling properties, lack of visual contrast with tooth structure, and the rigors of bonding. I find that 10x is the bare minimum for these new techniques, and routinely find myself working at even higher magnification levels.
 |
 |
| Figure 1. Oculars (loupes) rely on convergent vision that essentially requires a crossing over of images. This form of magnification creates increasing problems and eye strain as magnification increases. | Figure 2. Convergent 8x magnification and a representation of the 2 images that your brain receives as you begin to focus. |
 |
 |
| Figure 3. Incomplete merging of images, which is a common occurrence. Both images also demonstrate the visual noise in the background of loupes. | Figure 4. Infiniti corrected (parallel) optics at 24x. There is no eye strain. Loupes magnification at 8x and above becomes excruciating for most humans. |
 |
 |
| Figure 5. A sectioned molar is viewed at 16x. Note the cul-de-sac that is also divergent from the direction of the occlusal portion of the groove (a classic dogleg). Parallel-sided preparation of the groove, especially without the microscope, would not allow visualization of the true extent of the defect. | Figure 6. Microscopic comparison of fissurotomy burs S.S. White Original and Micro NTF with typical laser tips. The fissurotomy burs are narrower at the tip. The width, depth, and continuity of the cuts into dentin are the most crucial in dental crack and fracture avoidance. |
THE QUIET REVOLUTION IN DENTISTRY
The operating microscope is transforming restorative dentistry today the same way that it transformed endodontics 10 years ago. A case in point: just as the microscope revealed the complexity of root canal morphology, the anatomy of occlusal defects is revealed to be more complex than originally thought (Figure 5). I teach that we should refer to partially or noncoalesced enamel as “cul-de-sacs and doglegs” as opposed to “pits and fissures.” This point is crucial. The most insidious defects are the cul-de-sacs that masquerade as coalesced enamel at less than 16x magnification. In addition, many defects extend laterally (much like calcified root canal systems in molars), hence the term dogleg.
THE 9 FATAL FLAWS OF TRADITIONAL SEALANTS
(1) Traditional Diagnosis
Explorers and radiographs are the traditional tools used to detect occlusal decay. Microscopic examination of a desiccated tooth yields a wealth of information regarding incipient pathology. The translucent nature of enamel gives subtle clues regarding early microleakage, early in-complete fractures, and the true nature of enamel defects and occult decay. Other high-tech modalities can be helpful but are no substitute for a trained eye at 24x or 40x.
(2) Sealing Over Stained Grooves
All but the most superficial portions of these grooves are inaccessible to a toothbrush bristle. This allows very stubborn deposits that act more like calculus than plaque. Even with prolonged application of a prophy jet, this area often remains too contaminated to create a successful bond. It generally requires abrasion with a bur, air abrasion, laser, or similar cutting modality (Figure 6).
(3) Using Paste Composite Alone to Restore Micropreps
Manufacturers, in their zeal to create wear-resistant composites (Figures 7 and 8), are now selling pastes that are often too stiff to adapt well to grooves or anything small. The unidose syringes deliver inconsistent viscosities that have further exacerbated the problem.
(4) Traditional Sealants on Second Molars
These teeth are typically very poorly erupted on the distal aspect (Figures 9 and 10). In 10 years of microscopic examinations, I have observed that nearly all traditional sealants on the distal half have either fallen off, are leaking, and/or create overhangs where they flowed over the gingiva.
(5) Sealing Over Decay
First of all, most traditional sealants on molars are leaking, so the concept is an oxymoron. More importantly, even if it were possible to hermetically seal a tooth, the research has shown that bacteria can survive in seemingly impossible environments. Leaving decay behind is simply wrong.
(6) Relying on Phosphoric Acid to Clean and Deplaque the Tooth
I am always surprised that good clinicians assume that acid-etch removes plaque. The microscope confirms that it does not. In fact, research has shown that acid-etch does not even kill many strains of bacteria, much less remove them.
(7) Sealant Maintenance
This is a protocol that has emerged from the shortcomings of both the traditional sealant technique and the material itself. Hopefully, we do not plan to have our crowns wear out or fall off every 18 months. Why do we accept such a compromise with sealants? Many parents are asking this same question. My nephew received repeated sealant treatments on the same lower first molar, then experienced pain. His dentist found gross decay below the sealant, so then placed a sedative filling. Ultimately, the tooth required endodontic therapy and a crown. His father asked me some very pointed questions about his family dentist. I explained that in my practice I do a very different technique under the microscope, which can last decades or even a lifetime, but that sealants are still the standard of care. He responded, “All it takes is one lawsuit.” Dentistry would do well to address the sealant issue before a wave of negative publicity ensues. Our reputation is exponentially easier to maintain than to recapture.
In reality, traditional sealants rarely wear out. We see that they crumble around the margins, leak, chip away, and fall out (Figure 11). Repeatedly sealing over these teeth is a bit like painting over rust.
(8) Placement of Traditional Sealant Material in Teeth That Have Been Extensively Prepared (Cut With Burs, Air Abrasion, etc)
Traditional sealant material is either not filled or lightly filled (Figure 12). Clinpro Sealant (3M ESPE), for example, has filler content of 6% by weight. By contrast, Filtek Flow flowable composite (3M ESPE) has filler content of 68%. Sealant material was never designed to withstand occlusal forces.
(9) Sealants Placed With Low or No Magnification
One of the advantages to high magnification (10x and above) is the elimination of bubbles and voids. The viscous nature of sealants, flowable composites, and paste composites makes the incorporation of bubbles and voids virtually impossible to avoid. High magnification allows the clinician the ability to avoid or detect and remove these defects prior to curing. Figure 13 shows the effects of a bubble that was unseen by the clinician at the time of sealant placement.
 |
 |
| Figure 7. Stiff paste composite at 24x. Inconsistent viscosities wreak havoc on adaptation. | Figure 8. Note how the distal of the composite appears slightly lifted and no adaptation to grooves was possible. |
 |
 |
| Figure 9. Typical eruption of a second molar in an adolescent. | Figure 10. Disclosing solution demonstrates the original level of the gingival crest before tissue retraction provided by clamp. Arrows follow the rise of the gingiva as it approached the distal. The incessant action of the sulcular pump virtually guarantees distal fluid contamination when no retraction is performed. |
 |
| Figure 11. Maxillary second molar at one year after sealant placement. The distal portion of sealant has fallen off. A 24x view of the groove shows typical contamination that was probably not well addressed at time of sealant. A view of the intact portion of sealant demonstrates marginal breakdown of bond; sealant retention does not necessarily indicate success. |
 |
 |
| Figure 12. High magnification of sealant that was placed in a molar after moderate tooth preparation. Note the crack in the sealant. Sealant material lacks the strength required for this application. | Figure 13. Depending on size and location, bubbles cause aesthetic failure or overall failure. The microscope reveals that they are a very common problem. |
IN A NUTSHELL…
Sealants often do not flow anywhere near the depth of enamel defects. The grooves are often so badly contaminated that the bond is poor. The only decent bond is often outside the grooves on cusp inclines where the sealant wears off in a few months. When you cut open the grooves, the sealant material is no longer appropriate because it is not a restorative material. Aggressive tissue retraction may be the only way to isolate many molars properly. High magnification is ideal (Figures 14-16).
 |
 |
| Figure 14. Narrower fissurotomy bur Micro NTF at two-thirds depth. | Figure 15. Canula of 3M Filtek, which is smaller than some other brands, does not come close to depth of microprep. The microscope reveals the futility of injecting directly. Recommended protocol is to place on the triangular ridge of the functional cusp and then tease into the groove at 12x or 16x. |
 |
| Figure 16. The physical and optical characteristics of flowable composite make bubble formation and recognition more problematic than the sealant material. Here at 8x (left) we see a tooth restored with flowable composite that has no apparent bubbles. When we cut into the composite, we find multiple bubbles and voids (12x view, right) |
SHOULD WE TINKER WITH IMPROVING SEALANTS OR RETHINK THE ENTIRE APPROACH?
Traditional sealants have been shown to be effective in reducing decay and will likely remain common in HMO settings, public assistance dentistry, and third world countries. Ultimately, however, traditional sealants are temporary in nature. With the advent of high-level magnification, an entirely new approach is indicated.
MICROSCOPE-ENHANCED, LIFETIME DENTISTRY: THE MDMIPC
We inform our patients that we are committed to creating dentistry that has the potential to last a very long time. That requires the microscope, an unhurried schedule, and a fair fee that may not resemble the insurance UCR schedule du jour.
The microscope-delivered minimally invasive posterior composite (MDMIPC) will now be presented. Other excellent parallel procedures are being performed at high magnification. The rationale behind this particular approach will be explained.
Step 1—rubber dam. Goals are to retract gingiva, aid in microscopic visualization, eliminate contamination, and create the ethereal experience of a controlled field, dark background, and effortless microscope use. Neurosurgeons describe the experience as “deep sea diving narcosis.” Utilizing a microscope on an uncontrolled field is possible but not enjoyable.
Step 2—apply disclosing solution (Figure 17).
Step 3—apply coarse pumice in a rubber cup to all smooth surfaces.
Step 4—apply prophy jet to nonsmooth surfaces, being careful not to abrade gingival tissues.
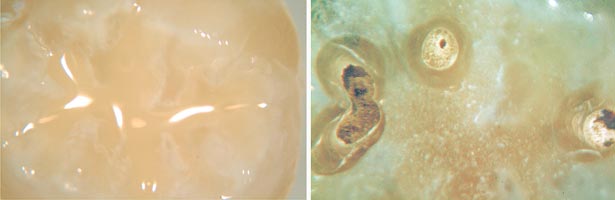
Step 5—16x inspection of the dry, clean tooth, final microscopic plaque removal, apply caries indicator (Figure 18).
 |
 |
| Figure 17. Disclosing solution demonstrates the incredible contamination present on an adolescent with seemingly excellent hygiene. | Figure 18. After multiple deplaquing modalities, contamination remains. Long-term retention of any bonded material is impractical without a more aggressive approach. |
Step 6—explore all microscopically suspicious defects with fissurotomy burs, alternating between 6x to 12x magnification. The goal of this step is to create a conical preparation that allows ideal visualization, superior enamel rod engagement, and minimal dentin involvement
A healthy debate is occasionally waged regarding ideal preparation design for the MDMIPC. A few of my colleagues feel that the fissurotomy bur is too invasive. For me, conservative dentistry has taken on a new meaning. The restoration that lasts longest and least predisposes the tooth to fracture is to me the most conservative, because it conserves the tooth as an entity the longest. As we study initiation and propagation of tooth fractures,2 we see that the majority of incomplete fractures are oblique, not vertical. Most of these cracks initiate in dentin, not enamel, and nearly always follow the line angles of cavity preparations. We should reconfigure our value systems. It is dentin worship today, not enamel worship. The fissurotomy bur can make a much narrower cut in dentin than some of the parallel-sided cutting techniques that at first glance seem more conservative. More import-ant than the cutting modality is microscopic visualization to remove minimum tooth structure and cut as shallowly as possible, with the goal of not connecting the defects.
Step 7—reapply caries indicator. Although not foolproof, low-tech caries indicator still has benefits. Parents and patients who normally watch the live broadcast seem to appreciate this step that allows judicious and appropriate removal of tooth structure.
Step 8—final or repeated use of fissurotomy bur and caries indicator. When significant dentinal decay is discovered, a round-end diamond or carbide is employed. Fissurotomy burs are poor at end cutting, which is a plus for ultraconservative groove and dogleg exploration. How-ever, that makes them inefficient and risky in carious dentin, as excess force is required to end cut.
Step 9—finally, I do a careful 3-D observation at 16x or 24x of the walls of the preparation to look for lateral defects or caries (Figure 19). This is yet another moment when only microscopic visualization will do
 |
| Figure 19. Enamel defect is finally appropriately prepared with the fissurotomy bur. The newer bur can provide an even narrower preparation. |
Step 10—apply etchant, utilizing liquid etch, then gel etch. A carefully prepared groove is so tiny that gel etch can be too viscous to reach the base; liquid etch helps to wet the enamel to facilitate the gel.
Two-step bonding, which allows a separate step for etching with phosphoric acid, offers an opportunity for incredible microscopic visualization. I find decay, chunks of old sealant, poorly etched sections, and a myriad of contaminations that seem to be only visible after application of etchant.
Step 11—click in the microscope’s orange light filter, apply bonding resin, (I prefer Optibond Solo [Kerr], which is lightly filled), blow lightly with dedicated air syringe, do not light-cure, then apply flowable composite. Figures 14 to 16 demonstrate the futility of attempting to syringe the material directly into the microprep. I find that in many cases, it is best to apply near the prep and then tease it into the groove at 16x. If dentinal caries are removed, paste composite is added as another layer.
Step 12—bubble search at high magnification (Figure 16).
Step 13—light-cure, polish with a brownie point, occlusal adjustment (Figure 20).
 |
| Figure 20. MDMIPC at low (left) and high (right) magnification at 3-year follow up. Nine-year follow up at 16x in our practice shows 95% look good or excellent (treatment by Dr. Jihyon Kim). |
SUMMARY
The original concept of dental sealants is truly intoxicating…that an entry-level auxiliary could prevent occlusal caries by painting over the grooves of the teeth, thereby freeing up the doctor for more difficult tasks…all with a tidy profit. The realities of high-level magnification and research are sobering the “sealant euphoria.” Today, we now understand that prevention of occlusal caries is significantly more complex and technically challenging than originally thought. Changing the process from a lower-skill, auxiliary-driven procedure to a high-skill, microscope-centered procedure will require a shift in scheduling and value systems.
Earlier in the article I mentioned my nephew with the catastrophic sealant failures. Today he drives 4 hours to the airport and then flies another 2 hours so that he can receive a microscope-centered level of care (and pays in full). Microscope-enhanced dentistry is much more than simply making tiny little holes in teeth. It is a commitment to dentistry where vision is un-compromised, and today that level can best be attained with an operating microscope.
References
1. Christensen RP, Ploeger BJ, Palmer TM. The role of pit-and-fissure discoloration in caries assessment. Compend Contin Educ Dent. Nov 2001;22(11A):996-1007.
2. Clark DJ, Sheets CG, Paquette JM. Definitive diagnosis of early enamel and dentin cracks based on microscopic evaluation. J Esthet Restor Dent. 2003;15:391-401.
Dr. Clark is the founder and current president of the Academy of Microscope Enhanced Dentistry, an international association formed to advance the science and practice of microendodontics, microperiodontics, microprosthodontics, and microdentistry. He is a course director at the Newport Coast Oral Facial Institute and co-director of Precision Esthetics Northwest, both of which are nonprofit, microscope-centered teaching institutions. He has published a completely new approach to diagnosis and treatment of cracked teeth, based on a new nomenclature and classification system for enamel and dentinal cracks observed at 16x magnification. He provides video, still images, and support to Clinical Research Associates for its international presentations about the role of the clinical operating microscope in dentistry. He maintains a microscope-centered restorative practice in Tacoma, Wash, and can be reached at (253) 472-4292 or drclark@microscopedentistry.com. For more information, visit microscopedentistry.com, lifetimedentistry.net, and NCOFI.org.
Disclosure: Dr. Clark is not a paid spokesman for any microscope manufacturer. Royalties from sales of the “Clark Explorer Series” are donated to the Academy of Microscope Enhanced Dentistry.


