
INTRODUCTION
As humans grow older and lose their teeth, the vertical dimension between their maxillae and mandibles decreases (Figures 1 to 4). When clinicians are making complete dentures or full-mouth prostheses for elderly patients, they need to verify each patient’s original vertical dimension of occlusion (VDO). There are 2 ways to do this: One way is the use of freeway space (2 to 3 mm), and the other is the use of inter-vestibular distance (38 to 42 mm).1
Traditionally, the mandibular overdenture requires at least 12.0 mm between the soft tissue and the occlusal plane to provide sufficient space (15 mm from bone level to the occlusal plane) for the bar, attachments, and teeth.2
The Implant Studio (3Shape), a surgical guide design software program, allows the clinician to determine the implant location after the initial crown is designed for a guided surgery procedure. This enables the dentist to perform a flapless or flap implant surgery and a prefabrication of the final prosthesis with a predictable result before the actual surgery is begun.
When the guide is planned precisely with proper intraoral scan data and CBCT clarity, the technique allows for ideal surgical placement and gives the precise placement of the implant fixture. Also, digital solutions provide convenience for dentists when treatment will include immediate loading and final prosthetic workflows without models for full-arch reconstruction. Implant placements with a minimally invasive flapless approach have the potential to minimize crestal bone loss, soft-tissue inflammation, probing depth adjacent to implants, and surgical time, thus affording increased comfort for the patient (Figures 5 to 7).
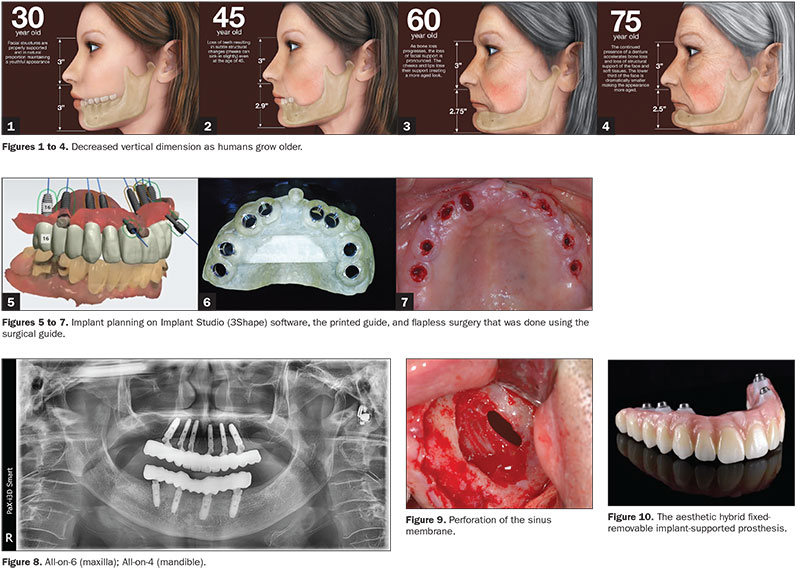 |
Why All-on-4 (or All-on-6) Is a Popular Treatment Option
What makes the All-on-4 (or All-on-6) procedure so unique is that this protocol only involves 4 (or 6) implants on the mandible or maxilla each, whereas the traditional method includes a minimum of 6 implants in the mandible and 8 implants in the maxilla. One benefit is the significant cost savings related to the number of implants involved. Another benefit is that All-on-4 (or All-on-6) implants are angled in either method, depending on the contour of the available hard tissue for maximal jawbone support (Figure 8).
Bone grafting and sinus grafts are perceived as surgeries with higher failure rates than conventional implant surgery, but All-on-4 (or All-on-6) surgeries are suitable for these situations as well (Figure 9).
As the prosthesis is screwed onto the implants, the dentist can remove the prosthesis at any time to improve, repair, or replace the restoration. The implants offer excellent aesthetic results once the teeth and gingiva are restored (Figure 10). And, with the hybrid prosthesis, patients will have a pleasing, natural smile. These are the main advantages of hybrid prostheses on dental implants.
With the recent development of digital implant technology, immediate loading in both mandible and maxilla is made possible on the day of surgery.
Is Crestal Bone Reduction Always Required With a Hybrid Implant Prosthesis?
An osteoplastic procedure to increase interocclusal space before implant placement is often indicated, especially when abundant bone height and width are present. The crown-height space should be evaluated, and the proper treatment should be planned prior to implant placement. Otherwise, a fixed porcelain-fused-to-metal restoration should be considered.
There must be enough vertical height to stack components: abutments, a titanium bar, the acrylic wrap, and denture teeth. It is commonly reported in the literature that a minimum vertical height of 15 to 16 mm from the fixture to the incisal edge is required.3 In the past, an implant hybrid consisted of a white and pink restoration. Because of bone loss, there is a need for natural-looking teeth with the gingival-shaded material placed more apically. This was often done using plastic denture teeth. A metal-framework implant hybrid design requires at least 18 mm of distance from the platform of fixture to the incisal edge4 (Figure 11). So most cases need crestal bone reduction before placement of the fixture to secure this space.
Currently, the trend is now to create final prostheses in zirconia, which may require less vertical dimension to accomplish. In some cases, digital hybrid implant prosthesis design requires at least 12.35 mm of distance from the fixture platform to the incisal edge. Multi-unit abutment and base structure height only needs 4.35 mm and simply requires zirconia thickness for the hybrid prosthesis (Figure 11). The difference in the required space between an old and a new hybrid prosthesis is 5.65 mm, which is a big enough difference so that a bone reduction is not required before implant placement, and this also allows for the use of a flapless technique.
Since all the implants are placed in the anterior zone from the second bicuspid anteriorly, in front of the enlarged maxillary sinuses, or in the mandible in front of the mental foramen and nerve, the intraoral scan data is likely to be more accurate; hence, the final full-arch zirconia prosthesis will fit better on the abutments as well.
CASE REPORT
A 76-year-old male patient had previously experienced a fracture of an upper bridge and several root restorations (on teeth Nos. 6, 7, 8, 10, 11, 13, and 14), and tooth No. 15 remained.
In order to prepare his maxillary surgery device, his mandible was treated with a conventional crown and a bridge and a removable partial denture (Figures 12 to 15).
After the extraction of teeth Nos. 13, 14, and 15, and following the appropriate healing period, it was decided to restore the maxilla with a full-arch fixed prosthesis on 6 implants. An impression was taken of the edentulous maxillary arch using a vinyl polysiloxane material, (EXAFINE [GC America]) and a working model was fabricated.
Markers were attached on the working model, and it was scanned with the TRIOS 3 (3Shape) and splint or base plate designed on the 3Shape Dental System (3Shape) and printed with the use of a 3-D printer. The working model covered by splint, which involved a marker, was prepared for taking the patient’s vertical dimension. After taking the patient’s vertical dimension and interarch relationship, a CBCT scan was taken with the splint in the patient’s mouth (Figures 12 to 15).
The patient’s model with a bite-registered splint was scanned by the TRIOS 3, and then his interarch relationship was taken. The STL file was then used in the Implant Studio software to design the surgical guide.
 |
Surgical Guide and Custom Multi-Unit Abutment Design
Aligning the CT image and intraoral scans is of paramount importance when using Implant Studio. This is accomplished by choosing and matching 3 points on the scans. Normally, natural teeth are the best choice for the integration; this is because they are not blurred on a CT image and are easily seen in the intraoral s
can image. In this case, the markers that were placed functioned as the natural teeth to facilitate the integration and to make the data integration more precise. After integrating these 2 sets of data, crowns were first designed to match with the functional cusps of antagonists, and then fixture locations were planned. These implants are positioned in a fan-like shape from apex to alveolar ridge, done to avoid anatomical structures such as the sinus medial wall and nasal cavity. For immediate loading in the maxilla, long-length (> 12 mm) and wide-diameter (> 4.0 mm) implants are recommended to achieve excellent primary stability.
With the All-on-6 in the maxillary anterior, facial-lingual width must be considered, and the longest possible fixture length should be chosen according to the anatomical condition. The recommended diameter of the drill is one size smaller than the final diameter of the fixture. Choosing the right fixture diameter is critical for an optimized initial stability after the surgery. In this case, 4.5-mm-diameter by 13.0-mm-length (Omni Implant System [URIS Implants]) implants were used at the canine and premolar positions, and 4.0-mm-diameter by 11.5-mm-length (Omni Implant System) implants were used at lateral and central incisal positions (Figures 16 to 19).
After finishing the surgical guide design, custom multi-unit abutment (All·on·T [TruAbutment]) design is possible using the 3Shape Dental System software. This custom abutment has the advantage of being designed for any location, from zero degrees to 30°, and the height of the structure is low (4.35 mm), allowing for actual hybrid prosthetic structure space (Figures 16 to 19).
Digitally Guided Surgery and Immediate Loading With a Zirconia Prosthesis
Before the printed guide was fixed to the surgery site, all residual roots were extracted (teeth Nos. 6, 7, 8, 10, 11, 13, and 14) using a simple protocol. Then the surgical guide was verified for fit on the edentulous patient. When the surgical guide was fixed on the edentulous area, a silicone putty bite (GC America) and a fixed kit (Pylon Kit [URIS Implants]) were used.
After finishing all drilling using the surgical guide, each implant was placed according to offset and hex alignment as per the design plan. Sometimes cortical bone around the platform interferes with correcting abutment connections, so this bone should be reduced/eliminated.
 |
Primary implant stability was verified (Osstell) with ISQ values in the 70 to 75 range, indicating it was fine to immediately load the implants using the splinting method.5 TruAbutment’s custom multi-unit abutments were connected to each fixture, and these were supported by an abutment holder and tightened at 30 Ncm with a hand ratchet driver (Figures 20 to 23). Every abutment was connected to a base (TruAbutment) at 20 Ncm with a hand ratchet and then scanned (TRIOS 3) for the prosthesis design. After scanning each arch, the splint from the original CT scan was modified to get the digital interarch relationship.
All scanned data using the TRIOS 3 was sent to the 3Shape Dental System, and the laboratory team designed the final prosthesis. For a more aesthetic result, the area without sufficient soft tissue was artificially filled in on the software end. The designed prosthesis was milled from a zirconia block and then sintered and finished.
The day after the surgery, the final prosthesis was delivered to the patient. During the osseointegration, the patient had been advised to eat soft food and to visit the clinic immediately in case of any pain (Figures 24 to 27).
Four months after the surgery, there were no symptoms of pain and no bone resorption seen in the radiographs. One year later, all the soft tissue around the prosthesis was healthy, and no bony changes were evident in the radiographs (Figures 28 and 29).
DISCUSSION
Any metal involved in a hybrid prosthesis can now be replaced by using zirconia due to its exceptional strength. Zirconia stabilized with yttrium oxide possesses good chemical and physical properties, such as low corrosion potential, low thermal conductivity, high flexural strength (900 to 1,200 MPa), and hardness (1,200 Vickers).6-8 Several studies have shown that zirconia restorations last for at least 5 years, which concludes that the fracture of zirconia is rare.9,10
Also, the height of a custom MUA structure is only 4.35 mm, which allowed enough space for a zirconia structure in this case. For this reason, we can place implants without performing bone reductions, even for a hybrid prosthesis in an edentulous patient with All-on-4 and All-on-6 concepts. When immediate loading is done on an edentulous arch, a temporary fixed hybrid denture is recommended during osseointegration. It should also be noted that the provisional is significantly weaker than the final prosthesis, so if any fracture occurs, the patient should visit the clinic immediately for a repair (Figure 30). However, it should be possible using a digital workflow to make a final zirconia prosthesis within one or 2 days that will be strong enough to complete the healing period without fracture from immediate loading. The final zirconia prosthesis can be easily removed for repairs.
CLOSING COMMENTS
It’s the authors’ sincere hope that the case examples shared herein will create a greater understanding of the interarch relationship in All-on-4 and All-on-6 edentulous cases and the workflow of digital guided surgery and prosthesis design and fabrication.
References
- Rivera-Morales WC, Mohl ND. Restoration of the vertical dimension of occlusion in the severely worn dentition. Dent Clin North Am. 1992;36:651-664.
- Misch CE. Dental Implant Prosthetics. 2nd ed. Elsevier Mosby; 2015.
- Ralstin B, Runyon W. Success in space with a fixed hybrid prosthesis. November 23, 2016. Accessed May 11, 2020. https://www.speareducation.com/spear-review/2016/11/success-in-space-with-a-fixed-hybrid-prosthesis.
- Hess TA. Choosing Between Fixed and Removable Prostheses. Decisions in Dentistry. April 2017;3(4):29–31.
- Han CH, Mangano F, Mortellaro C, et al. Immediate loading of tapered implants placed in postextraction sockets and healed sites. J Craniofac Surg. 2016;27:1220-1227.
- Piconi C, Maccauro G. Zirconia as a ceramic biomaterial. Biomaterials. 1999;20:1-25.
- Manicone PF, Rossi Iommetti P, Raffaelli L. An overview of zirconia ceramics: basic properties and clinical applications. J Dent. 2007;35:819-826.
- International Organization for Standardization. ISO 13356:2008. Implants for surgery—Ceramic materials based on yttria-stabilized tetragonal zirconia (Y-TZP). International Organization for Standardization; 2008. Accessed May 11, 2020. https://www.iso.org/standard/40166.html.
- Sailer I, Fehér A, Filser F, et al. Five-year clinical results of zirconia frameworks for posterior fixed partial dentures. Int J Prosthodont. 2007;20:383-388.
- Heintze SD, Rousson V. Survival of zirconia- and metal-supported fixed dental prostheses: a systematic review. Int J Prosthodont. 2010;23:493-502.
Dr. Kang has been the co-owner of Yedam Dental Hospital in Mokpo, South Korea, since 2001. He received his DDS, MSD, and PhD degrees from the Chosun University School of Dentistry in Gwang-ju, South Korea, in 1995, 1997, and 2005, resp
ectively. He is also an adjunct professor in the department of prosthodontics at the Chosun University School of Dentistry. He was a postgraduate resident doctor of the department of prosthodontics at Chosun University Dental Hospital between 1995 and 1998. He was in the United States as a visiting scholar of the department of periodontics and implant dentistry in the University of Pennsylvania School of Dental Medicine from 2008 to 2009. He is the director of G10 International Dental Education Academy in South Korea and a board member of the Korean Academy of Prosthodontics, the Korean Academy of Oral and Maxillofacial Implants, and the Korean Academy of Digitalized Dentistry. He can be reached at [email protected].
Dr. Son received her DDS, MS degree in prosthodontics, and PhD in periodontics from the Chosun University School of Dentistry. From 1999 until 2001, she completed Fellowships at Harvard University Dental School and at the University of Texas Health Science Center. Starting in 2009, she dedicated herself to research and education as a professor in prosthodontics at Chosun University. She also contributes in academics, including for the Korean Academy of Oral and Maxillofacial Implants, the Korean Academy of Geriatric Dentistry, and the Korean Academy of Prosthodontics. Currently, she is a director of Chosun University Dental Hospital and a chair of G10 International Dental Education Academy. She can be reached via email at [email protected].
Disclosure: The authors report no disclosures.
Related Articles
Ridge Augmentation: Understanding the Power and Potential of Particulate Grafting
Simple Maxillary Sinus Tenting and Implant Replacement
Vitamin D Deficiency and Early Implant Failure: What Every Clinicians Needs to Know

