
In a previous article, published in the September 2019 issue of Dentistry Today, I discussed different irrigants and their roles in cleaning the canal. This section covers the proper techniques used to ensure safe, efficient cleaning.
Irrigation Techniques
Traditionally, the chemo-mechanical preparation of root canals has included the use of a conventional endodontic syringe and an open- or closed-ended cannula for irrigation. This technique is the most widely used because it doesn’t need any special device to operate and allows reasonable control of cannula depth and volume of irrigant delivered.
Conventional Syringe With Open- vs Closed-Ended (Side Open) Cannulas
The high flow rate used to introduce the irrigant into the canal and cannula wedging results in technique-related factors that increase irrigant pressure at the apical portion of the canal when open-ended cannulas are used, which can sometimes extrude the solution periapically, resulting in tissue damage and postoperative pain. The true frequency of such accidents is unknown, as many of them may not be reported, while minor extrusion incidents might even remain undetected due to the absence of severe symptoms. A 2008 survey of endodontists in the United States indicated that nearly half of the respondents (42%) had experienced at least one NaOCl accident during their practice careers.1
 |
 |
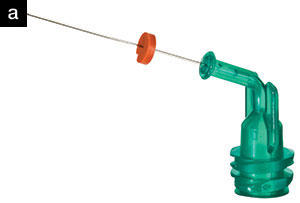
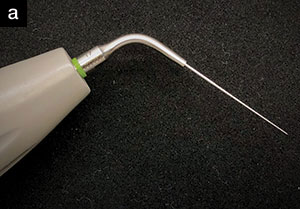
| Figure 1. Closed-ended 31ga cannula (NaviTip 31ga with Double Sideport Irrigator Tip [Ultradent Products]). |
Regarding its efficacy, conventional syringe and open-ended cannula irrigation leaves a large amount of debris clogged in the irregularities of the root canal system2,3 and does not efficiently deliver the irrigant solution into the apical third of the canal.4
Closed-ended (side open) cannulas (Figure 1) result in the development of lower liquid pressure at the apical foramen compared to open-ended cannulas, having a direct effect on dropping the irri-
gant flow rate, which is the most frequently reported technique-related factor in extrusion-accident case reports. The ability of clinicians to estimate irrigant flow rate inevitably relies on subjective estimation, and there is no unanimous definition of “low flow rate” or “high flow rate” in endodontic irrigation. From a safety perspective, not wedging the cannula and using a low flow rate should be done to avoid the possibility for irrigant extrusion.
Irrigation Protocol Suggestion With Syringe and a Closed-Ended Cannula Scouting:
- Fill the canal with NaOCl gel (ChlorCid V) solution, and place a small amount of lubricant (File-Eze EDTA Lubricant [Ultradent Products]).
- Scout the canal with a #10 or #15 SS K file until the temporary working length, and irrigate it with 3 to 5 mL of NaOCl solution (ChlorCid or ChlorCid Surf).
Preflaring:
- Fill the canal with NaOCl gel (ChlorCid V) solution, and use the orifice shaper in the straight part of canal.
- Irrigate with 3 to 5 mL of NaOCl solution (ChlorCid or ChlorCid Surf).
WL Determination and Glidepath:
- Fill the canal with NaOCl gel (ChlorCid V) solution, determine the WL, and create a Glidepath with an SS K-file #15 and #20 to WL.
- Irrigate with 3 to 5 mL of NaOCl solution (ChlorCid or ChlorCid Surf).
Instrumentation:
- Fill the canal with NaOCl gel (ChlorCid V) solution, and start instrumentation.
- Irrigate with 3 to 5 mL of NaOCl solution (ChlorCid or ChlorCid Surf) between each file.
- After the final file, irrigate with 3 to 5 mL of NaOCl solution (ChlorCid or ChlorCid Surf).
- Fill the canal with EDTA, leave 60 seconds, and evacuate.
- Fill the canal with chlorhexidine 2% (Consepsis [Ultradent Products]), leave for 5 minutes, and evacuate (Figure 2).
Irrigant Activation
The effectiveness of irrigation relies on both the mechanical flushing action and the chemical ability of irrigants to dissolve the tissue. Passive ultrasonic irrigation (PUI) has been introduced to increase the effectiveness of canal cleaning and disinfection by ultrasonic activation/agitation of the chemical solution (NaOCl and EDTA) inside the canal. The ultrasonic activation of irrigants creates acoustic microstreaming and transient cavitation that push the irrigant laterally into the irregularities of the canal. Acoustic microstreaming is defined as a rapid movement of fluid in a vortex motion, generating shear stresses that enhance debridement. Transient cavitation generates bubbles that, when collapsing, produce radiating shock waves and temperature rise.5
 |
| Figure 2. Irrigation protocol (syringe and cannula with the Genius files (Ultradent Products). |
 |
 |
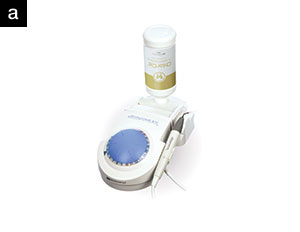
| Figure 3. (a) The Ultrawave XS (Ultradent Products) piezo unit with the bottle connector installed and a bottle of NaOCl 3% solution (ChlorCid). (b) The bottle connector kit with the NiTiSonic tips (Ultradent Products). |
 |
 |
| Figure 4. The NitiSonic tip. The intermediate part of the tip has a green-colored band that matches the color of the power level on the dial of the Ultrawave XS. The tip is a smooth NiTi 20.02, similar to a finger spreader. In this type of irrigation tip, the liquid comes from a port located at the intermediate section. |
Using ultrasonic-assisted irrigation, the solution can access areas that were not touched by the instruments and are hardly ever reached when used in other modes due to the high surface tension of the irrigant.6 It has also been reported to allow better penetration into lateral canals and narrow isthmuses compared to syringe and cannula irrigation.7 Greater penetration of the irrigant into dentinal tubules has also been reported, even at 1 mm from the working length.8 The cavitation effect produced by PUI, co
mbined with the increase in NaOCl temperature, has also resulted in better tissue dissolution.9
Intermittent vs Continuous PUI
During and after completion of mechanical preparation, PUI can be used in either intermittent or continuous mode. In the intermittent technique, the canal is first filled with the chemical solution using a syringe and cannula, and an ultrasonic tip is activated in the canal up to 1 mm from the working length. The ultrasonic tip is moved passively with an in-and-out motion to ensure that it does not bind with the root canal walls. The recommended activation protocol cycles 30 seconds after changing the instrument during the sequence of instrumentation enlargement for each canal.
 |
 |
| Figure 5. Open-ended continuous ultrasonic passive irrigation (CUPI) cannula (ProUltra PiezoFlow [Dentsply Sirona Endodontics]). The cannula is coupled with the 20-mL syringe through a silicone tube. |
 |
| Figure 6. The CUPI protocol with the Ultrawave XS, bottle connector, and NiTiSonic irrigation tip (Ultradent Products). |
Continuous Ultrasonic Passive Irrigation
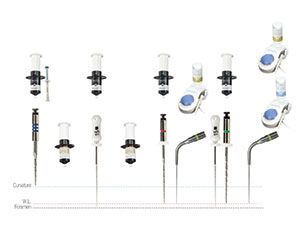
Continuous ultrasonic passive irrigation (CUPI) is achieved by simultaneously and continuously delivering irrigation during ultrasonic activation through a specially designed irrigation tip, in contrast to intermittent PUI, which needs manual (syringe and cannula) replacement of the liquid inside the canal. It is well known that chlorine is responsible for the dissolution of organic tissue and the antimicrobial effect of NaOCl, and it is rapidly consumed during the first phase of tissue dissolution. Therefore, regular replenishment and large volumes of NaOCl are required. During CUPI, the volume of irrigant can be set by the operator, allowing control of irrigant volume exchange during the procedure and, more importantly, after finishing the mechanical enlargement. The chemical solution (NaOCl or EDTA) is housed in a reservoir, or even in the original irrigant bottles (Ultrawave XS [Ultradent Products]) with the bottle connector (Figure 3) on the ultrasonic unit itself, and will be dispensed by the unit, continuously providing new reactant for the irrigation chemical reaction.
There are 2 types of CUPI systems available, both related to piezo ultrasonic units. The non-apical delivering tip is based on a stainless steel K-File or a NiTi smooth digital spreader design. In this type of delivery/activation method, the liquid comes directly from a reservoir (or irrigant bottle attached to the piezo unit) to an exit port located at the intermediate section of the tip (Figure 4). The liquid navigates the surface path of the tip to its end, passively, without apical pressure. This allows the operator to insert and activate the liquid without apical pressure, preventing apical extrusion of the irrigant. Robinson et al10 showed that the direction of the displacement of the liquid at the ultrasonic-activated tip end pulls debris instead of pushing it out.
By continuously using a new reactant (NaOCl or EDTA), the chemical reaction will be always in favor of tissue dissolution, keeping a high concentration of chlorine (in the case of NaOCl) and chelating action (in the case of EDTA) in the canal. Furthermore, the NiTi alloy used in the NiTiSonic tip allows it to negotiate curvatures without ledging.
The second type of CUPI is an ultrasonic-activated open-ended cannula with a silicone tube connection that dispenses the irrigant at the open apical end of the cannula (Figure 5). The flow rate of the liquid is determined by using a 20-mL syringe operated manually or with an optional mechanical syringe pump. The operator needs to be careful concerning the apical extrusion of the solution, especially when using NaOCl, as was discussed previously for the open-ended cannulas. In a study from 2012, Malentacca et al11 showed that this form of ultrasonic activation using an apically opened cannula was dangerous if performed at a distance of less than 5 mm from the apex.
CUPI Protocol With the Ultrawave XS, Bottle Connector, and NiTiSonic Tip
Start the CUPI after opening a 25.04 space to WL. This procedure will allow enough space to create the micro-acoustic stream effect with the 20 .02 NiTiSonic tip (Figure 6).
Setting the Bottle Connector onto the Ultrawave XS Piezo Electric Unit:
- Remove the original reservoir.
- Place the cap on the bottle of ChlorCid or ChlorCid Surf.
- Connect bottle to connector base.
- Press the connector base onto your Ultrawave XS device.
Activate Ultrasonic Irrigation During instrumentation:
- Install the Ultrawave NiTiSonic tip using the flat wrench.
- With a Sharpie pen, mark the WL.
- Set the dial to power level No. 5 (green zone).
- Determine the amount of irrigant to dispense. Set the output to drip irrigant alongside the tip.
- Insert the tip until the WL with small-amplitude “back and forth” movements for 15 to 30 seconds (Figure 4).
Final irrigation:
- Proceed with a final NaOCl solution (ChlorCid or ChlorCid Surf) irrigation for 30 to 60 seconds.
- Replace the bottle with an EDTA bottle and reinstall.
- Proceed with a final EDTA solution (EDTA 18%) irrigation for 30 to 60 seconds and evacuate.
- Fill the canal with CHX 2% (Consepsis) and leave for 5 minutes. Do not use ultrasonics. Evacuate.
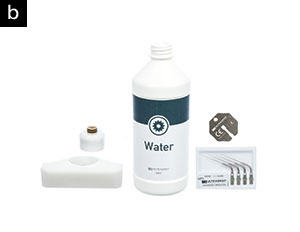
After finishing the endodontic session, replace the last bottle used with a bottle filled with water and flush for 1 minute to internally clean the device. Remove the bottle connector cap from the bottle and recap it with the original cap. Clean both the cap and bottle connector base with water.
CLOSING COMMENTS
Effective cleaning comes from the action of the irrigation liquids, and these must be used properly by respecting appropriate volume, time of action, and concentration. It is essential that the entire extension of the canal to the apical foramen is achieved to avoid extrusion to the periapical tissues, especially with NaOCl. Delivery and activation/agitation techniques should be preferred as long as safety is maintained.
References
- Kleier DJ, Averbach RE, Mehdipour O. The sodium hypochlorite accident: experience of diplomates of the American Board of Endodontics. J Endod. 2008;34:1346-1350.
- Wu MK, Wesselink PR. A primary observation on the preparation and obturation of oval canals. Int Endod J. 2001;34:137-141.
- De-Deus G, Reis C, Beznos D, et al. Limited ability of three commonly used thermoplasticized gutta-percha techniques in filling oval-shaped canals. J Endod. 2008;34:1401-1405.
- Munoz HR, Camacho-Cuadra K. In vivo efficacy of three different endodontic irrigation systems for irrigant delivery to working length of mesial canals of mandibular molars. J Endod. 2012;38:445-448.
- van der Sluis LW, Versluis M, Wu MK, et al. Passive ultrasonic irrigation of the root canal: a review of the literature. Int E
ndod J. 2007;40:415-426. - Ahmad M, Pitt Ford TR, Crum LA. Ultrasonic debridement of root canals: an insight into the mechanisms involved. J Endod. 1987;13:93-101.
- Susin L, Liu Y, Yoon JC, et al. Canal and isthmus debridement efficacies of two irrigant agitation techniques in a closed system. Int Endod J. 2010;43:1077-1090.
- Kanter V, Weldon E, Nair U, et al. A quantitative and qualitative analysis of ultrasonic versus sonic endodontic systems on canal cleanliness and obturation. Oral Surg Oral Med Oral Pathol Oral Radiol Endod. 2011;112:809-813.
- Paragliola R, Franco V, Fabiani C, et al. Final rinse optimization: influence of different agitation protocols. J Endod. 2010;36:282-285.
- Robinson JP, Macedo RG, Verhaagen B, et al. Cleaning lateral morphological features of the root canal: the role of streaming and cavitation. Int Endod J. 2018;51(suppl 1):e55-e64.
- Malentacca A, Uccioli U, Zangari D, et al. Efficacy and safety of various active irrigation devices when used with either positive or negative pressure: an in vitro study. J Endod. 2012;38:1622-1626.
Dr. Ramos graduated with a degree in dentistry from the State University of Londrina in Brazil (1987). He is an endodontist and PhD in endodontics and a former endodontics sector coordinator for the State University of Londrina. He has had 3 endodontic textbooks published and has written more than a dozen chapters for various endodontic books. Living in the US since 2012, Dr. Ramos lectures about endodontics domestically and internationally. He can be reached via email at
[email protected].
Disclosure: Dr. Ramos reports no disclosures.
Related Articles
Focus On: New Endodontic Technology
Endodontic Treatment Advances: Apical Cleaning and Apical Shaping Limits
Hybrid Reciprocation and Rotary Instrumentation: A Streamlined Technique

