
INTRODUCTION
It was in the early 1990s when Dr. Gary Carr, a leading endodontist, effectively introduced the surgical operating microscope (SOM) into dentistry in this country.1 In reality, the use of the SOM in academic endodontics was introduced in 1992 when Dr. Syngcuk Kim went from Columbia University to the University of Pennsylvania (Penn) School of Dental Medicine as its endodontic chairman. Dr. Kim quickly established Penn as the premier training center for the use of the microscope in endodontics. The response was immediate and profound. Everyone understood the need for enhanced magnification and light. Endodontists attending the multiple-day course at Penn suddenly found themselves re-energized in performing their specialty. Many of the attendees started documenting their cases, and numerous participants began presenting at various dental schools and conferences.2 The positive aspects of microscope use were fairly obvious, but what was not completely understood were the challenges associated with the scope, such as the need to par focus and the myriad challenges related to patient positioning.
As microscope use became more common among endodontic training programs, it was absolutely startling that its use did not translate to other specialties in dentistry. Everyone seemed to be continuing with their use of magnifying loupes, generally in the range of 2.5x or a tad higher in magnification. Looking back, there were a few reasons for this. The use of an SOM does require training as the learning curve associated with such scopes is quite steep. At that time, there were few premier training centers other than Penn. There were also the costs associated with purchasing an SOM. These were significant. It is also noteworthy that an SOM is ideally attached with a ceiling mount or a wall mount. Portable scopes on wheels could present a challenge when people walked into the treatment room due to the movement of the supporting arm. This movement was generated by the significant weight associated with the optic center of an SOM. Subsequently, there was an unpleasant tendency for the supporting arm to move up and down. Even a slight movement was disconcerting to the clinician because, after all, we were working under magnification.
This trend of principally only endodontists utilizing a scope to practice continued into the 21st century. Even as of late 2018, some studies listed microscope usage among general dentists as less than 4%!3 Why was there not greater adaptation to a protocol that could deliver enhanced magnification and light? This is a good question.
Cost and physical size were both seen by some practitioners as reasons not to employ a microscope. But clearly, the biggest challenge was the lack of ease of use. Microscopes do require training in their use, and too often, older clinicians, when giving scopes a “test drive,” discovered that they were not seeing what they thought they would be seeing. Furthermore, the need to par focus continued to be an issue. Also, as previously mentioned, proper patient positioning presented its own problems. Patient positioning with a traditional SOM can be a challenge because of the strict limitation of the optic head. The arc of movement is less than 40°, and some clinicians have reported a microscope’s range of angulation to be about 15°.4 One of the workarounds to solve this problem has been to have patients lie on their sides during a procedure. However, having patients lie on their sides is not ideal for many people. If the patient is overweight, the distribution of weight on various organs can be a concern, and for some patients, depending upon how they are attired, there may even be some modesty issues.
As we entered 2020, a few salient changes have been noted. In addition to the previously mentioned challenges associated with SOMs, digital technology has advanced to unprecedented levels. Years ago in dentistry, when we mentioned digital imaging, we were thinking of digital radiography. Furthermore, the concept of producing a digital image was criticized by the microscope companies as being merely 2D and, therefore, representing an inferior image. However, the upgrade in digital technology has changed the game. Think of your cell phone. What is the quality of your cell phone pictures? How easy is it to use? Can you zoom easily with your phone? This is digital technology circa 2021! When a clinician today views a digital image under relatively high magnification, it appears 3D (Figure 1).
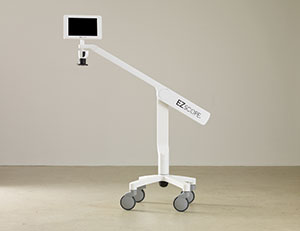
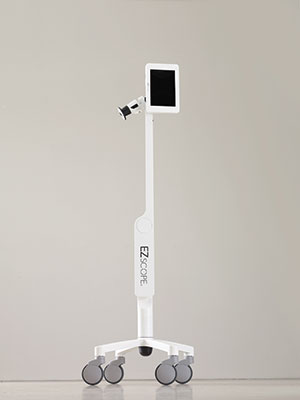
If you are a dentist currently using an SOM, and it is working well for you, what is our recommendation? Keep using it! Binocular SOMs changed the way we practice endodontics, and if you are able to use them comfortably and work at a reasonable speed, keep at it. But if you are one of the many dentists who could never get the hang of an SOM, or if for some other reason you were not able to employ their use in your office, it is recommended that you investigate EZscope (KGG Inc) (Figure 2).
A NEW PARADIGM
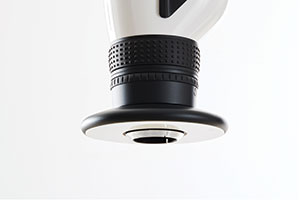
EZscope is a digital imaging system that is digitally based and ergonomically designed. The first things that EZscope eliminated were the binocular eyepieces and the video ports usually associated with SOMs. In lieu of the binocular eyepieces, we have substituted a high-grade Microsoft tablet that acts as a monitor. Software associated with the tablet (acting as a monitor), along with our own proprietary software, allows the programming of many functions (Figure 3). Furthermore, a lightweight optic center has been designed that consists of a digital sensor (camera), a high-grade lens, and a diffused light source.
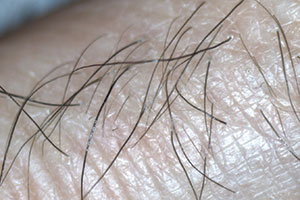 |
| Figure 1. Digital image of a finger at moderate magnification, demonstrating fine detail. |
 |
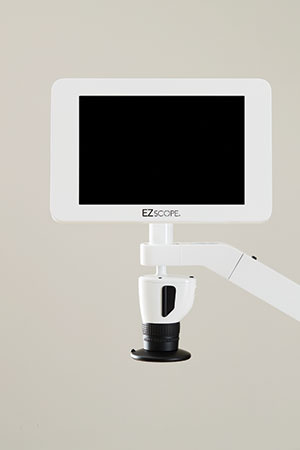 |
| Figure 2. EZscope (KGG Inc) is a next-generation digital imaging system with simple and intuitive ergonomic design. | Figure 3. The optic center and its monitor, which is a high-grade Microsoft tablet. |
 |
 |
| Figure 4. The weighted distal end of the balancing arm prevents swaying of the optic center. | Figure 5. Vertical positioning of the EZscope allows for easy storage. |
 |
 |
| Figure 6. The one-button optic head quick release allows for complete disengagement of the optic center. When placed in its custom carrying case, EZscope becomes totally portable. | Figure 7. Elastomeric textu res on high-frequency touch points provide precise zoom and focus control. |
Additionally, we have placed the optic center on a balancing arm that connects to a mobile stand. Sufficient weight has been added to the distal end of the balancing arm that prevents any up-and-down movement of the arm (Figure 4). The entire optic center has been designed to be fully detachable by a push-button release, thereby making the optic center completely portable. In addition to being fully portable, the optic center has been designed to be fully maneuverable, thereby making patient positioning much easier and more comfortable for the patient. The ergonomic design features of the EZscope were principally generated by our own experiences and needs as clinicians in concert with Metaphase Design Group (St. Louis), the design firm that collaborated with intuitive surgical in creating their next generation surgical robot.
OVERVIEW OF THE CONCEPT
The EZscope is a digital imaging system that allows the user to orient a digital camera and display an image on a tablet (monitor) for optimum viewing of a dentition or surgical field. The camera is guided by hand to the desired position of viewing. The counterbalanced arm “follows” and holds its position via friction and counterweighting located at the end of the balancing arm. The arm has a 90° range of motion from horizontal to vertical. The vertical post is also free to rotate on the base, thereby creating a point of rotation, which allows for additional fine positioning. Additionally, there is an offset on the vertical post that allows clearance for the arm in a vertical position.
However, the best way to understand the functionality and performance of a digital imaging system is to start at the top with the optic center and work down to the base.
OVERVIEW OF THE DIGITAL IMAGING SYSTEM
The EZscope consists of 4 main modules: the imaging module, the balancing arm module, the camera overview, and the camera enclosure. The imaging module, which is also known as the optic center, can be completely removed from the counterbalanced arm, which makes the unit portable. A vertical post attaches to the balancing arm, and the vertical post also attaches to a base and wheel assembly, which adds to the mobility of the unit. The weight located in the rear of the balancing arm is sufficient to prevent movement of the arm when someone enters a room. The base itself is very solid, and the oversized wheels have a locking system to prevent rolling. The width of the base is such that the wheels will hit a wall before any of the optic components do. This is a safety factor built into the design (Figure 5).
Imaging Module Overview
The imaging module consists of a camera-digital sensor and the display module, which is a computer tablet. The display module includes a front and rear bezel and has an adjustable arm. A button lock is used to separate the balancing arm from the optic center (Figure 6). Upon separation from the balancing arm, the optic center (imaging module) will fit into a specially designed travel case for safe transportation.
Module Arm Overview
The module arm clips into the counterbalance arm and is detachable via a button lock similar to what is seen on a vacuum cleaner tube. There is a display module pocket, which allows for coupling to the imaging module (tablet). There is also a built-in space within the arm to allow the passage of cables or wires. Precision-made Delrin components are employed to capture and secure the camera ball mount position. The button lock release operates so that it allows for the passage of wires or cables through a machined space.
Camera Overview
The camera is built around an existing digital sensor and lens component. The camera is attached to the module arm via a ball mount, allowing for an unprecedented degree of movement from the center in any direction. There are adjustment rings on the camera for focus and aperture. Both rings are able to fully rotate and are easy to grasp. Additionally, a ring light and diffuser are enclosed in a housing located at the end of the lens. Overmolded touch points enable a secure grip for users to position the camera easily with one hand. In fact, as a result of its minimal weight, the optic center has been designed for movement with 3 fingers.
Camera Enclosure Overview
The camera components are inserted through the top of the camera enclosure and captured in place with the top cap. The top cap is intended to be held in place by 4 head screws. A flange on the top cap also conceals a threaded rod. The easy-to-grip focus and aperture rings have rubber overmolds (to facilitate turning capability). Specific screws have been designed that hold the focus and aperture rings in place. Particularly noteworthy is that the screws must be short enough so that they do not lock the lens components from turning when tightened (Figure 7).
SUMMARY OF THE EZSCOPE
EZscope is actually a complete digital imaging system. Instead of looking through binoculars, as is common with an SOM, the clinician looks at a monitor that is, in reality, a sophisticated computer tablet. The software with the tablet is also its latest version (Windows Pro 10.0), accompanied by our own proprietary software. This combination allows the system to program many functions. The optic center combines a digital sensor with a very sophisticated lens and also contains the obligatory light source and diffuser. ‘
Because of a special ball-swivel adaptor (the Gatti adaptor), the optic center has incredible maneuverability, which makes patient positioning quite easy. In fact, the optic center can be positioned below the occlusal plane, shining directly up into the maxillary arch. This is a significant improvement because, as is very often the case with SOMs, the patient has to lie on his or her side. In the case of a digital imaging system, the optic center is being maneuvered, not the patient. Furthermore, since it is entirely digital, there is no need to par focus anything with the EZscope. For many clinicians, the need to par focus is the biggest frustration associated with an SOM.
When using the digital EZscope, one can zoom up in magnification to approximately 20x and still remain in focus. A Bluetooth-enabled foot pedal may also be employed to zoom in or zoom out as well as pan left or pan right. These features allow the operator to view the entire ROI (region of interest) or field. Additionally, the foot pedal has the ability to fine focus. In Version 2.0 of the digital system, we are already programming in voice recognition to zoom in, zoom out, pan left, pan right, etc.
As a result of the sophisticated software associated with the tablet, along with our proprietary software that we have built into the system, we anticipate having digital overlay surgical stents for implant placement and other complicated procedures. After activating the system, there is a red dot function that allows you to place a red dot over a target area. Once satisfied with the ROI, the operator simply zooms up to whatever magnification he or she needs. The surgical stent will, in fact, be a digital overlay.
This digital imaging system has been designed to be completely portable. As more dentists (especially dental specialists) and other healthcare providers work in multiple offices, we have made the optic center of the EZscope fully portable. At the end of the day, the doctor simply removes the optic center (one connection) and places it into our custom-designed Pelican case for easy transportation. He or she then goes to a different office and simply connects the digital optic center to the stand assembly that office has purchased.
CLINICAL APPLICATIONS
Clearly, the use of enhanced magnification and light can be utilized in all aspects of dentistry.5 But for this article’s sake, let’s briefly discuss 2: e
ndodontics and prosthodontics.
The use of the surgical operating microscope in both surgical and non-surgical endodontics is what really puts microscopy on the map in dentistry. Along with NiTi rotary files and CBCT technology, the SOM is one of the technologies that has seriously raised the bar in endodontics.
Initially, endodontists were using the scope principally for surgical procedures, but as more residents became trained in their use, microscopes started being used in both non-surgical treatments as well as in diagnostic workups. A good example is the sudden explosion we have seen in cracked or fractured teeth as a result of the pandemic. Historically, dentists have used a periodontal probe and a tooth slooth to help differentiate a cracked tooth from one that is fractured. Transillumination, which can be very helpful in diagnosis, was not used nearly enough, but the use of such a technique is very easy with a microscope or a digital imaging system.
In terms of clinical use, obviously, the more one can see, the easier it is to locate hidden orifices and accessory canals. The reluctance to microscope use by general dentists has not been due to the lack of recognition of their benefits. It has been more related to cost and the challenge with par focusing a scope. Endodontists usually don’t buy microscopes; endodontic practices buy microscopes. That’s a big difference.
It has always seemed obvious that the use of magnification in dentistry would increase significantly if we could find a less expensive, easier-to-use technology. The average dentist is not performing brain surgery (nor complicated endodontic procedures), so the car analogy does apply. Not everyone needs a Ferrari; a Lexus that performs beautifully will do fine! The vast majority of dentists do not need magnification in excess of 10x. In fact, 8x to 10x is a lot of magnification, and it is magnification under which clinicians can work comfortably for extended periods of time. When using a digital imaging system, magnification is not necessarily read as 4x, 10x, or 20x. More commonly, the increase in magnification is seen as intervals rather than being read as ordinals. There are some complicated formulas that exist to make the conversion over to a magnification number, but these are very complicated and involve things such as focal length, etc. It is so easy to “zoom up” with a digital system that we just simply slide to whatever level we desire for the procedure.
In terms of prosthodontics and cosmetic dentistry, the indication of use for enhanced magnification and visibility is very high. With greater magnification, we suddenly can see how smooth our crown preps are. Years ago, when performing prosthodontics, I used to prepare many butt joint porcelain crowns. I would put the shoulder on using an end-cutting diamond. When I finally started using enhanced magnification, I was stunned to see all the swirls and striations from the diamond bur on the shoulder. Soon after, I started preparing my butt joint shoulders with a hand instrument. I also used to ditch my own dies—under a benchtop microscope! Simply said, the use of magnification is the best way to follow a finish line.
Another note is that the most effective microscope operators and those with the best ergonomic postures are those clinicians who, once they get comfortable in the eyecups, don’t come out (or, at least, not too often) until the procedure is complete. If you are constantly going back and forth and having to refocus every time, it gets both very frustrating and fatiguing. However, with a digital imaging system, you can go back and forth at will and not suffer any ill effects. Instead of getting hunched over like many practitioners looking into eyecups, you simply sit back and look at the monitor: “EZ!”
IN SUMMARY
In this article, we have introduced a digital imaging system that is both multifunctional and easy to use. Everyone in dentistry benefits from enhanced magnification and increased visibility. The key is having new technology that works for you, the practitioner. Think of your cell phone and the quality of the pictures made possible by digital technology. The time for inexpensive, quality digital imaging in dentistry has come. The time for EZscope is now!
References
- Carr GB. Microscopes in endodontics. J Calif Dent Assoc. 1992;20(11):55-61.
- Koch K. The microscope. Its effect on your practice. Dent Clin North Am. 1997;41(3):619-26.
- Dental Microsurgery Market Size, Share & Trends Analysis Report By Procedure, By Product (Optical/Viewing Instruments, Microsurgical Instrumentation), By Region, And Segment Forecasts, 2019 – 2026. https://www.grandviewresearch.com/industry-analysis/dental-microsurgery-market
- Buchanan SL. MoraVision 3D: A paradigm shift in the ergonomics of dental imaging. Endodontic Practice. 2016;19(2):52-54.
- van As GA. Magnification alternatives: seeing is believing, part 2. Dent Today. 2013;32(8):80–4.
Dr. Koch received both her DMD degree and certificate in endodontics from the University of Pennsylvania School of Dental Medicine (Penn Dental). She is also the founder and past director of the Postdoctoral Program in Endodontics and Microsurgery at the Harvard School of Dental Medicine. Following her clinical and academic career, she formed her own successful technology and development company, Real World Endo, where she was CEO and president. Dr. Koch is the holder of multiple patents, maintains a faculty position in the Department of Endodontics at Penn Dental, and serves as a Senior Fellow with Penn Medicine. She is also a member of the Board of Overseers for Penn Dental and maintains an adjunct faculty position at the Harvard School of Dental Medicine. She can be reached at [email protected].
Disclosure: Dr. Koch is an equity owner and partner in KGG Inc.
Related Articles
Intuitive Rotary Instrumentation
EndoSequence: Melding Endodontics With Restorative Dentistry, Part 3
Preventive Endodontics: The Art of Avoiding a Root Canal

