
INTRODUCTION
“Responsible aesthetics” and “minimally invasive dentistry” are buzzwords that reflect the current trends in dentistry. We all strive to perform conservative treatment, but how do we differentiate between the cases that lend themselves to successful outcomes via minimally invasive dentistry and those cases involving porcelain restorations that may require more aggressive preparations? The dentist’s obligation is to evaluate each situation, gaining a thorough understanding of the patient’s history, condition, and expectations; then, to assess the risk, longevity, and predictability of each proposed treatment modality. When a patient presents with discolored teeth and a high smile-line on both maxillary and mandibular arches, bleaching is my treatment of choice. If the result is satisfactory, a minimally invasive solution (such as bonded composite resin augmentation, or minimal to no-prep feldspathic veneers) can be proposed.
Historically, whitening is more predictable and dramatic with yellow teeth and not as effective with gray teeth. Also, monochromatic (even-toned) teeth have a more predictable bleaching outcome than striated, tetracycline-stained, or white-spotted teeth.
White Spot Lesions
White spot lesions are caused by the demineralization of the subsurface enamel, by the malformation of the enamel during tooth development, acid breakdown of the enamel, and/or poor oral hygiene. During bleaching procedures, the teeth desiccate and the white spots appear more prominent. During the next few days, as the tooth rehydrates, the white spot color may blend in with the new whiter surrounding enamel or the white spot color may become visually intensified, requiring an additional procedure of either composite resin or microabrasive techniques.
Microabrasion uses a slurry of pumice with 15% hydrochloric acid (HCl) applied to the tooth for 15 to 30 seconds. Next, the slurry is rinsed away, and then visually observed. The procedure is repeated again until the desired color correction is noted.
The enamel “microreduction” technique utilizes a fine-grit diamond, which is applied to the affected enamel for 5 to 10 seconds. This removal of a small amount of the affected enamel decreases overall treatment time for the microabrasion as the microabrasion eliminates superficial intrinsic stain and the bleach lightens the deeper stain.1,2
If the color does not match after microabrasion or microreduction, then a composite protocol can be implemented.
Bleaching Choices and Techniques Differ
Time, convenience, and efficacy are the variables to be evaluated when comparing in-office systems and take-home systems. It takes 14 days of continuous use of take-home bleach to gain the same effects of one in-office procedure.
Both light-activated and non-light-activated systems produce whitening of between 6 to 9 shade differences. However, the light-activated systems will provide one to 2 shade guide improvements over the non-light-activated in-office systems.3,4
The current whitening lamp (Zoom WhiteSpeed [Philips Oral Healthcare]) has a narrow light spectrum that produces very little heat. The LED blue light technology makes the hydrogen peroxide more effective at breaking down stains (double carbon bonds) that are held within the carbon portion of the tooth. The blue light from the lamp is absorbed by the yellow stains in the dentin.5
Greater tooth sensitivity has been reported when using the light; therefore, pre-existing sensitivity must be identified and recorded. Patients must be informed prior to treatment that a temporary increase in sensitivity may be experienced, and a strategy for managing this sensitivity should be implemented.
If a patient has a history of sensitivity to hot and cold temperatures, a desensitizing toothpaste that does not contain sodium laurel sulfate should be used for 2 weeks before the procedure (Sensodyne Pro Enamel). For the patient who reports extreme sensitivity, desensitizing gels (Relief ACP Gel [Philips Oral Healthcare]) can be placed inside the custom whitening trays and worn for one hour daily for a week before the in-office procedure and for one hour immediately following the whitening session.6
Sensitivity during the bleaching procedure is likely caused by the penetration of the hydrogen peroxide through the enamel and dentin into the pulp, creating a reversible pulpitis.7 Any sensitivity is transient and an analgesic (such as Ibuprofen 600 mg) should be administered at the onset of the procedure.8
CASE REPORT
Diagnosis and Treatment Planning
A 16-year-old male presented with multicolored teeth. His mother confidentially warned me of his extreme emotional sensitivity, and asked me to choose my words carefully when evaluating her son’s photos and explaining his treatment options.
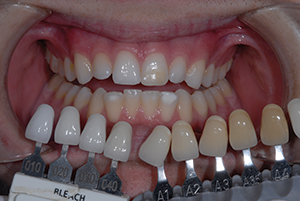 |
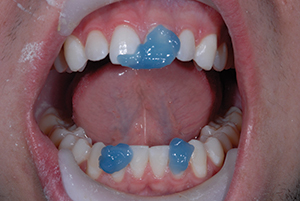
| Figure 1. Initial consultation of our patient, showing yellowed, multicolored teeth. |
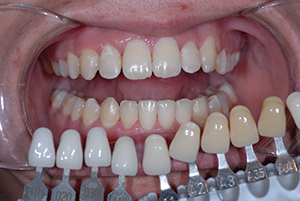 |
| Figure 2. Pre-op shade photos of a case similar to our patient shown in Figure 1. Photos in Figures 2 to 4 were used for a before-and-after comparison in the process of explaining treatment options. |
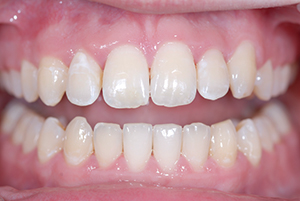 |
| Figure 3. Preoperative photo before bleaching and bonding (same patient shown in Figure 2). |
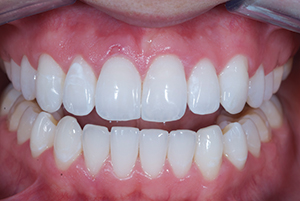 |
| Figure 4. Postoperative photo after bleaching and bonding showing similar potential results (same patient shown in Figure 2). |
It was difficult to get him to smile during the photographic series, and when the photos were displayed, he was uncomfortable looking at himself on the screen. As a result, I immediately changed the facial images to pictures that showed only his teeth with the adjacent shade tabs (Vitapan Classic [Vident]) (Figure 1). He was then shown pretreatment images with visual color matching followed by pre- and post-treatment images of a completed bleaching and bonding case (Figures 2 to 4). Visual verification occurred when he saw another patient’s teeth that appeared similar to his and that had been transformed to an amazing, whiter result. This visual evidence of success was crucial in gaining his confidence. After he saw the photos, he relaxed and became open to learning about the risks and benefits of his treatment options. Once I gained his confidence, it was crucial to make sure that I managed his expectations properly.
Further examination and evaluation revealed a stained composite and some white spots on his left maxillary incisor. His initial shade of A3.5 on the lowers and a range of A1.5 to A3 on the uppers was noted.
Whitening options were then presented.9 He was a teenager with a history of noncompliance, so he declined the at-home tray protocol (such as KöR Whitening [KöR Whitening], Venus White Pro [Heraeus Kulzer], Opalesc
ence PF [Ultradent Products], and Philips Day White). He desired the quickest solution to attain the whitest smile possible, so in-office power bleaching (Zoom WhiteSpeed) was chosen as the treatment of choice in this case.
Clinical Protocol
The 25% hydrogen peroxide bleaching gel (Zoom 2 kit) was applied and repeated for three 15-minute cycles, for a total exposure time of 45 minutes. At-home trays were filled with desensitizing gel (Relief ACP Gel) that also contains remineralization agents to increase the enamel microhardness.10
 |
| Figure 5. Etchant placed on affected teeth. |
 |
| Figure 6. Pre-op photo showing the aesthetic challenge. |
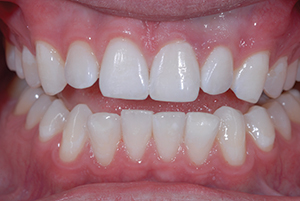 |
| Figure 7. A whiter, brighter and aesthetic outcome can be seen here in this post-op photo. |
 |
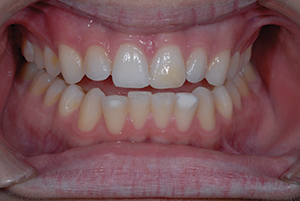
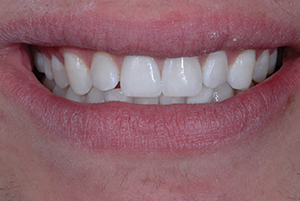
| Figure 8. A close-up photo of the patient’s preoperative condition. (Note the guarded low smile-line.) |
 |
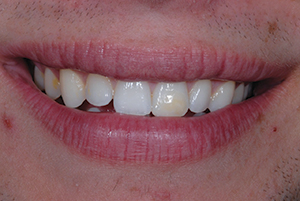
| Figure 9. The minimally invasive treatment provided a highly aesthetic and natural looking result, as seen in this final close-up photo. (Note: patient is confident and smiling showing all teeth in the smile zone.) |
The peroxide from the whitening decreases the bond strength to the tooth, and it takes 14 days for the bond strength to return to normal. Therefore, the patient was appointed 2 weeks later for an evaluation of the initial bleaching results, and also to discuss the treatment options to complete his overall treatment. We planned microabrasion on the lower incisors and replacement of the unattractive composite with a new, imperceptible composite on tooth No. 10. A composite protocol for the lower incisors was selected instead of microabrasion, because he was leaving for college in a few days and he desired predictability and imperceptibility on all discolored areas.
All extrinsic stain on the teeth was removed with pumice on a soft prophy brush. The tooth was monochromatic on the facial areas being restored so only one body shade was necessary. Shade selection was accomplished by curing small increments of enamel shades (A1E and B1E Filtek Supreme Ultra [3M ESPE], Premise A1 [Kerr], Venus Diamond A1 [Heraeus Kulzer]). All 4 of these materials/shades were previewed and visual color matching occurred. The B1E (Filtek Supreme Ultra) demonstrated the best match for the surrounding tooth structure. A coarse diamond bur (No. 850.31.016 [Brasseler USA]) was used to remove the previously placed stained composite resin, and then a football diamond (No. 8379.31.021 [Brasseler USA]) was used to remove a small portion of the affected enamel white spot. In order to produce a seamless and undetectable transition from tooth to restoration, an infinity bevel (as described and taught by Dr. Newton Fahl) was prepared on the facial with a medium-grit diamond bur (No. M862-009 [Brasseler USA]). Next, the tooth was microetched (MicroEtcher II [Danville Materials]) and then rinsed. Since all the bonded surfaces were in enamel, a total-etch technique was done using a 37% phosphoric acid etching gel. The gel was placed to extend beyond the margins of the infinity bevel and onto unprepared tooth enamel, then agitated with a microbrush for 15 seconds (Figure 5). The etchant gel was rinsed off the tooth for 5 seconds, then lightly air-dried in order to leave the preparation visibly moist. Next, a coat of universal (MDP-containing) adhesive (Scotchbond Universal [3M ESPE]) was scrubbed with a microbrush on the preparation for 15 seconds. A second coat was scrubbed for 15 seconds, then the excess solvent was evaporated away by thoroughly air-drying with an air syringe for 10 seconds. Once the tooth had a glossy appearance, it was ready to be light-cured for 10 seconds.
This total-etch and adhesive technique was also used on all the surfaces that were selected for augmentation with composite resin (teeth Nos. 8, 9, 23, and 26). A gold waxing instrument (Titanium 8A Instrument [Cosmedent]) was used to anatomically sculpt the composite resin. Shade B1E (Filtek Supreme Ultra) was placed in a very thin increment on the body (middle) of the teeth. A microfill composite resin (Durafill VS SL [Heraeus Kulzer]) was selected as the thinnest final facial layer for these restorations and was carried across the restoration surfaces. The silica particles are 0.04 µm in size, with the fillers comprising 35% of the weight. It is translucent, providing an illusion of depth along with excellent polishability and long-term color retention. It should be noted that the incisal edges were augmented using shade XWB (Filtek Supreme Ultra).
The primary anatomy was refined using finishing and polishing discs (Sof-Lex [3M ESPE]). Finally, the polishing sequence consisted of using spiral-finishing wheels (Sof-Lex Spiral Finishing and Polishing Wheels [3M ESPE]), and then achieving the final desired luster with a polishing paste (Enamelize [Cosmedent]) on a felt wheel (Figures 6 to 9).
CLOSING COMMENTS
In a society where instant gratification reins and patient compliance is often lacking, in-office power bleaching is a quick, safe, and predictable way to discern whether a simple solution to an aesthetic situation can be accomplished. In order to optimize success, the cosmetic practice depends upon the clinician’s ability to offer a fast and predictable solution to the patient’s presenting concern, to know when simply changing the shade and brightening up the patient’s smile will satisfy their aesthetic desires, or whether a more invasive procedure might be required, such as the preparation of the teeth for porcelain restorations. This initial consultation must provide clarity regarding both the possible treatment options and the results that can be expected with each option proposed.
References
- Croll TP, Segura A, Donly KJ. Enamel microabrasion: new considerations in 1993. Pract Periodontics Aesthet Dent. 1993;5:19-29.
- Croll TP. Enamel microabrasion in conjunction with carbamide peroxide bleaching. Dent Today. 1992;11:56-57.
- Ontiveros JC, Paravina RD. Color change of vital teeth exposed to bleaching performed with and without supplementary light. J Dent. 2009;37:840-847.
- Lee SS, Kwon SR, Arambula M, et al. Assessment of whitening efficacy of two in-office professional bleaching regimens. Poster presented at: IADR General Session; March 21, 2013; Seattle, WA.
- Young N, Fairley P, Mohan V, et al. A study of hydrogen peroxide chemistry and photochemistry in tea stain solution with relevance to clinical tooth whitening. J Dent. 2012;40(suppl 2):e11-e16.
- Haywood VB, Caughman WF, Frazier KB, et al. Tray delivery of potassium nitrat
e-fluoride to reduce bleaching sensitivity. Quintessence Int. 2001;32:105-109. - Croll TP, Donly KJ. Tooth bleaching in children and teens. J Esthet Restor Dent. 2014;26:147-150.
- Charakorn P, Cabanilla LL, Wagner WC, et al. The effect of preoperative ibuprofen on tooth sensitivity caused by in-office bleaching. Oper Dent. 2009;34:131-135.
- Strassler HE. Professionally dispensed vital tooth bleaching—an update on the newest whitening materials. Inside Dentistry. 2010;6:68-73.
- Ochiai K, Sung EC, Chung J, et al. Effect of remineralizing agents on enamel microhardness after bleaching. J Dent Res. 2007;86(special issue A). Abstract 95249.
Dr. Bassett, a graduate of The Ohio State University College of Dentistry, practices comprehensive restorative and aesthetic dentistry in Scottsdale, Ariz. She is president-elect of the American Academy of Cosmetic Dentistry (AACD) and is also an Accredited Fellow, the highest level of achievement recognized by the AACD. She is an associate member of the American Academy of Esthetic Dentistry, a member in the Academy of Fixed Prosthodontics, and a Fellow in the AGD. She serves as a Kois mentor, and she is adjunct faculty at the Arizona School of Dentistry, where she has taught the aesthetic continuum. She is a national lecturer (also a Catapult speaker), published author, and is a member of the editorial board of several peer-reviewed publications. Recognized in Dentistry Today’s prestigious Leaders in Continuing Education directy, she can be reached via e-mail at the following address: [email protected].
Disclosure: Dr. Bassett has lectured on behalf of Philips Oral Healthcare.

