INTRODUCTION
As a practicing clinician for nearly 27 years I have seen enormous technological advancements in all aspects of dentistry. One of the most anticipated clinical products to be recently introduced is a direct composite resin restorative material that has a bonding agent (GPDM adhesive monomer) incorporated in the composite resin. This eliminates the need for a separate bonding application step. For the clinician, this will greatly simplify the direct restorative process, thus helping to reduce postoperative sensitivity and saving valuable time.
This article will focus 2 common procedures performed numerous times daily in the general practitioner’s office: the placement of small Class I composite resin restorations and pit and fissure sealants.
CASE REPORT 1
Conservative Occlusal Composite Technique
| Case 1 | ||||||||||||
|
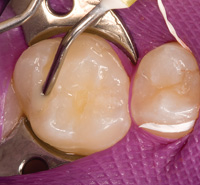
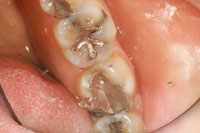
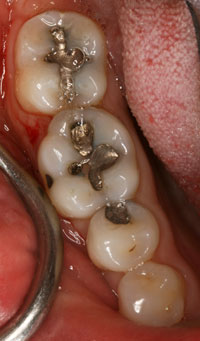
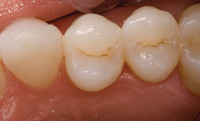
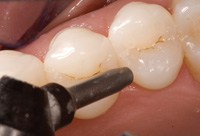
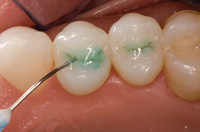
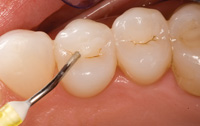
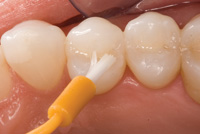
A 17-year-old male had a small carious lesion and a failing composite restoration on tooth No. 3 (Figure 1). The carious lesion and the defective composite resin were removed (Figure 2), and the margins were beveled. The preparation was cleaned with a chlorhexidine rinse (Ultradent Products) and dried with air. A small amount of a self-adhering flowable composite (Vertise Flow [Kerr]) was applied into the preparation with a dispensing tip (Figure 3). Then, with the applicator brush provided in the kit, the composite resin was brushed over the preparation. With this material, it is important to cover all the dentin and enamel surface areas for 15 to 20 seconds while applying moderate pressure (Figure 4). Try to obtain a thin layer of 0.5 mm. The clinician must remember this is the creation of the hybrid layer. Excess flowable composite resin was then removed from around the margins and light-cured for 20 seconds. (When necessary, this material can be added and light-cured for 20 seconds in 2 mm increments. It has a thixotropic nonslumping quality that assists the clinician when sculpting the material.)
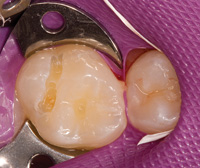
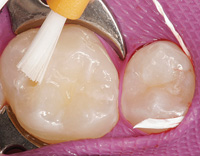
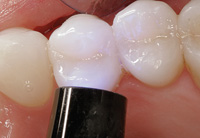
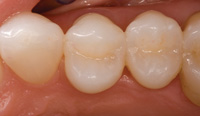
Next, excess cured composite was removed with a 7404 fluted carbide bur (AXIS Dental). Finally, the restoration was completed using fine abrasive polishing points (HiLuster Plus Polishing System [Kerr]) (Figures 5 and 6). The nanoparticles incorporated into this material help to make finishing and polishing an easy and expedient process.
CASE REPORT 2
Pit and Fissure Sealant Technique
| Case 2 | ||||||||||||||||||
|

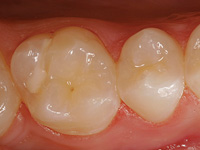
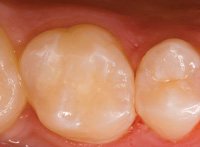
A 15-year-old female with a high caries index, who had numerous posterior restorations placed previously, was interested in preventing future decay. The 2 teeth of concern were the upper left first and second premolar (Figure 7).
First, isolation of the teeth was accomplished. This can be done with either a rubber dam or cotton rolls. The clinician has 2 options to clean the surface area of the teeth: either air abrasion (Figure 8), or use a nonfluoridated pumice to clean the surface area. After rinsing and thoroughly drying the tooth surfaces, a 30%+ phosphoric acid gel was applied for 15 seconds and then rinsed (Figures 9 and 10). (The phosphoric acid gel etchant is for cleaning purposes only. If air abrasion is performed, using an acid etchant is not necessary.)
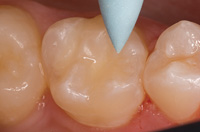
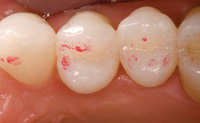
Vertise Flow was dispensed onto the cleaned surfaces (Figure 11) and the enclosed brush was used to apply the material to the occlusal areas with moderate pressure for 15 to 20 seconds (Figure 12). Excess material was then removed using the brush to obtain a 0.5 mm depth, and the teeth were light-cured for 20 seconds each (Figure 13). If necessary, the clinician can add additional material. When enough material was obtained and light-cured, the occlusion was checked and adjusted (Figures 14) to complete the placement of the sealants (Figure 15).
DISCUSSION
This new self-adhering flowable composite material allows the clinician to place small Class I occlusal restorations or can be used as a pit and fissure sealant, as demonstrated above. It can also be utilized as a liner for Class II restorations and larger Class I restorations. In addition, it not only bonds well to enamel and dentin, it also bonds well to other substrates such as porcelain, making it a possible choice for use in minor porcelain repairs. Because of its chemistry, it will bond to the porcelain with light sandblasting or roughing the porcelain with a diamond. There is no need to etch the porcelain or to apply a silane coupling agent.
The physical properties of Vertise Flow show bond strengths comparable to other self-etch adhesive systems. Studies have shown the shear bond strength to enamel and dentin to exceed well over 20 MPa.1
It is also easy to recognize radiographically because of the nano-ytterbium fluoride particles, and it is highly radiopaque with an index of 320%.2
Initial polish and gloss retention are important for composites to maintain their aesthetics, and this material displays similar gloss characteristics to those of traditional flowable composites.3 Because there are multiple Vita shades available, the clinician can select matching shades for the sealant as well as any other restorative need.
CONCLUSION
This article has described a technique using a flowable composite system that has multiple uses, and because it is a self-adhering composite, chair time is saved for both the clinician and the patient. Since the evolution of adhesive dentistry more than 50 years ago, this advancement has opened a new era in restorative dentistry.
References
- Muñoz-Viveros CA, Campillo-Funollet M. Shear bond strength of vertise flow to dentin enamel substrates. In: Vertise Flow Self-Adhering Flowable Composite Portfolio of Scientific Research. Kerr Dental. 2010:12-13. kerrdental.com/index/cms-filesystem-action?file=KerrDental-University3rdPartyData/vertiseflow_clinicaldata_booklet_final.pdf. Accessed on January 26, 2010.
- Internal testing, Kerr Corporation, Orange, CA. Data available upon request.
- Thompson JY. Optical properties of flowable composites. In: Vertise Flow Self-Adhering Flowable Composite Portfolio of Scientific Research. Kerr Dental. 2010:34-35. kerrdental.com/index/cms-filesystem action?file=KerrDental-University-3rdPartyData/vertiseflow_clinicaldata_booklet_final.pdf. Accessed on January 26, 2010.
Dr. Poss graduated from the University of Tennessee College of Dentistry in 1983, and maintains a cosmetic oriented restorative practice in Brentwood, Tenn. He is also clinical director at The Center for Exceptional Practices in Cleveland, Ohio. Dr. Poss has directed numerous live patient continuums at various teaching institutes. He also serves on the editorial team for REALITY publishing. Dr. Poss lectures internationally on aesthetic dentistry and TMD and has had numerous articles published. He can be reached via e-mail at beautifulsmiles@earthlink.net or by visiting DrPossSmiles.com.
Disclosure: Dr. Poss is an active, nonpaid consultant to several dental manufacturers in the area of new product development and refinement for Kerr Dental, DENTSPLY/Caulk, 3M ESPE, Triodent, and many more.