


INTRODUCTION
When maxillary posterior teeth are extracted, and the extraction site is not grafted, the maxillary sinus can pneumatize. Even in areas where a graft was placed but an extended period of time has passed, this enlargement of the sinus cavity, along with the loss of crestal bone volume, can complicate the placement of dental implants. The complication revolves around the loss of height of bone that prevents implant placement due to not enough vertical height to contain the implant without perforating into the sinus or not having enough bone to resist prosthetic loads once an implant is loaded.
Historically, sinus elevation has been done with many different techniques, as shown below, but all these techniques fall under one of 2 approaches: vertical (or crestal) approach or a lateral approach utilizing a Caldwell-Luc osteotomy.
1. Tatum (c. 1970) augmented the posterior maxilla with an autogenous rib.
2. Tatum (c. 1974) developed a modified Caldwell–Luc procedure by in-fracturing the crest of the alveolus.
3. Tatum modified his own procedure to lift the membrane via a lateral approach.
4. Summers (c. 1994) showed an internal approach to lift the membrane via the osteotomy.
5. Chen (c. 1996) showed the hydraulic sinus-condensing technique. This technique uses an osteotomy on the lateral aspect of the ridge of the maxilla.
Although sinus grafting is considered to be a relatively invasive surgical procedure, the incidence of reported surgical and postsurgical complications is relatively low. In fact, reported perforation rates vary from as low as 7% to as high as 58%.1
The basic idea of both these approaches is to elevate the Schneiderian membrane and place some sort of graft material to maintain space between the membrane and the bony floor of the sinus cavity until the native bone regenerates. This results in the formation of increased bone volume in the vertical dimension that is a necessity for implant placement and the longevity of the final restoration.
Everything from autogenous bone to allografts, xenografts, and alloplasts have been successfully used as graft material in the sinus. The osteoconductive activity of various bone substitutes has been assessed according to the quality and quantity of newly formed bone in the augmented areas.2 All graft types appear to be relatively equal in facilitating bone growth. The important aspect is having something that maintains the space.
Studies on elevation of the Schneiderian membrane with no bone graft material reported an implant survival rate between 97.7% and 100%, and studies on only autologous bone graft material reported a 98.8% survival rate.3
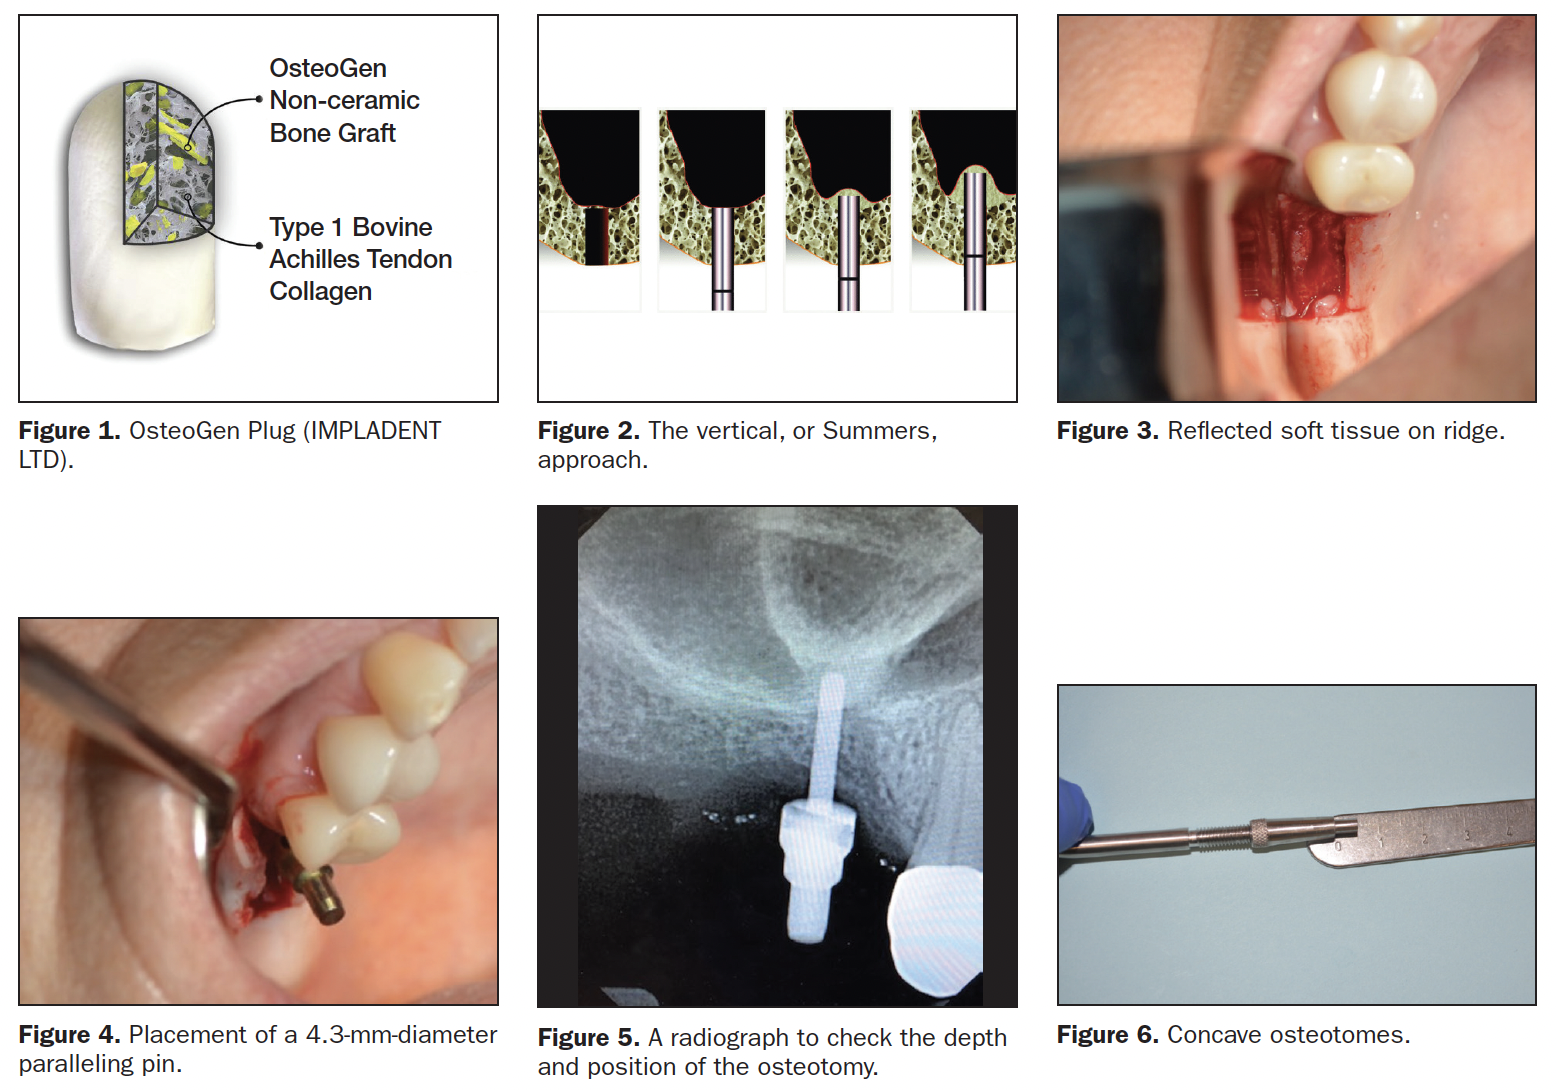
In this article, I will demonstrate the use of a single alloplastic material known as OsteoGen Plug and Strip (IMPLADENT LTD) for subantral grafting. OsteoGen Plug and Strip material is an alloplast composed of bioresorbable calcium apatite crystals and bovine collagen (Figure 1). The approximate ratio is 60/40 of mineral to collagen, which is similar to the makeup of native bone. This graft, when placed, is relatively radiolucent when compared to other augmentation materials at the time of placement. Once bone is regenerated and the graft material is resorbed, the area will appear to have the radio opaqueness similar to that of the surrounding bone. This visual change makes it easy to tell when the patient is ready for either restoration or placement of implant(s) as a second stage of treatment.
Vertical Approach
This vertical or crestal approach method is also known as the Summers approach. It was first described in 1994 by Summers4 and can be described in simple terms as a technique where an osteotomy is created to within 1 mm of the sinus floor. Instruments such as an osteotome, Densah burs (Versah), or other specialized instruments are introduced into the osteotomy in order to up-fracture the floor of the sinus while maintaining the integrity of the Schneiderian membrane (Figure 2).
Once this up-fracture occurs, then graft material of the clinician’s choice is introduced in order to elevate the membrane and fill the space. As stated before, many materials have been used to accomplish this successfully. Once the membrane has been lifted and the site grafted, an implant can usually be placed at the same time.
CASE REPORTS
Case 1
A healthy 34-year-old female presented with an edentulous space at No. 3, where the tooth had been extracted approximately 8 years prior. The preoperative evaluation showed a vertical deficiency due to sinus pneumatization. After profound anesthesia was attained with 4% Septocaine (Septodont), a full-thickness elevation with a No. 15 blade and a periosteal elevator exposed the crestal bone. I prefer to do full-thickness elevations when doing crestal lifts so I can see the crest and have a definitive reference point for up-fracture (Figure 3).
After a 1.5-mm pilot drill was used to create an osteotomy to within 1 mm of the sinus floor, a paralleling pin was placed (Figure 4), and a verification radiograph was taken (Figure 5). The osteotomy was then widened with successive osteotomy drills until the desired diameter was achieved. Then an offset, concave osteotome had its depth stop set for a depth equal to the vertical distance between the crest and the sinus floor (Figure 6). The osteotome and a mallet were used to gently up-fracture the floor. The integrity of the membrane was checked by having the patient perform a Valsalva Maneuver. Recently, the literature has shown that membrane perforation rate was 18.2%.5
Even if we had encountered a small tear, the fact that the OsteoGen plug has mineral bound in collagen, we would not have had to worry about potential migration of the graft, and the plug would provide a solid framework for the damaged membrane to repair itself. Essentially, it would self-seal the area. Due to this reason, I also use this material when repairing oral-antral communications.
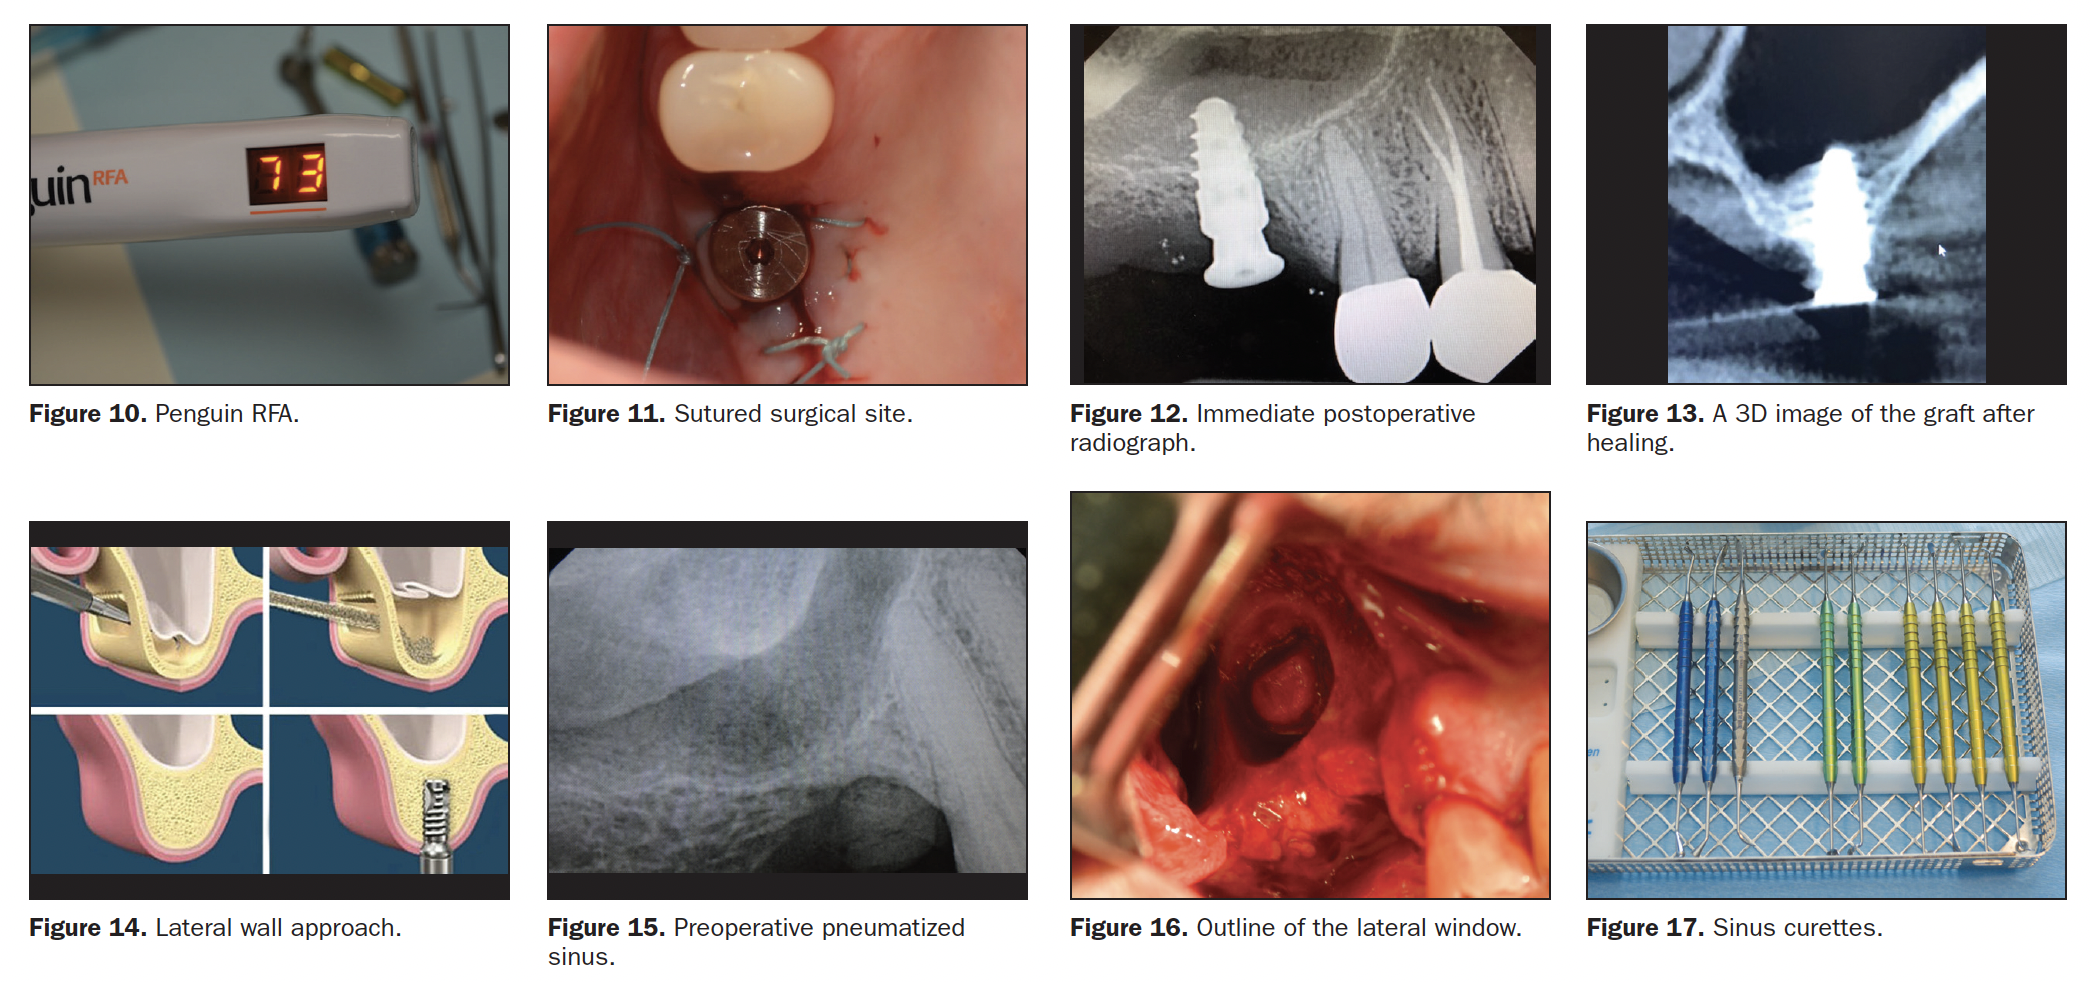
An Osteogen plug was then cut approximately 6 mm from the apex and formed with an instrument to create a small concavity (Figures 7 and 8). After inserting it into the osteotomy and gently pushing it up to the sinus floor, a Hahn 4.3- × 10-mm Tapered Implant System (Glidewell) was placed by hand using a torque wrench (Figure 9). Stability was checked with a Penguin RFA unit (Figure 10).
Due to the excellent stability, a 3-mm tall healing abutment was placed and sutured with 4.0 Poly suture (Figure 11). If the ISQ would have been below 55, a flat cover screw would have been placed, and the site would have been closed in a primary fashion.

The final 2D periapical film shows a nice, even elevation of the membrane (Figure 12), and a CBCT scan taken 4 months later shows excellent coverage of the apical portion of the implant (Figure 13).
Lateral Approach
It is reported that Tatum6 first described this surgical method during a 1977 lecture and later in a publication, and Boyne and James7 published this technique in 1980.
The lateral approach is accomplished via a lateral window in the bone using a Caldwell-Luc approach. Once full soft reflection is completed, either a round diamond on a high-speed surgical handpiece or a piezotome is utilized to create a window through the lateral wall of the sinus. Then specialized instruments and curettes are used to elevate the sinus membrane and again create space for the placement of graft materials (Figure 14). Usually, in these cases, the implants are placed at a later date once bone has been regenerated in 4 to 5 months. Though, if primary stability can be attained, implants can be placed concomitantly with grafting.
Case 2
A 62-year-old patient with a history of Type 1 diabetes presented with a large pneumatized sinus in the area of No. 3 (Figure 15). The remaining crest only has 3 mm of vertical height, so it was decided to do a lateral approach. A full-thickness elevation with releasing incisions was created to expose the lateral wall of the maxillary sinus. Using a No. 2 round diamond bur in a surgical handpiece, the outline of a lateral window was created (Figure 16). These cuts were advanced until the bone in the center was mobile and the membrane could be elevated using specialized sinus curettes (Altatec) (Figure 17).
OsteoGen Strips were then soaked in sterile saline (Figure 18) to make them malleable and allow them to conform to the contours of the sinus cavity. The OsteoGen Strip has the same makeup as the OsteoGen Plugs but in a strip form that can be used for grafting around implants in immediate placement cases and a host of other grafting scenarios.
Starting at the most posterior aspect of the intended elevation, the soaked strips were placed and gently compacted against the walls (Figure 19). Working from posterior to medial and then to anterior aspects of the lift, additional strips were placed to fill any voids.
A 5.0- × 10-mm Hahn Tapered Implant System was placed with 20 Ncm of torque (Figure 20) through an osteotomy created in the crestal bone. Additional strips were then placed to cover the implant and fill the sinus cavity out to the lateral wall (Figure 21). A 4- to 6-month collagen membrane (Newport Biologics) was placed over the graft material (Figure 22) before closing the site with sutures (Figure 23).

The immediate postoperative radiograph shows the relatively radiolucent graft material (Figure 24) at the time of placement, and a 4-month PO check showed that the graft was turned over and the implant was ready to be restored (Figure 25).
CONCLUSION
When presented with a deficiency in alveolar bone volume in the posterior maxillary region, various methods and graft materials can be used to create more bone. The key to success lies in the ability to maintain space under the membrane long enough to allow bone growth to occur. The OsteoGen Alloplastic graft material has proven to be simple, effective, and cost-efficient as a subantral grafting material, whether used either for vertical or lateral augmentations.
REFERENCES
1. Gandhi Y. Sinus grafts: science and techniques—then and now. J Maxillofac Oral Surg. 2017;16(2):135-144. doi:10.1007/s12663-017-1007-x
2. Artzi Z, Nemcovsky CE, Tal H, et al. Histopathological morphometric evaluation of 2 different hydroxyapatite-bone derivatives in sinus augmentation procedures: a comparative study in humans. J Periodontol. 2001;72:911–920. doi:10.1902/jop.2001.72.7.911
3. Banihashem T, Zulfijaj F. Maxillary sinus floor augmentation with different bone grafting materials for dental implant treatment. A systematic review. Academia Regia Odontologica. 2013.
4. Summers RB. A new concept in maxillary implant surgery: the osteotome technique. Compendium. 1994;15(2):152, 154-6, 158 passim; quiz 162. PMID: 8055503.
5. Boyacıgil DU, Er N, Karaca Ç, et al. The effect of residual bone height and membrane thickness on sinus membrane perforation in crestal sinus grafting: A prospective clinical study. Int J Oral Maxillofac Surg. 2021;50(2):251-257. doi:10.1016/j.ijom.2020.05.018
6. Tatum H Jr. Maxillary and sinus implant reconstructions. Dent Clin North Am. 1986;30(2):207–29.
7. Boyne PJ, James RA. Grafting of the maxillary sinus floor with autogenous marrow and bone. J Oral Surg. 1980;38(8):613–6.
ABOUT THE AUTHOR
Dr. Schlesinger graduated from The Ohio State University in 1996. After 2 residency programs with the VA Medical Center he was a private practitioner in San Diego for 14 years. He has been teaching implantology and grafting internationally for the past 16 years and is currently the COO of GMS Healthcare. Dr. Schlesinger continues to provide patient care in Albuquerque, NM. He can be reached at cdschlesinger@gmail.com.
Disclosure: Dr. Schlesinger consults and teaches for Hahn Implant System and IMPLADENT LTD.
RELATED ARTICLES
Restoring Function With Prosthetically Driven Implants


