


In some instances, an integrated dental implant will need to be removed and replaced. This can be the result of poor positioning, inadequate integration, periodontal issues, or functional forces.
CASE REPORT
An implant was placed in this patient and then in function for several years (Figure 1). The patient presented with the abutment and crown out of the mouth and epithelial overgrowth of the site. Radiographic evaluation indicated that the coronal portion of the implant had spread out, making stability of the abutment and crown no longer possible (Figure 2). The only treatment options available were removal and replacement or simply burying the non-functional fixture. Here we discuss the removal of the damaged and non-restorable integrated dental implant in the posterior mandible using a fairly non-invasive surgical procedure. Figure 3 illustrates the removal of the soft tissue over the implant with a tissue punch (Salvin Dental) to evaluate the damage of the buried implant.
There are several methods discussed in the literature, and applied by the profession, for removing failing or ailing dental implants. These include using a fine bur in a high-speed handpiece; the use of electrosurgery units to cause thermo-necrosis of the bone surrounding an implant, leading to expulsion; laser or piezo use, removal torque procedures, and the use of a trephine bur.1-4 In this case, the implant was removed with complete control and minimal trauma to the surrounding anatomy using a specially designed trephine (Long Trephine Drill #TREPH-4 [4.25 mm inside, 5.0 mm outside] [Salvin Dental]). This bur extends slightly beyond the circumference of the implant to be removed. With careful pressure, the bone around the implant is excised, making removal fairly simple with luxation.5,6
Calcium Apatite Grafting Material
Because of the lack of extensive facial and lingual bone, it was decided to graft the socket prior to replacement of the implant. Immediate replacement could have been considered using a slightly wider or longer dental implant to establish initial stability. Here that option was not considered due to the position of the mandibular canal and available hard tissue.
 |
 |
| Figure 1. Preoperative radiograph of the previously placed, restored, and integrated dental implant. | Figure 2. The coronal portion of the implant fractured, requiring removal. |
The OsteoGen Bone Grafting Plug (IMPLADENT LTD) is a calcium phosphate-based graft that is not a beta-tricalcium phosphate (β-TCP) nor a dense ceramic hydroxyapatite. Not all calcium phosphates are created equal, and most dentists think of β-TCPs or hydroxyapatites when they hear the term “calcium phosphate.” The key difference is that other grafts are sintered at high temperatures when they are made. This increases the material density, which impacts how the graft resorbs—or if it even resorbs at all. OsteoGen is made using a low-temperature production process that results in a low-density, resorbable graft.7
Implant Removal Protocol
In deciding to remove this damaged, integrated dental implant, several factors were considered. They included the proximity to the natural tooth root and the posterior, well-restored dental implant. A relatively non-invasive technique would ensure control in the removal of the implant. Septocaine (4% Articaine) in 1:100,000 epinephrine (Septodont) was infiltrated around the surgical site to achieve profound anesthesia. Figure 4 illustrates the specially designed trephine bur and how it was placed on top of the implant body to make sure that the implant fit inside the precisely designed bur. A trephine bur is a hollow cutter that is slightly wider than the outside diameter of the implant itself. It is used slowly with lots of external irrigation to avoid heat damaging the surrounding bone. The implant depth was known, and the trephine itself has clear markings to help in removing the bone around the implant. Our implant motor was turned to 800 rpm at 25 Ncm of torque, and extensive external irrigation was done using sterile saline. Once the trephine extended about 80% from the apex of the implant body and was verified with a digital radiograph (Figure 5), the implant was easily luxated out of the socket, preserving the facial and lingual hard tissue (Figure 6). A radiograph was taken to verify the complete removal of the entire implant (Figure 7).
 |
| Figure 3. The epithelium above the implant was incised and removed using a tissue punch. |
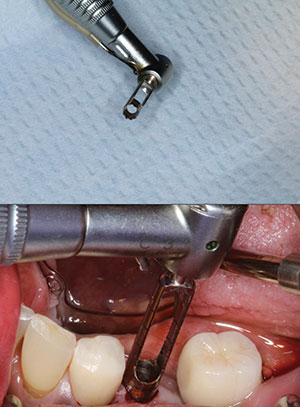 |
| Figure 4. A trephine bur (Salvin Dental) was used to precisely cut through the bone around the implant. |
Bone Grafting Principles, Materials, and Clinical Protocol
Bone grafting is possible because bone has the ability to regenerate completely if provided the room it can grow into. As natural bone grows, it will replace the grafted material completely, resulting in new bone development. The biologic mechanisms discussed for bone grafting are osteoconduction, osteoinduction, and osteogenesis.8 The dental alveolus is labile in the absence of loading and will shrink at some rate if not grafted. Osteogenesis is the ability to create viable bone cells with autogenous bone or the patient’s own hard tissue. Osteoinduction is the ability to stimulate those cells capable of formulating bone cells in a chemical manner, like bone morphogenic proteins and platelet-derived growth factors. Osteoconduction is a structure that is created to scaffold bone development in a physical manner.8,9 The OsteoGen particulate and plug configuration provides for osteoconduction and bone replacement.
 |
 |
| Figure 5. A PA radiograph helped to determine the depth of the trephine incision. | Figure 6. The integrated, damaged implant was easily removed. |
 |
| Figure 7. A postoperative radiograph verified the complete, controlled removal of the implant. |
OsteoGen materials come in 2 distinct forms: as bioactive resorbable calcium apatite crystal clusters in a particulate form or as a plug of graft and bovine Achilles tendon collagen combination.7 With any socket preservation, the use of a membrane is important. There are 2 primary purposes of a membrane. The membrane helps contain the graft material and prevents invagination of epithelium into the socket site. The integration of any graft occurs from the apical portion of the socket toward the crest.8 Epithelium grows from the crest apically. There is a race for bone formation vs connective tissue migration.
As the primary socket preservation material, the OsteoGen Bone Grafting Plug’s crystal particles are hydrated with sterile water, sterile saline, or blood, and the resorption process begins, which releases calcium ions and creates an environment that is preferentially favorable to bone. OsteoGen is specifically designed to mimic the structure of human bone mineral. It is a calcium-deficient apatite, which is based on the ratio of calcium to phosphorus in the graft. Analysis of the mineral in human bone allograft is also found to be a calcium-deficient apatite. So the OsteoGen material is most similar to human bone. The crystals of the OsteoGen materials form a strong bond with bone as they resorb, which helps exclude connective tissue. The specially designed crystal clusters intertwine as the graft is packed, leaving space for the absorption of blood flow and angiogenesis. The low-density graft provides a radiographic indicator that the material has been resorbed and replaced with host bone.
 |
| Figure 8. Wetted OsteoGen Bone Grafting Plug (IMPLADENT LTD) particulate crystals were used to fill the defect. The material was firmly packed to the crest of the ridge. |
Figure 8 demonstrates the wet OsteoGen Bone Grafting Plug particulate being placed into the socket site and compressed firmly to the crest of bone. The particulate was moistened with sterile saline. Since epithelium grows significantly faster than bone, the prognosis of proper bone formation is based on protecting the graft. The OsteoGen Bone Grafting Plug demonstrated here contains graft material but also controls connective tissue migration through both a physical and chemical barrier. The physical barrier is created as the plug is compressed into the socket site. This compression gives the epithelial cells a choice to either fight through the condensed plug or simply grow over the top. They will choose the path of least resistance. The chemical barrier is created through the incorporation of the graft material. Here, the plug was used to protect the crystal particulates from invagination of epithelium into the socket site.7 Figure 9 illustrates the use of a flattened OsteoGen Bone Grafting Plug, cut in the shape of a manhole cover, to protect the crystals from invagination of epithelium. The compressed plug serves as our membrane and is sutured over with resorbable Vicryl (polyglycolic acid suture) (Figure 10). Figure 11 shows the opacity of the material immediately postoperatively.
 |
| Figure 9. An OsteoGen Bone Grafting Plug was trimmed in the shape of a disc and positioned on the crestal portion of the graft to retain the crystal particulate and to act as a membrane. |
 |
 |
| Figure 10. A Vicryl suture was placed to maintain the grafted material. | Figure 11. An immediate post-op radiograph illustrated the graft opacity. |
 |
| Figure 12. Radiograph of the grafted site after 3 months of integration. |
 |
| Figure 13. A new dental implant was surgically placed and restored with a custom titanium abutment and a full monolithic zirconia crown. |
Grafting at the time of extraction minimizes bone loss, supports the soft-tissue structures, prevents periodontal pathology, and provides an adequate site for implant placement. The failure to graft following extraction into the socket can result in soft-tissue infiltration into the socket, loss of ridge height and width, and 30% to 60% bone loss in a 3-year period.7
Simple socket preservation techniques provide adequate bone quality and quantity to help establish the initial stability of our dental implants and their eventual integration.
 |
| Figure 14. The final BruxZir crown (Glidewell) was cemented over the custom abutment and evaluated with a final radiograph. Bone turnover of the graft material appeared complete. |
Placing the New Implant After Integration of the Graft
Twelve weeks were allowed for integration of the graft prior to re-implanting a new implant. Bone turnover was verified with a digital radiograph. There was an objective change in the opacity of the integrated site (Figure 12). It is important to note that at least 1.0 to 2.0 mm of facial and lingual bone remained intact. These osseointegrated implants can be challenging to remove and potentially invasive to the surrounding anatomy and teeth. The mechanical fracture of an implant requires prompt and complete action. The reasons for a fracture include heavy occlusal stresses or bruxism, mechanical trauma, material fatigue, or bone loss, resulting in reduced support for the implant and prosthesis. The trephine burs can also be used to harvest bone cores to determine if bone formation has occurred.
Following the minimally traumatic removal of the implant, the socket was grafted with the alloplastic OsteoGen Bone Grafting Plug crystal particulate. The socket-preserved site was allowed to integrate for approximately 3 months, after which the site was restored with a new implant, a custom abutment, and an implant-retained crown. Figures 13 and 14 illustrate the newly placed dental implant, the custom titanium abutment torqued to place, and the permanently cemented BruxZir crown (Glidewell) (Improv Provisional Cement [Alvelogro Inc]).
IN SUMMARY
When an implant fails and is deemed non-restorable yet remains integrated in viable bone, several methods are available to remove the implant. High-speed surgical burs are aggressive and may result in overheating the surrounding hard tissue and creating potential damage to the adjacent anatomy. The trephine method provides outstanding control, radiographic verification, and a relatively non-invasive removal of the failed implant.
References
- Levin L. Dealing with dental implant failures. J Appl Oral Sci. 2008;16:171-175.
- Bowkett A, Laverty D, Patel A, et al. Removal techniques for failed implants. Br Dent J. 2016;220:109-114.
- Froum S, Yamanaka T, Cho S-C, et al. Techniques to remove a failed integrated implant. Compend Contin Educ Dent. 2011;32:22-30.
- Messina AM, Marini L, Marini E, et al. A step-by-step technique for the piezosurgical removal of fractured implants. J Craniofac Surg. 2018;29:2116-2118.
- Muroff FI. Removal and replacement of a fractured dental implant: case report. Implant Dent. 2003;12:206-210.
- Stajčić Z, Stojčev Stajčić LJ, Kalanović M, et al. Removal of dental implants: review of five different techniques. Int J Oral Maxillofac Surg. 2016;45:641-648.
- Valen M, Ganz SD. A synthetic bioactive resorbable graft for predictable implant reconstruction: part one. J Oral Implantol. 2002;28:167-177.
- Misch CE, Dietsh F. Bone-grafting materials in implant dentistry. Implant Dent. 1993;2:158-167.
- Kosinski T. Simple and predictable socket preservation techniques all dentists can implement regardless of extraction or grafting experience. The Profitable Dentist. Summer 2016:46-50.
Dr. Kosinski is an affiliated adjunct clinical professor at the University of Detroit Mercy School of Dentistry (Detroit Mercy Dental), currently serves as the associate editor of the AGD journals, and was recently named implants editor at Dentistry Today. He is a past president of the Michigan Academy of General Dentistry. Dr. Kosinski received his DDS degree from Detroit Mercy Dental and his Mastership in Biochemistry from the Wayne State University School of Medicine. He is a Diplomate of the American Board of Oral Implantology/Implant Dentistry, the International Congress of Oral Implantologists, and the American Society of Osseointegration. He is a Fellow of the American Academy of Implant Dentistry and received his Mastership in the AGD. Dr. Kosinski has received many honors, including Fellowship in the American and International Colleges of Dentists and the Academy of Dentistry International (ADI). He has received the ADI’s Humanitarian Award “in recognition of significant contributions to the enhancement of the quality of life and the human condition.” He is a member of Omicron Kappa Upsilon, the national honor society for dentistry, and the Pierre Fauchard Academy. Dr. Kosinski was the Detroit Mercy Dental Alumni Association’s Alumnus of the Year, and in 2009 and 2014, he received the AGD’s Lifelong Learning and Service Recognition. Dr. Kosinski has placed more than 14,000 dental implants and published more than 200 articles on the surgical and prosthetic phases of implant dentistry. He can be reached at drkosin@aol.com.
Dr. Tilley is a graduate of the University of Alabama School of Dentistry. She is a native of Pensacola, Fla, and has been practicing dentistry in her hometown since 1998. Dr. Tilley keeps up with the latest in dentistry by attending continuing education seminars on topics such as oral surgery, implants, veneers, periodontal disease, cosmetic procedures, and much more. She has also done extensive training at the Las Vegas Institute and the Engel Institute with Drs. Timothy Kosinski and Todd Engel. She is a member of the AGD, the ADA, the Florida Dental Association, the Alabama Dental Association, the Academy of Laser Dentistry, and the Academy of American Facial Esthetics. Dr. Tilley has received her Fellowship with the International College of Oral Implantologists and has published extensively on implant dentistry techniques, lasers, and Botox/fillers. She can be reached at stephflynntilley@cox.net.
Disclosure: The authors report no disclosures.
Related Articles
Creating an Autogenous Graft from Extracted Teeth: A Faster Implant Integration Time
Aesthetic Case Treatment Planning: It’s Easier and Faster Using a Mobile App
Simple Maxillary Sinus Testing and Implant Placement


