INTRODUCTION
White spot lesions are often the result of demineralization (the dissolution of enamel) which creates a subsurface pore system within sound enamel. As demineralization occurs, the enamel becomes increasingly honeycombed and can somewhat resemble the structure of a sponge. This subsurface pore system becomes filled with an air-fluid mixture that causes light to refract differently than the surrounding healthy tooth structure, thus causing the distinctive “white spots” on the surface.1
A growing number of dentists are utilizing a technique known as resin infiltration to treat both white spots and other incipient lesions. In 2009, a new resin infiltration system (Icon [DMG America]), the first and only product of its kind, was introduced. This resin system is designed to penetrate the porous defects in demineralized enamel and to halt the progression of proximal lesions, making white spot lesions disappear.2
Understanding the Materials and Technique
Resin infiltration is a straightforward technique, but it is important to understand what needs to be accomplished for success, and what each of the product’s components delivers. The technique is exacting and requires strict adherence to the protocol to achieve the best outcomes. The resin infiltration system has 3 component parts. The first is Icon Etch, a 15% hydrogen chloride acid solution designed to remove the thin layer of remineralized enamel that generally covers areas of demineralization, such as post-orthodontic white spots.3 The second part is Icon Dry; a high concentration of alcohol designed to desiccate both the surface of the lesion and the subsurface porosity, which is the body of the lesion. Last, the Icon Resin is an ultraflowable resin that has a high penetration coefficient, one that is much greater than that of the most flowable adhesives available.4 It is this patented high-penetration resin that finds entry into the tiny pore system, reinforcing the enamel, improving the Vickers hardness, and refracting light similarly to that of healthy enamel.5 Remarkably, this resin stops lesion progression by establishing a diffusion barrier within the enamel matrix, strengthening the enamel by increasing the physical hardness of the enamel, while making it less resistant to further acid attack.6 The refractive index of the resin closely matches that of the dissolved enamel it is replacing, so the restoration blends with the surrounding tooth structure for excellent aesthetic results.7
CASE REPORT
Diagnosis and Treatment Planning
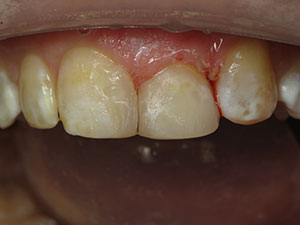
A 26-year-old female who was suffering from unsightly post-orthodontic white spots since the age of 12 years presented to the office. She liked the general shape and alignment of her teeth, but was increasingly unhappy about the white spots (Figures 1 and 2). In this particular case, the surfaces of teeth Nos. 4 to 13 were heavily demineralized, and the lesions were considered to be profound. Historically, 2 different regimens of remineralization treatments using popular remineralization products and techniques during an extended period of time had been attempted. Each had proven unsuccessful in masking the defects. The patient continued to seek a solution which then led to discussions on bleaching and cosmetic veneers. Eventually, I learned about the new resin infiltration system as a minimally invasive, lower-cost, and yet permanent solution to the problem.
 |
| Figure 1. The patient presented with significant white spot lesions that were clearly visible when smiling. |
 |
 |
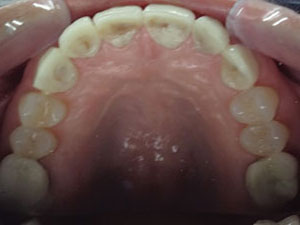
| Figure 2. White spot lesions present where brackets were removed post-orthodontic treatment. |
 |
| Figure 3. The teeth were isolated from gingival tissue using resin dam and OptraGate (Ivoclar Vivadent) for retraction. First applications of Icon Etch (DMG America) were placed only on the white spot lesions. |
 |
 |
| Figure 4. Icon Etch was removed using water spray, surgical suction, and cotton gauze. The teeth were then evaluated to see if additional application was necessary. | Figure 5. Next, Icon Dry was applied and then the white spots were evaluated. An additional application of Icon Etch was necessary where more significant white spots prevailed (Nos. 6, 7, 8, and 10). |
 |
 |
| Figure 6. Icon Dry was applied again. Cosmetic preview helped determined that the surfaces of the white spot lesions were removed by etching process. The teeth were dried vigorously to prepare for application of the Icon Resin. | Figure 7. Resin infiltration is a 2-step process. Icon Resin was applied and allowed to penetrate for 3 minutes. Additional resin was then applied periodically to maintain a glistening surface during this time. Each treated surface was then light-cured for 40 seconds. An third infiltration with Icon Resin for one minute was necessary, followed by removal of excess resin and light-curing. |
 |
| Figure 8. The patient, after final polishing of the curing resin infiltrant. |
 |
| Figure 9. The patient was thrilled to have a more aesthetically pleasing smile. |
Because the patient had undergone previous remineralization therapies, I was prepared for the substantially harder and more acid-resistant enamel surface layer covering the surface of the teeth.8 When using the Icon system, the clinician should be aware that aggressive remineralization attempts, prior to resin infiltration, may present a somewhat more complicated “surface removal step.” Normally, two 2-minute etching steps on white spot lesions are sufficient. However, the previous surface remineralization made the surface enamel of this patient harder and more resistant to the Icon Etch, requiring additional steps to penetrate the lesions.
Clinical Protocol
The patient was fitted with an OptraGate (Ivoclar Vivadent) for isolation and, due to the close proximity of the white spots to gingival tissue, a light-cured resin material (FastDam [Spectrum Dental]) was placed along the gingival border to protect the tissue from exposure to the Icon Etch.
Prior to the etching/surface removal procedure, the surface of the teeth was gently abraded with a medium-grit flexible disk (Medium Sof-Lex Contouring and Polishing Disc [3M]). This procedure, when done conservatively, removes only a very thin layer of the surface enamel and does not harm the surface of the teeth. Next, the enamel surfaces of teeth Nos. 4 to 13 were etched for 2 minutes using the Icon Etch (Figure 3). The etchant was periodically massaged against the tooth surfaces to freshen the acid against each surface. The etchant was then suctioned and removed with cotton gauze, and the etching procedure was repeated using the same protocol for another 2-minute period (Figure 4). The teeth were then thoroughly rinsed with copious amounts of water. Next, the surfaces of the teeth were dried for an extended period, knowing that the desiccation of the tooth surface and subsurface pore structure is most critical to a successful outcome. At this point, I focused attention on the centrals for application of the Icon Dry. This is also a critical waypoint that must be understood by all who would employ Icon in their treatment strategies. The Icon Dry performs double duty in the technique; it provides a proof check that the enamel surface has been removed, as well as that of an effective drying agent. To “proof” your work, apply just a drop or 2 of Icon Dry, and then the appearance of the lesion should be carefully observed. Should the lesion experience a positive, more natural appearance, it is a sure indication that the surface enamel has been removed (Figures 5 and 6).7 However, should the surface remain unchanged and very whitish in appearance, it should be assumed that enamel remains atop the lesion. Additional removal of enamel will be necessary.
In this case, a third etching step proved necessary, but only on certain surfaces. Following the final rinse and drying step, we were able to proceed with the resin infiltration step. The etched surface must be kept free of saliva and other contaminates and, if contamination occurs, simply re-etch for 10 seconds.
The infiltration was completed in 2 separate steps; an initial 3-minute infiltration in which individual lesions or entire surfaces were coated with a thin layer of the resin infiltrant (Figure 7). It is during this period that the Icon Resin is drawn into the desiccated lesions by way of capillary action. Attention should be kept that the surfaces being treated be kept “glistening,” thus providing a constant source of resin for the thirsty lesions. At the end of the infiltration step, excess resin was removed by means of a cotton roll (or similar) and contact areas cleared utilizing dental floss prior to light-curing. The treated surfaces were then individually light-cured for 30 to 40 seconds. (This time period has been recommended by a number of clinicians who have written on the topic.) Per manufacturer’s instructions, it is important that light-curing units used for this procedure have an output of 450 nm and a light intensity of at least 800 mW/cm.9 The light should be placed as close to the material as possible but should not touch the material. Following the first infiltration step, a second infiltration step is required; this step addresses any minor polymerization shrinkage that may have occurred and seals microgaps at the surface.6 The case was then completed by utilizing composite polishing instruments to bring the surface to a smooth texture.
CLOSING COMMENTS
Since its introduction in 2009, Icon has been the subject of literally hundreds of studies, the subject of numerous case reports, and has been discussed in professional forums around the world. This resin infiltration technique has received its own CDT Code, D2990, in 2013 from the ADA Code Committee.
The resin infiltration product and technique, described and demonstrated in this clinical case report, represents a significant step forward in the minimally invasive treatment of incipient caries lesions, post-orthodontic white spots, as well as mild to moderate fluorosis cases (Figures 8 and 9).
References
- Kim S, Kim EY, Jeong TS, et al. The evaluation of resin infiltration for masking labial enamel white spot lesions. Int J Paediatr Dent. 2011;21:241-248.
- Paris S, Meyer-Lueckel H. Infiltrants inhibit progression of natural caries lesions in vitro. J Dent Res. 2010;89:1276-1280.
- Meyer-Lueckel H, Paris S, Kielbassa AM. Surface layer erosion of natural caries lesions with phosphoric and hydrochloric acid gels in preparation for resin infiltration. Caries Res. 2007;41:223-230.
- Meyer-Lueckel H, Paris S. Infiltration of natural caries lesions with experimental resins differing in penetration coefficients and ethanol addition. Caries Res. 2010;44:408-414.
- Palamara JEA, Tyas M, Burrow MF. Resin infiltrated artificial caries lesions examined by polarized light microscopy and micro-hardness tests. In: Icon Science Book: Micro-invasive Caries Treatment with Resin Infiltration. 3rd ed. London, England: Icon Books; 2010.
- Paris S, Schwendicke F, Seddig S, et al. Micro-hardness and mineral loss of enamel lesions after infiltration with various resins: influence of infiltrant composition and application frequency in vitro. J Dent. 2013;41:543-548.
- Torres CRG, Borges AB, Torres LMS, et al. Effect of caries infiltration technique and fluoride therapy on the color masking of white spot lesions. J Dent. 2011;39:202-207.
- Koenigs PM, Faller RV. Fundamentals of dentifrice: oral health benefits in a tube. dentalcare.com/en-US/dental-education/continuing-education/ce410/ce410.aspx?ModuleName=coursecontent&PartID=1&SectionID=-1. Accessed July 23, 2016.
- DMG America. Icon Resin Infiltration Product [instructions for use]. dmg-america.com/catalog/infiltrant/icon. Accessed July 23, 2016.
Dr. Winter started working in her father’s dental practice as a teenager. She received her bachelor of science from University of Southern California (2001) and graduated magna cum laude from the University of Nevada, Las Vegas School of Dental Medicine in 2010. She currently practices comprehensive restorative and aesthetic dentistry in San Diego (Hornbrook Center for Dentistry) and in Chino Hills (Fabozzi Dental), Calif. Dr. Winter is a member of the American Academy of Cosmetic Dentistry and the AGD. She can be reached via email at sarah@hornbrook.com.
Disclosure: Dr. Winter reports no disclosures.
Related Articles
Silver Fights White Spot Lesions in Orthodontics
Treating White Spots: New Caries Infiltration Technique
Orthodontic Solutions for the Hygiene Patient