INTRODUCTION
Determining when it’s time to redo a dental case can be a difficult decision at times. Obvious problems such as recurrent decay, complete failure of restorative materials, or fractures are not always the case. Chips, margin stains, fracture lines, and complete debonding of an intact restoration are all signs of failing work. However, determining, in these cases, when to pull the proverbial trigger, especially in a complex case, can be more challenging. Add in the considerations of the patient who may remember “ugly, sensitive temporaries with multiple appointments and injections,” and the decision can get even more cumbersome.
Enter the era of digital dentistry. With the advances in digital impression taking and fabrication processes, it is possible to start and finish indirect dental restorations that rival those done in the dental laboratory in a little more than an hour or, at the most, in a few days utilizing online case transportation techniques. But when does a case become too complex or cumbersome for a busy dental office to take on in a single visit? Do we revert back to traditional impressions and temporaries? Do we put the schedule into upheaval trying to make it work? The obvious solution would be to have a trained and experienced dental technician in the office on our team. However, most solo or even 2-doctor offices would have a difficult time justifying the expense of having their own on-site dental technician. Another choice is to bring a dental technician into the office only on days when large cases are scheduled and there is a need for single-day completed indirect dental restorations.
The feasibility of a trained dental technician coming into the office to fabricate and deliver indirect dental restorations was previously nonexistent due mainly to the inability of transporting the necessary tools and equipment. With the advent and advancements of in-office CAD/CAM dentistry, these barriers are falling away. It is now reasonable to consider bringing a dental technician into the office on an as-needed basis, and this new service is financially advantageous for both the certified dental technician (CDT) and dental office. Employing an experienced dental technician to design and fabricate the case frees up the dentist to continue providing services to other patients and provide unrushed hygiene checks through the course of the day.
CASE REPORT
Diagnosis and Treatment Planning
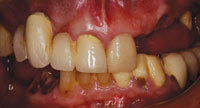
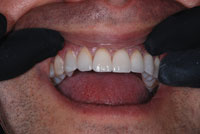
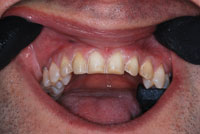
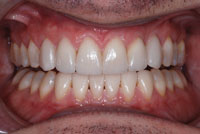
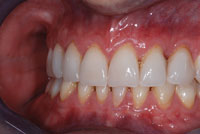
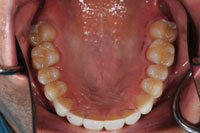
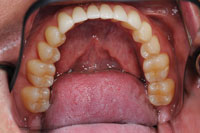
A 42-year-old male presented with porcelain veneers on teeth Nos. 6 to 11 and teeth Nos. 22 to 27 (Figure 1). The original feldspathic units were bonded into place in 2003. During the last 9 years, small chips on teeth Nos. 6, 9, 11, and 22, a complete failure of the restorations on teeth Nos. 24, 25, and 27, and generalized staining at the margins had occurred. These failures were attributed to the patient’s nocturnal bruxism habit, as well as mild occlusal interferences in the anterior region (Figures 2 and 3).
Initially, tooth No. 11 had been bony impacted and was surgically uncovered and orthodontically brought into place. After completion of orthodontics, he was left with an osseous and associated soft-tissue defect. This initial restoration was handled with a direct resin veneer. The upper veneers were selected in 2003 to address this aesthetic issue, and the lowers were added to balance the aesthetic requirements of the patient.
 |
 |
| Figure 1. Preoperative: existing veneers on teeth Nos. 6 to 11 and teeth Nos. 22 to 27. | Figure 2. Preoperative: marginal staining and chips. |
 |
 |
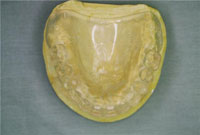
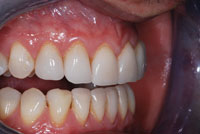
| Figure 3. Preoperative: fractures and complete debonds. | Figure 4. Composite mock-up: aesthetics and occlusion refined for correlation scan. |
The patient was a practicing dentist for 16 years who had clear expectations, knowing exactly where he wanted the case to finish from an aesthetic point of view. He did not wish to repeat his last veneer experience, and did not want to have temporaries during the treatment phase because he had previously needed to recement a section of his original temporary veneers twice a day. It was of paramount importance to fully understand what the patient was expecting, and equally important to have him fully understand what was possible and what limitations could be expected. (With regard to the patient’s knowledge and experience as it related to expectations, it should be noted that the patient lectures internationally on the science of color and shade matching.)
Once the treatment goals were agreed upon, I contacted my dental technician, Eddie Corrales, who is a CDT, and we reviewed the preoperative photos and case expectations as a team before scheduling the patient’s next appointment.
TREATMENT DAY
Diagnostic Mock-up
On the day of treatment, we started by reviewing expectations and any limitations or complications we might encounter. I confirmed the shade selection, followed by the dental technician and (most importantly) the patient. A Vita 3D (Vident) Shade 1M1 was selected. Because the case was only extending from cuspid to cuspid, it was extremely importance to obtain an exact color match. The shade was taken at the beginning of the appointment to avoid any errors (especially in value) that can occur after the teeth are dehydrated. It also allows us to do this important procedure before we experience any eye strain (which can weaken our ability to accurately match a shade). The shade was confirmed under 3 light sources: nature, halogen, and florescence. Preoperative pictures were taken on a set sequence. Reproducibility between pre- and postoperative photos requires identical magnification, angle, and exposure to produce a set of pictures that can be accurately used for both future case presentations and self-analysis.
To start, the patient was anesthetized with 2.5 carpules of 4% Septocaine (1:100000 epinephrine) on the upper only. All the teeth were mocked up on both the upper and lower arches with composite, and the incisal embrasures were modified to enhance desired aesthetic qualities. The occlusion was modified to enhance long centric, the patient’s cuspid guidance was restored, and the angle made shallower to provide a freer envelope of function (Figure 4). At this point, the patient was shown changes and reviewed and consented to them. Photos were again taken, in retracted positions only.
Clinical Technique
At this point, the lower arch was anesthetized with 2 inferior alveolar blocks using 4% Septocaine (1:100000 epinephrine). The upper arch was digitally scanned from the mesial of tooth No. 3 to the mesial of tooth No. 14, utilizing the CEREC system (Sirona Dental Systems). Special attention was paid to the all the surfaces of teeth Nos. 6 through 11, assuring accurate detail of both the occlusal surfaces and the facial characteristics. The existing veneers were removed in a conventional manner of incising with a course tapered bur through the facial and extending it into the occlusal reduction area; followed by an oblique force applied by a crown-splitting instrument (CRSPR [Hu-Friedy]). Any areas that would not readily debond were prepped traditionally.
 |
 |
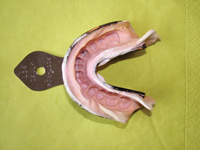
| Figure 5. Preparations. | Figure 6. Model try-in: working model utilized for test fitting and contact refinement. |
 |
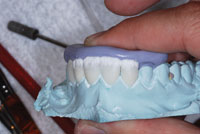 |
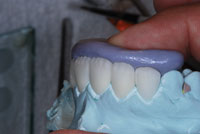
| Figure 7. Putty matrix fabricated to assure final contours. | Figure 8. Mild cutbacks. |
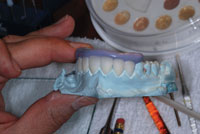 |
| Figure 9. Layering Vita VM 9 (Vident) porcelain into cutbacks. |
The original preparations were quite good and presented with adequate reduction. Only minor additions were added to the line angles to better hide the transitions and support the subsequent cervical embrasures (Figure 5). Due to the patient’s low lip-line and the complete absence of any sensitivity, we agreed to stay supragingival and not attempt to hide the recession. This was considered and agreed upon to sustain natural dentin for the possibility of future grafting, if necessary. The preparations were finished with an ultra-fine diamond bur (NTI Diamond Fine FG, F850-016 [Axis Dental]) to take advantage of the high accuracy of the CEREC scan and milling chamber as well as to maximize the ceramic’s strength after bonding.
We took full advantage of having Mr. Corrales, our dental technician in the office. We had him evaluate that the preparation style and reduction achieved would maximize his ability to deliver the desired product, in terms of both strength and aesthetics. The preparations were then digitally impressed from the mesial of both first molars. A vinyl polysiloxane (VPS) (Imprint 3 [3M ESPE]) impression was also taken for Mr. Corrales. He used that to make a working model to fine-tune the embrasures and interproximal contacts.
At this point, Mr. Corrales began to work on the maxillary veneers as I proceeded on to the lower teeth. He began by moving the digital impressions of both the preparations and the preoperative images into the Correlation software program (which aligns and matches both digital models). Then, the process of digitally replacing what is missing between the preparation and the preoperative models was completed and readied for fabrication in the MC XL milling chamber (Sirona Dental Systems) from a block of porcelain.
The CAD/CAM materials selected for the case were a combination of Vita RealLife (Vident) and Vita Mark II blocks (Vident). Vita Mark II, a fine-grained feldspathic ceramic that is highly aesthetic, has a long history of success for the fabrication of all-ceramic CEREC restorations. The RealLife block was introduced in late 2010 and is fabricated from the same Mark II ceramic material. However, it is stratified with a semispherical dentin layer (porcelain) and a gradient of enamel layering porcelain. The digital restoration is moved within the digital block to obtain the most aesthetic and lifelike restoration. We selected RealLife blocks for teeth Nos. 7 to 10, and Mark II blocks for the remaining teeth.
Moving to the mandibular arch, the preoperative detail and occlusion were scanned from teeth Nos. 20 to 29. The existing veneers were removed and the preparations were refined and polished. Next, the final preparations were scanned and reviewed for accuracy and detail. Any missed areas can be easily added to with additional scans in just a few seconds. The lower veneer program was started and the CEREC AC digital impression was returned to the dental technician. A final VPS impression for the working-model was taken and poured. Temporaries were fabricated using a putty matrix and relined with Integrity (DENTSPLY Caulk). Flash was removed, and the patient was released for 2 hours while the veneers were being fabricated.
At this point, I moved on to my other scheduled patients and hygiene checks and let Mr. Corrales continue the design and fabrication process. Typically, at this point I would do the entire design, milling, test-fitting and finishing (leaving no time for any other patients that day). Having the dental technician perform these vital steps reduced my stress and freed me to increase the office’s production and diagnoses for the day.
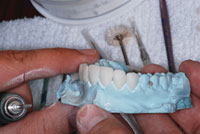
Mr. Corrales designed each veneer using the CEREC software and then milled them in the MC XL milling chamber. Once the veneers were finished, he test-fit each individually, then together on the working models to ensure accurate fits and correct interproximal contacts (Figure 6). He added the subtle details in terms of the embrasures, developmental grooves, and incisal-edge positions. Teeth Nos. 7 to 10 received conservative cutbacks (Figures 7 to 9). (A cutback is the process of removing ceramic and then rebuilding it in a traditional manner with various layering ceramics. In this case, a translucent material was added.) All restorations were then stained, glazed, and hand-polished. Then he test-fit all units on the working models again and delivered them to my operatory for try-in.
| A Dental Technician’s Team Perspective |
|
Eddie Corrales, CDT |
Same-Day Delivery of the Final Restorations
The patient was called back and the room was reset for delivery. We removed the temporaries and test-fit each unit clinically, first by themselves and then together. Only minor interproximal contact adjustments were necessary. Translucent try-in paste (Variolink II [Ivoclar Vivadent]) was used so the patient could approve the aesthetics. He loved the appearance and accepted the veneers.
Bonding was carried out with a translucent resin cement (base only) (Variolink II). The bonding sequence was the central incisors (Nos. 8 and 9) first, followed by the right lateral incisor and cuspid (Nos. 6 and 7), and finally, the left lateral incisor and cuspid (Nos. 10 and 11). The etching (Ceramic Etch [Vident]) and silanization (Silane Primer [Kerr]) process was carried out 2 restorations at a time. Once 2 were bonded in, the next 2 would be test-fit to ensure full seating prior to preparing the surfaces for bonding. This sequence does add time to the bonding process, but it also lowers any chance for margins to be inadvertently opened due to interproximal contact interference or incisal edge shifting. Once all 6 units were placed, the same process and sequence was carried out to completion.
 |
 |
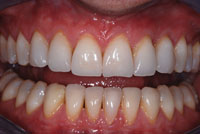
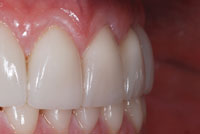
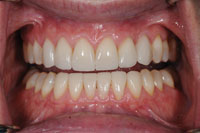
| Figure 10. Postoperative: Finished and bonded Vita Mark II (Vident) and Vita RealLife Veneers (Vident) utilizing the CEREC system (Sirona Dental Systems). | Figure 11. Postoperative: a 12-unit veneer case started and finished same day with a certified dental technician in the office. |
 |
 |
| Figure 12. Lateral view—close-up. | Figure 13. Retracted view finished. |
 |
 |
| Figure 14. Final maxillary restorations. | Figure 15. Final mandibular restorations. |
Cement removal was finished using a combination of interproximal scales and rubber cup polishers (Porcelain Polishing Kit [Axis Dental]). Selective polishing on the surfaces of the maxillary veneers was also added to further “break up” the reflective surfaces to obtain an as natural as possible finish. Occlusion was then checked and verified and final impressions were taken for fabrication of an occlusal guard. Final pictures following the initial sequence were taken and postoperative instructions were reviewed with the patient (Figures 10 to 15).
CONCLUSION
Digital dentistry has evolved to such a degree that delivering same-day dentistry is a reality. Large cases present a time-management issue. Scheduling a day of treatment for a single patient in a busy dental practice with a number of hygienists is a difficult task and can be counterproductive to production goals and new patient treatment diagnosis. Bringing in a properly trained and experienced CDT for a day to provide restorations using your equipment can be a cost-effective means of obtaining an excellent result for your patient. In addition, it can be a real practice schedule-saver for your team in a busy office.
Dr. Hatch, an alumnus of the University of Maryland Dental School, worked as an instructor in the laboratory after graduation. He has served on the board of the Academy of CAD/CAM Dentistry and has been involved in CAD/CAM dentistry and education for more than 7 years. He started and developed 2 practices in the United States, first in Columbia, Md, and most recently in San Diego, Calif, both with full integration of CAD/CAM technology. Dr. Hatch has taught and mentored other doctors on how to integrate this technology into their practices as well as many other aspects of practice growth and leadership. He can be reached at numbgum@gmail.com.
Disclosure: Dr. Hatch is a Vident Advocate and does receive financial compensation for speaking engagements.
Mr. Corrales’ education as a ceramist began at Dental Technology Institute, where he graduated with high distinction at the early age of 18 years. After gaining industry experience and becoming a Certified Dental Technician, he opened the doors of his state-of-the-art lab, Downtown Dental Designs, in 1997 where he practices the art of smile design. As a Las Vegas Institute and PAC-Live graduate, he constantly seeks industry excellence. He has volunteered with Scottsdale Center for Dentistry sharing his knowledge in CAD/CAM Technology for 2 years. His dental laboratory is now part of the CEREC Connect Network, a Web-based digital impression transmission from the dental office to the laboratory. An innovative educator and active advocate of advancements in technology, he has founded CAD Smiles, a unique service cater to CEREC doctors. He can be reached via e-mail at ecorrales@downtowndentaldesigns.com.
Disclosure: Mr. Corrales reports no disclosures.