High-quality clinical photography might possibly be the best tool available for increasing case acceptance and communicating with patients regarding their treatment options. However, many dentists have not fully embraced this approach in their practices. As I travel the country teaching, I often ask students why they have not already incorporated high-quality digital photography as a regular aspect of their clinical experience. Through thousands of interactions with fellow dentists, I’ve seen several answers come up over and over again. It disheartens me to hear these reasons, because most of these barriers are easily overcome with a little understanding and assistance.
The goal of this article will be to point out the common obstacles that prevent dentists from using digital photography and digital case presentation. It is also to help readers find ways to use these amazingly powerful tools more frequently.
“I ALREADY HAVE A GREAT INTRAORAL CAMERA! WHY WOULD I NEED MORE?”
I remember using my first intraoral camera back in 1994. This was a couple of years after I started in clinical practice. It was amazing how I was suddenly able to show patients what was happening in their mouths without having to use a mirror, an overhead light, or a lot of neck craning. At the same time, I was also shooting slide film with an older, single-lens reflex (SLR) camera. It was working moderately well for showing comprehensive cases, but I found that my images were not so beautiful.
Often, cheeks, lips, retractors, mirror edges, and/or other nonessential items would obscure the very oral conditions that I was trying to highlight with the photo. Like almost all of my peers, I had minimal training in how to capture good-looking images properly, and was basically learning as I went.
 |
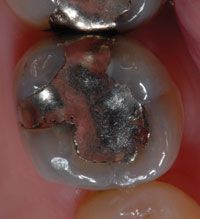 |
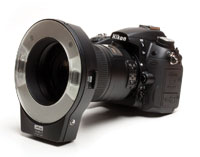
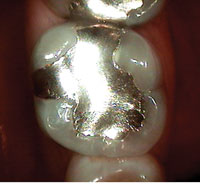
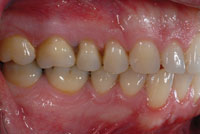
| Figure 1. Image of tooth No. 14 taken with a “wand-like” intraoral digital camera. | Figure 2. Image of the same tooth taken with a SLR extraoral digital camera. |
However, what did become clear to me rather quickly were the differences between using the 2 types of photography as communication tools. I found that the intraoral camera, while successful at conveying details like cracked teeth and heavy plaque deposits, failed miserably at conveying overall treatment needs, such as occlusal therapy or cosmetic changes. The major difference is that the extraoral camera is able to capture full-arches, smiles, and faces without any distortion. And it does so with remarkable clarity and detail! If one wants to provide more comprehensive care, complete more cosmetic cases, and offer a more thorough diagnosis, an extraoral camera will go much further toward that end (Figures 1 and 2).
Clinicians who are currently using only an intraoral camera for patient communication should recognize that it is a really great starting point for discussions related to overall care, not an end point. Consider taking the next step and buy a high-quality camera that will take your documentation and case presentations to the next level.
“TAKING IMAGES WILL WASTE MY VALUABLE PRODUCTION TIME!”
Sure, it makes perfect sense. If a clinician is going to take great images, it takes time out of the schedule where higher production could otherwise have been booked. Additional time also needs to be set aside to review the images. Many clinicians think that if they decided to begin routinely taking images, either their staff members would revolt, believing that future bonuses would become threatened, or the office would simply become less productive than it had been. Oddly enough, this is the exact opposite of what most of my students have found once they started capturing images on a regular basis.
In every office that I personally know of, where they have implemented taking a comprehensive series of images and digital codiagnosis, I have watched their production rise and staff burnout decrease. At the same time, they have been treating fewer patients and have created a more enjoyable, fulfilling workplace. I know that it all sounds too good to be true, but it happens just like that. For positive changes to occur, we need only break the pattern that we are in and create the necessary time in our schedule for images to be taken and reviewed.
Once a clinician begins taking complete records, more comprehensive diagnosis and treatment planning follows, and dollars per case naturally rises. As a result, fewer patients need to be treated for the same production to be achieved, and all of this is done while providing a better level of care. Compare the time and cost associated with doing one crown each on 6 patients, versus 6 crowns on one patient. Clinicians should factor this into the equation when determining whether they can afford the time to slow down in order to capture the kind of images necessary to diagnose, treatment plan, and present the type of care described above. Once the math is done, one will see that the answer is clear.
“CAPTURING GREAT IMAGES WILL TAKE WAY TOO LONG TO LEARN.”
 |
 |
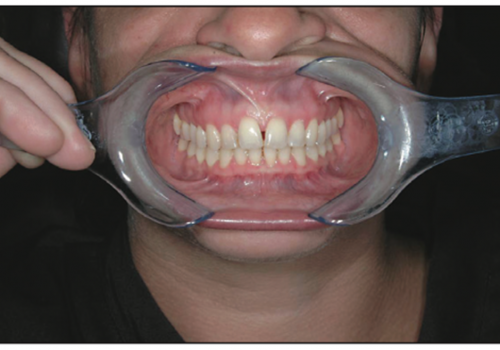
| Figure 3. Unedited images taken by an attendee of a hands-on course after only a couple of hours of training. |
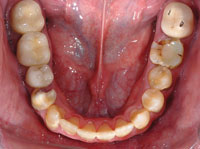
Figure 4. Unannotated image of a mandibular arch. |
As a dental student, learning how to properly prepare an interproximal, 2-surface restoration took me some time. I did not just walk into the clinic, pick up a handpiece, and suddenly create a properly designed restoration. There were many—I dare say too many—plastic teeth sitting in the garbage can next to my lab bench as I tried to master what now seems like a remarkably easy process. Learning good clinical photography is no different than learning any other clinical skill. It takes instruction and practice to master, but I can tell you, from both a personal and student-reported experience, that learning how to get exquisite clinical images is far, far easier than learning how to master basic operative dentistry.
Clinical photography has rules regarding what to look for in a final image as well as shortcuts that can be taken to make the process easier. A good hands-on course that emphasizes proper photographic technique using mirrors and retractors is essential to dramatically shorten the learning curve dramatically. In my opinion, a 1-day or 2-day hands-on course with a camera and patient will immediately allow almost any clinician to begin capturing beautiful sets of images back in the office first thing Monday morning (Figure 3).
Find a course that provides the necessary tools to learn how to capture great images. Do not buy a camera until the necessary skills to capture exceptional images have been learned. Most good courses will have loaner cameras to allow you to play around with the technology before committing to a system that may not work well for a desired purpose. Great systems are out there that work beautifully and simply, but do not just rely on a vendor or friend’s advice. Test drive the equipment and then make a purchase based upon sound fundamental education and personal experience.
“I HAVE NO IDEA WHAT TO DO WITH THE IMAGES THAT I TOOK.”
 |
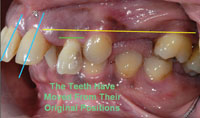 |
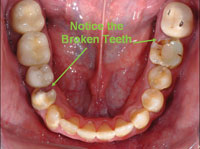
| Figure 5. Annotated image of the same arch as Figure 4, illustrating a couple of fractured teeth. | Figure 6. Annotation can also be used to show misalignment or virtually any other oral condition worth noting and documenting. |
Many dentists have dipped their toe in the water and tried clinical photography, only to report that the images simply sat in the patient’s chart. This made the whole process seem like wasted time. It makes sense that if images are going to be taken, they should be utilized in some productive way, true? Many years ago (way back in the early 1990s), slide film and printed photographs were the 2 options that clinicians had when it came to clinical photography. Each had pros and cons relative to one another, but both had several drawbacks that kept them from being the easiest ways to communicate treatment intricacies.
One had to wait for a lab to process images. As a result, instantaneous discussion regarding the images was clearly out of the question. This lack of instant feedback also meant that there was no possible way to know whether the image’s composition and exposure were correct. Many dentists were sorely disappointed when opening the envelope containing the slides or photos and finding images that were too light, too dark, or out of focus.
Digital photography has erased many of these problems simply because of the inherent advantage of instant feedback. Another great benefit of digital technology is the ability to edit and present these images quickly and easily. Programs allow clinicians to crop, sharpen, and rotate images with the touch of a button, and certain features help create seamless patient presentations, including annotation and sound. These bells and whistles are ultimately used to motivate patients to become the clinician’s partner in the diagnostic process. It is this partnership that leads to digital codiagnosis, a term I use in referring to my patient presentation process using digital technology (Figures 4 to 6). The aforementioned programs, like everything else mentioned above, take a small degree of training and practice, but I believe that it is far easier to master the digital technology than the clinical photography components of this diagnostic workflow. Many clinicians are technophobes, but I have always said, “Even if your VCR always blinks ‘12:00’ at home, you can still feel extremely comfortable with the digital technology after only one to 2 days of hands-on training at the right course.”
“MY PATIENTS WILL NEVER GO FOR THIS TYPE OF STUFF.”
 |
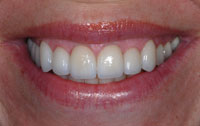 |
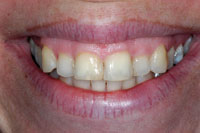
| Figures 7 and 8. Preoperative and postoperative images are a great way to show patients the kind of services that you offer in your practice. |
When I first started exposing patients to my digital co-diagnosis, I was concerned that they might see me as a salesman, someone who was trying to pull out all the possible smoke and mirrors to sell them a case. Although confident that I was comprehensively diagnosing their cases, I somehow felt that I was manipulating the outcome using digital technology as part of the process. After my first week of presenting cases, I quickly learned that nothing could be further from the truth!
Every clinician has a unique style of presentation and verbage related to case presentation; however, the one thing that I have heard from hundreds of clinicians is, “I hate to sell dentistry.” That is what makes this process so wonderful. I never need to sell anything! On the contrary, when properly done, the digital co-diagnostic workflow merely educates patients as to their current condition and allows them to make choices that will feel right to them. Imagine turning on a patient presentation showing only a current condition from several angles using high-quality images, leaving the room to perform a hygiene ex-am, and returning to find the patient on the edge of his or her seat. There they are, describing to you all of the things they have just seen in such a way that it was how you would have described it to them! This really happens, and it happens almost all of the time. Patients will appreciate the explanations that only pictures can give them (Figures 7 and 8). They will often ask the question, “Why hasn’t anybody ever done this for me before?”
CONCLUSION
Since graduating from dental school in 1992, Dr. Krieger has been committed to staying on top of the newest and most innovative aspects of general dentistry. Having achieved more than 1,500 hours of continuing education in all fields of dentistry, he became a Fellow of the AGD in 2001. Drawing upon a lifelong love of photography, he sought out the best resources to help him understand the basics of excellent clinical photography. With the arrival of digital technology in the photographic world, Dr. Krieger merged his knowledge of traditional photographic technique with the advantages of digital cameras. These experiences have allowed him to create a course for dentists to help them gain a better understanding of the concepts that facilitate world-class clinical images with methods so easy that virtually every clinician could instantly apply them in a clinical setting. He can be reached at (206) 935-1855, dockrieger@aol.com, or by visiting betterdentalimages.com.