I find it interesting to hear some of the commentary from laboratory owners regarding the digital photos that accompany their clients’ casework. While the labs appreciate their doctors’ excellent intentions, they are often disappointed in the usefulness of the imagery supplied. This is not surprising, given the number of possible variables when performing close-up dental photography. Variables include not only the ever-challenging camera settings, but also the doctor’s photographic techniques.
Experience as both an instructor in dental photography and a practicing dentist using digital photography since its inception has made one thing perfectly clear: The shortest, least frustrating route to eliminating the camera equipment/camera set-up variable is to purchase your dental camera outfits from a dealer that specializes in dental photography. This will virtually guarantee that your system components are matched and suited to dentistry. Moreover, the dealer will have determined that system’s optimal settings. They will provide cameras that are preset and ready to function as you had hoped they would. For example, one such company, Photomed International, ships turnkey packages that are accompanied by exceptionally good Quick Start guides. These color-illustrated guides chronicle how the company has set up your camera if the settings ever need to be recovered. Digital camera systems acquired in this ready-to-roll manner turn the dental photography process into a point-and-shoot affair. Certainly, there will always be room for fine-tuning your camera settings according to taste, but the fact remains that even a novice can immediately implement a “complex” Canon, Nikon, or Fuji system that has been properly set up, and obtain positive results.
LAB COMMUNICATION
At its simplest level, photo communication with a lab is aimed at providing dental technicians with real-world (as opposed to stone) information about the case at hand. In so doing we hope to improve the look and function of our cases and reduce the need for remakes or corrections. This does not have to be complicated or require an overabundance of images. Making the process too complex will likely discourage participation in the digital photo experience altogether.
Let’s look at the images dental technicians are most likely to appreciate, and at the same time cover some technique tips to improve the quality of the images you will provide. As would be guessed, such images are most critical when considering anterior, aesthetic dentistry, so let’s proceed in that direction.
PORTRAIT VIEW
| Table. Tips for Taking Better Portrait Photos. |
|
 |
 |
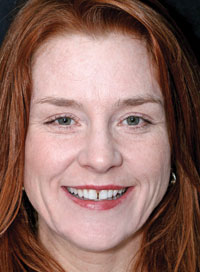
| Figure 1. Preoperative portrait. |
Figure 2. Simulation of restorative recommendations. |
Although the word portrait conjures up images of high school yearbooks, it remains helpful for you and your dental technicians to get a gander at the patient’s face prior to beginning treatment, notably with teeth in full display (Figure 1, Table). And while not everyone subscribes to this approach, I also like to supply a digital simulation of what the patient’s new smile might look like. Simulations can be done in-house or outsourced to such companies as Smile-Vision. My best results occur when they are professionally done. I consider these simulations as “blueprints” for case design that help to ensure that the dental technicians, the patient, and I are on the same page (Figure 2).
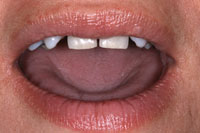
NONSMILING TOOTH DISPLAY VIEW
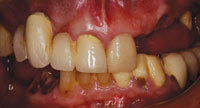
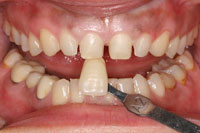
This particular photo often is forgotten. It is simply a shot of tooth display with your unanesthetized patient open an inch or so, and not smiling (Figure 3). This view can assist the technician when incisal edge positioning is underway during restoration fabrication. It’s essential to know where the patient was prior to being restored.
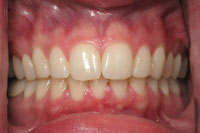
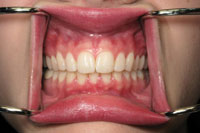
RETRACTED ANTERIOR VIEW
 |
 |
|
Figure 3. At-rest tooth display. |
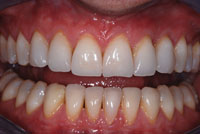
Figure 4. Correct anterior retracted angulation. |
 |
 |
| Figure 5. Angle too high and camera too close. |
Figure 6. Angle too low. |
 |
| Figure 7. To o much retractor and soft tissue in the image. |
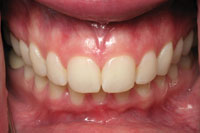
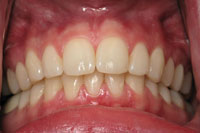
Of course, we all know about these shots. They are best taken with cheek retractors in place. It is also helpful to provide both occluded and open views. The most frequent errors involve image framing and angle. That is to say, we often include too much in the picture (retractor handles, cheeks, and chin, etc) and either shoot up or down with respect to an imaginary perpendicular line that extends from the camera lens to the teeth. Improving these shots can be done simply by centering, leveling, and visually cropping the shot as you view it, before hitting the shutter release. It only takes a few extra seconds to compose your shots properly (Figures 4 to 7).
SHADE TAB VIEWS
 |
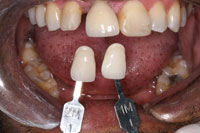 |
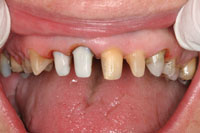
| Figure 8. Determining the stump shade. | Figure 9. A look at relative preoperative shades. |
The most important thing to remember about shade tab photos is to place the shade tab in the same plane as the teeth to which you are referencing the tab. Ideally you’d like the tab and the adjacent teeth to receive the same amount of light. It is also sometimes helpful to include 2 shade tabs in the image: one brighter and one darker. These shots are reference shots so that the dental technician is able to see how the adjacent teeth compare to a known entity, ie, the shade tab. They are not intended to select the shade. You still have to do that yourself, or with the assistance of a shade-taking device or software. If you are not familiar with such aids, check out ClearMatch at the Web site photomed.net. This software actually turns your digital camera into a capable colorimeter. No joke! (On the hardware side, we have also had good luck with the Vita Easyshade [Vident] device.)
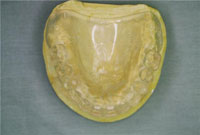
We like to take shade shots preoperatively before the teeth dehydrate and lighten, particularly when attempting to blend in a single anterior crown. The other frequently submitted shot is the stump shade image. A shade tab positioned next to your moistened prep or preps will help the lab determine what level of ceramic translucency or opacity will be needed to achieve the desired end shade. This is especially critical when doing IPS Empress (Ivoclar Vivadent) units (Figures 8 and 9).
PHOTO OF THE PREPARATION
 |
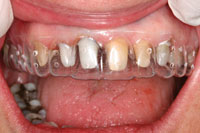 |
| Figure 10. An uncluttered view of the preparations before impressions. | Figure 11. Reduction template in place. |
We also send along a “prep shot,” which is a retracted, uncluttered view of the final preps. This helps to cue the dental technician in on tissue appearance and the possibility of a “maverick” tooth, whose color varies from the rest of the pack, allowing the technicians to plan how to optimize the aesthetic use of their materials (Figure 10).
If working off of a mock-up, as we usually do for multiple anterior units, we will use a clear reduction guide to ensure adequate tooth preparation. We include a shot of this to demonstrate to our technicians how our preparations conform to the mock-up. Interestingly, it is good to take a look at these photos before taking your final impression because often you will notice an area to be slightly underprepared compared to the reduction template (Figure 11).
PHOTO OF THE PROVISIONAL RESTORATIONS
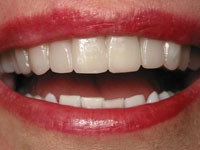 |
| Figure 12. Provisionals. |
Finally, we photograph our provisionals intraorally, and if the patient is able, in full-smile regalia (Figure 12). I think we send these along to prove to the laboratory technicians that, yes, our mock-up can be delivered intraorally…so please get it right!
A WORD ABOUT FOCUS
The debate rages among dental photographers as to which method of focusing is better: manual focus or autofocus. Purists insist that manual focus ensures constant distances and consistent lighting. The purists are probably right, but I confess to using autofocus more often than not, simply because it’s faster. Increased experience will usually place you at the same distance and consequent magnification and lighting by virtue of your chair set-up and how the patient is usually positioned when taking your shots. Yes, magnification and color rendition may vary slightly, but I am not convinced that they are significant enough in the majority of instances. This is because most of the information communicated is “relative” as opposed to “absolute.”
LAST, BUT NOT LEAST…
I have given you a lot to ponder. However, I will lay one last recommendation on you. The only way that you know you will be looking at the same digital image as your dental technician is to send it as a hard copy print. If you send the shots digitally (e-mail or CD), what the lab sees depends upon how its monitor is calibrated with respect to color. Or, if the lab prints your digital photographs on a different printer and different paper than what you use, the appearance will bear little resemblance to what you saw on your end. Prints eliminate this variable.
If you would like to increase the likelihood that your monitor is giving you a color-corrected image (which is more likely to show up as an accurate print), consider purchasing an inexpensive calibration unit such as Datacolor’s Spyder-2express (colorvision.com). These calibration systems are extremely simple to use.
CONCLUSION
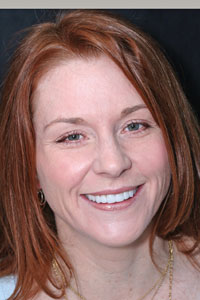 |
| Figure 13. When it all comes together. |
Certainly, the number of shots suggested in this article are more likely to accompany a full set of veneers or crowns, as opposed to one or 2 teeth. As you become more adept at this process, you will know just what shots are critical to dental technician(s) for the case at hand. You will also realize that the short time spent on this photo record will result in better-looking cases the first time around (Figure 13).
So there you have it! I have given you a collection of suggestions to help your dental technicians be more effective in delivering cases that you can be proud of. In the end, your laboratory staff will appreciate your efforts (in addition, of course, to sending a great impression), and your patients will appreciate the lengths you are going to in order to obtain a stellar result. It’s a win-win for everybody!
Dr. Goldstein, a Fellow of the International Academy of Dento-Facial Esthetics, practices general dentistry in Wolcott, Conn. Recognized by Dentistry Today as a Top Clinician in Continuing Education for the last 5 years, he lectures and writes extensively concerning cosmetics and the integration of digital photography into the general practice. A regular contributing editor for Dentistry Today, he has also authored numerous articles for multiple dental periodicals both in the United States and abroad. He can be contacted at martyg924@cox.net. His current speaking schedule can be found at drgoldsteinspeaks.com.
Disclosure: Dr. Goldstein is a consultant for PhotoMed.