The old adage garbage in, garbage out definitely rings true when addressing the doctor-technician relationship. Every dentist has taken a questionable impression and stared down into the dark abyss of contorted, twisted impression material and thought, “Maybe the margins will be easier to see when the laboratory technician pours it up.” Other misguided optimists think that through some miracle at the laboratory bench, the technician can create ideal anatomy and contours on a molar PFM when there is only 1.0 mm of clearance. News flash: It isn’t going to happen, and it never will.
Dental laboratory technicians are skilled artisans and craftsmen, but there is a good reason why they are not called dental laboratory magicians. Even when the restorative dentist gives the laboratory perfect impressions and ideal contours to work with, the technical lab work is still tough and demanding, with little room for error. Trying to make perfect crowns with less than perfect impressions ranges somewhere between very difficult and virtually impossible.
I have spent a lot of time with my dental technician at his bench. Seeing some of the preparations and impressions sent to him by hopeful dentists can sometimes make even the average clinician feel like Dr. G.V. Black. It is a tough spot to be in for technicians, and often it is difficult to call their customers and let them know the preparation or the impression is un-acceptable. It is even tougher if the dentist says, “Just make it work.” My dental technician is very kind to me. If my finish lines are not perfectly clear he says,
“I think I am going to have you trim the die for this case.” Translation: Take a new impression. What is the point of all this? Restorative dentists need to provide the most ideal conditions possible for their dental technicians so that they can do their best work. When the whole team works together, it creates a beautiful dental synergy, and you will maximize your chance of ultimately having a happy patient.
When planning to restore missing teeth, whether it is with implants, fixed prosthodontics, or a removable appliance, the bony architecture of the existing periodontium can be critical to achieving an aesthetically pleasing result. We will review a case in which the doctor gave his patient multiple options for restorative treatment while giving the dental laboratory technician a beautiful canvas upon which to perform artistic genius.
CASE REPORT
 |
|
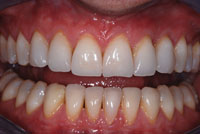
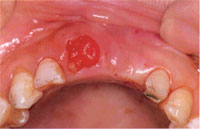
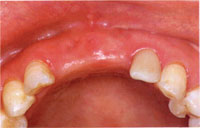
Figure 1. Patient’s preoperative condition. |
A 65-year-old female patient presented with one of the most challenging problems: years of dental neglect and a severely compromised periodontal situation. Probably the biggest challenge in these cases is getting the patient to commit to improved home care after the restorative work is done, but first things first. Can something be done to restore the teeth? The patient had an existing 3-unit bridge with three-quarter crown abutments on teeth Nos. 8 and 10 (Figure 1). Tooth No. 9 was missing. Tooth No. 8 had been ravaged by severe periodontitis and had a mobility of 2+. There was no bone on the facial of No. 8 all the way up to the root apex. Obviously, tooth No. 8 was best suited for an extraction.
The biggest issue the removal of No. 8 presented was the facial bony defect it would leave, making it difficult to plan an aesthetically pleasing restoration with such a severely compromised periodontal architecture. Placing some kind of a bone graft was considered as a solution to this problem. The material chosen for socket/ridge preservation was a new augmentation material for use after dental extractions (Foundation [J. Morita USA]). Foundation is not a bone substitute; however, it stimulates new bone growth at an accelerated pace. Terumo Medical Corporation in Japan originally developed this product in sheet form in 1993 as a skin graft material. The product was originally called Terudermis. A short time later it was determined that this bovine collagen product not only worked well to stimulate growth of soft tissue at an accelerated pace, but it also did the same thing with bone in the alveolar socket, helping to maintain bone after any permanent extraction. In late 2004, it was issued FDA clearance as “a collagen-based bone filling augmentation material for use in the filling of extraction sockets.” The bovine collagen is taken from skin only, which is considered “no risk” for BSE (bovine spongiform en-cephalopathy [Mad Cow disease]) by the European Medical Examination Agency, the US Food and Drug Administration, and the US Department of Agriculture.
THE TECHNIQUE
 |
 |
|
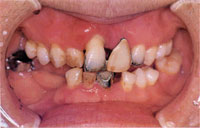
Figure 2. Extraction site after careful curettage of the socket. |
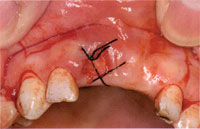
Figure 3. The Foundation plug has been placed. This demonstrates ideal placement of the plug into the socket of No. 8. Note that the plug is saturated with blood, flush with the contour of the ridge, and completely filling the socket. |
 |
|
Figure 4. A single, passive suture was placed to ensure that the Foundation plug is retained in the socket. |
Immediately following the extraction of tooth No. 8, the socket is thoroughly curetted and the clinician must carefully remove any granulation tissue (Figure 2). The curettage of the socket also ensures adequate blood supply, which is a key to success with the Foundation augmentation material. Foundation plugs come in 2 sizes: small (S), which is 8 mm in diameter and 25 mm in length, and medium (M), which is 15 mm in diameter and 25 mm in length. The plugs are bullet-shaped for easy placement, and they can be cut, trimmed, or shaped to fit appropriately into any socket. It is very important that the plug be-comes fully saturated with blood, so that the surrounding cells and capillaries are able to gradually infiltrate the augmentation material. As the extraction socket heals, it is filled with new, augmented bone. There is no need to remove the Foundation augmentation material and no membrane is needed.
 |
 |
|
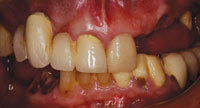
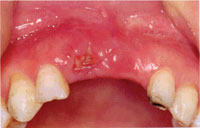
Figures 5 and 6. Postoperative photos show rapid healing. |
 |
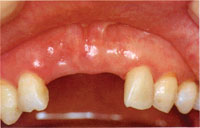 |
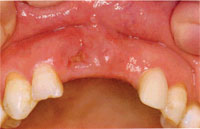
| Figures 7 and 8. Four months post-placement, an aesthetically pleasing ridge. |
After curetting the socket it is critical to choose a Foundation plug that is slightly larger than the socket to be filled. Foundation must be in contact with bone in order to draw new cells into the plug. While Foundation contains no bone morphogenetic proteins (BMPs) or any other growth factors, it has osteoinductive qualities. Figure 3 demonstrates ideal placement of the plug into the socket of No. 8. Note that the plug is saturated with blood, flush with the contour of the ridge, and completely filling the socket. Also notice that the facial gingiva, where there is no buccal plate, is well supported by the material so that the new bone growth will replace the bone lost due to periodontal disease. Figure 4 shows a single, passive suture placed to ensure that the Foundation plug stays in the socket. The soft tissue will heal very fast because, as mentioned previously, this material was originally developed as a soft-tissue healer (Figures 5 and 6).
Placing the Foundation plug into the extraction site of tooth No. 8 was very simple to do and resulted in a much-improved bony architecture in the maxillary anterior region of this patient. At 4 months post-placement, Figures 7 and 8 clearly demonstrate an aesthetically pleasing ridge with which the dental laboratory technicians and the patient could be happy. Unsightly bony defects were avoided, and this case could be then be restored in any number of ways, giving the patient restorative options.
CONCLUSION
According to Dr. Jon Suzuki, director of the postgraduate periodontology department at Temple University School of Dentistry, “Placing some kind of bone graft material in every extraction socket is approaching standard of care status.” New materials have proven to be effective and very user-friendly so that even the most conservative general dentists can now do bone grafting. This helps to expand the doctor’s range of services and ultimately his or her production as well. This case report demonstrated how we can give our dental laboratory technicians a beautiful canvas upon which to perform their best technical work as well as an excellent example of success via a total team effort!
Dr. Turchi began practicing general dentistry after graduating from the Arthur A. Dugoni University of the Pacific School of Dentistry in 1988. He is currently the director of educational and clinical affairs and senior product manager for J. Morita USA in Irvine, Calif. He is a member of the ADA, the California Dental Association, the Orange County Dental Society, and the Academy of Osseointegration. Dr. Turchi can be reached at (949) 465-1038 or jturchi@jmoritausa.com.
Sources
Ishii T, et al. Clinical evaluation of bullet-type atelocollagen sponge (Teruplug) wound dressing for tooth extraction site. Shikaitenbou. 2001; 97:665-677.
Konishi J, et al. Animal study of tooth extraction wound healing using collagen sponge matrix “TRE-641.” Seitaizairyou. 1998; 16:266-275.
Kitsugi D, et al. The effect of tooth extraction alveolus healing by atelocollagen sponge implantation. Journal of Japanese Society of Oral Implantology. 1997; 10:52-61.
Mizuki N, Fujita K, Kawabe R, et al. Clinical evaluation of atelocollagen sponge(TRE-641) in tooth extraction wounds.The Quintessence. 1996;15:1450-1468.
Turchi J. Foundation bone augmentation material. Perio Tribune. US Edition. November 2006; 16-18.
Turchi J. Creating bone…alone: foundation bone augmentation material simplifies filling extraction sockets. Dental Products Report. April 2007.