


Some patients feel that spacing and misaligned teeth make them unique. They are quite content with what nature has given them. However, others feel that nature could have made a better choice. This is where the dentist steps in. We all know that very conservative changes through bonding can make us look like magicians. The use of plumber’s teflon tape (PTFE thread seal tape), which is available at any hardware store, can make bonding procedures a joy (Figure 1).
 |
 |
| Figure 1. Plumber’s teflon tape (PTFE Thread Seal Tape 1/2†X 260). | Figure 2. Patient was dissatisfied with unnatural-looking bonded diastema closure of teeth Nos. 8 and 9. Previous dentist had closed diastema by adding composite just to the proximals as illustrated in the drawing at the bottom right corner. (Redo of diastema closure can be seen in Figure 3d.) |
One of the most rewarding bonding procedures to both the dentist and the patient is the closure of anterior spaces. This procedure presents the dentist with two challenges:
1) Closing the space so that the interproximal composite flows and blends against the tooth, thus fooling the eye into believing this is the natural state of the tooth. No straight lines allowed.
2) The interproximal composite from both sides of the embrasure should approximate the interdental papilla closely enough so that any triangular opening above the papilla is minimized (commonly known as black triangle disease).
When closing anterior spaces with composite, one common error by dentists is to simply place composite along the proximal surfaces of the teeth and shape the composites to touch somewhere in between. This will work, but often compromises the result with unnatural contours (Figure 2). A better method when closing anterior spaces is to bond to the proximal third of the tooth. This allows the dentist to shape the composite along the papilla while simultaneously blending the composite against the tooth. The result will be a more pleasingly shaped composite that melts against the tooth (as shown in Figure 3d).
To aid in finding the midline between two spaced central incisors, a boley gauge is very useful. Measure the distance between the distals of the two centrals and divide by two. This will provide you with the width of one central incisor. Central incisors of unequal width and height are very obvious to the eye. When closing diastemas always add composite to the proximal third of each tooth. The resulting contours will be more natural looking.
Following are case reports in which plumber’s teflon tape was used to address many of the challenges associated with direct bonding.
CASE 1
 |
 |
 |
 |
| Figures 3a through 3d. Teflon tape isolates and visually enhances the tooth it drapes (a). this helps the dentist to properly shape composite to the proximal third of the neighboring tooth. Composite was added to tooth No. 8 (b) and then to tooth No. 9 (c) to close the diastema (d). (See Figure 2 for before photo.) |
The patient did not like the appearance of the bonded composite diastema closure that was previously performed on her central incisors (Figure 2). Old composite was removed from the proximal surfaces of teeth Nos. 8 and 9, and teflon tape was placed around tooth No. 9. The tape was stretched tight so that the anatomy of the tooth was easily perceived (Figure 3a). The tape protects the proximal tooth from the etchant. The surface was etched. The enamel bonding material of choice was placed and light cured. Composite (Herculite A1, Kerr) placement was initiated by placing the material completely through the interproximal and against the enamel. Do not be concerned about whether the material extends too far to the lingual or to the buccal. Your main concern is to establish a smooth emergence profile along the interdental papilla. This is accomplished by wetting an explorer tip with unfilled resin and smoothing the base to the most desirable emergence profile.
Immediately cure before the material has an opportunity to slump (Figure 3b). The rest of the composite can now be shaped with fluted carbide burs. The opposite side is now done in the same manner. Besides isolating the neighboring tooth from the etchant, the teflon tape displays the anatomy of the neighboring tooth in stark white. Placement of the composite to mirror image the interproximal emergence profile of the neighboring tooth is simplified (Figure 3c). Because the proximal thirds of teeth Nos. 8 and 9 were bonded, the eye cannot perceive where composite and tooth melt into one another (Figure 3d). The teflon tape is so thin that it does not interfere with a snap contact.
CASE 2
 |
| Figures 4a, 4b, and 4c. Teflon tape simplifies closure of gingival spacing. |
Teflon tape is useful when your patient finds it desirable to close a triangular space at the gingiva. Teflon tape has the ability to slide between even the tightest contacts, and because it is so thin, access and visibility are enhanced. One proximal surface is bonded, then the teflon tape is reversed and the other proximal surface is bonded (Figure 4). This is particularly useful in cases of gingival recession caused by periodontal disease.
Today’s composites are stiff but plastic enough that they can be shaped prior to curing. Unlike amalgam, composites do not have to be boxed up within a matrix to perform well. In fact, composites perform better outside the box. Teflon tape in conjunction with the Contour Wedge takes advantage of the composite’s ability to stay where placed. The Contour Wedge is custom carved and then feathered against the teflon-draped proximal contact. Because there is no metal or plastic matrix to get in the way, the composite is formed directly against the neighboring tooth. This allows the dentist to develop a contact that has proper depth as well as length. The Contour Wedge is made of high-density polyethylene. Cases 3 and 4 illustrate the use of the Contour Wedge with teflon tape.
CASE 3
 |
 |
 |
 |
| Figures 5a through 5d. Setup (a), composite application (b,c), and final restoration (d) of tooth No. 7. The tooth was isolated mesial and distal via teflon tape. The Contour Wedge provided interproximal shaping. Risk of matrix malformation has been eliminated. |
The patient had broken off the incisal third of tooth No. 7. The tooth was weakened by large mesial and distal composites, which were removed. The patient wanted a quick fix so that she could return to work immediately. Teeth Nos. 6 and 8 were isolated with teflon tape as described in previous cases. Contour Wedges were carved, shaped, and after interproximal insertion were feathered against the teflon tape (Figure 5a). The tooth was prepared for composite bonding using Prime & Bond NT (DENTSPLY Caulk). The first layer of composite was A4-0 Esthet X (Caulk) (Figure 5b). The next layer was Esthet X A2-0, which was tapered toward the lingual. Esthet X Y incisal completed the incisal third. The tooth was now ready for cutback and final shaping (Figure 5c). The final restoration blends with the surrounding teeth both in morphology and in color (Figure 5d). The Contour Wedge allows the dentist to produce a restoration with the necessary rounded shapes that compliment the surrounding teeth. The teflon tape is easily flossed away once the restoration has been completed.
CASE 4
 |
| Figure 6. (left) Excellent, consistent interproximal contact is achieved with Teflon tape and the Contour Wedge because there is no matrix to get in the way. |
The teflon tape in concert with the Contour Wedge allows the dentist to restore class 2 cavity preparations with:
(1) strong and consistent contacts. Even MODs have excellent contacts at both ends.
(2) contact and marginal ridge areas that flow properly both buccal-lingual and occlusal-cervical. There is no matrix memory to distort the final restoration.
(3) enhanced visibility so voids are easier to prevent. There are no hidden corners as is common with a matrix setup (Figure 6).
CASE 5
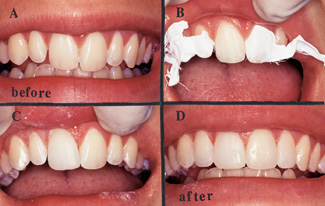 |
| Figures 7a through 7d. When changing size and position of multiple teeth through direct composite bonding, the teflon tape is useful in isolating each tooth while still providing the dentist with good visibility of the remaining teeth. Figures 7b and 7c show isolation and completed bonding of tooth No. 8. Teeth Nos. 7, 9, and 10 were isolated and composite bonded in the same manner. |
The patient was distressed by her lingually inclined and distally rotated central incisors. She also did not like the space between teeth Nos. 7 and 8 (Figure 7a). Various options were discussed including doing no treatment. The patient decided that direct bonding was her treatment of choice. It became clear that if the incisal portions of teeth Nos. 8 and 9 were brought labially, teeth Nos. 7 and 10 would also need to be lengthened. As with all bonding procedures involving the upper anterior teeth, whether direct or indirect, one must begin with the centrals. The centrals set the stage and determine the length, width, and shape of all bonded teeth. Teflon tape is a great aid when doing direct veneer bonding on misaligned and misshapen teeth because it allows the dentist to visualize the whole operative field while being simultaneously focused on one tooth at a time.
Teflon tape was placed mesial and distal of tooth No. 8 (Figure 7b). The labial surface was direct bonded using A1 enamel Esthet X (Caulk) (Figure 7c). Tooth No. 9 was bonded to mirror image tooth No. 8. Again, tooth No. 9 was isolated with the teflon tape in the same manner as was tooth No. 8. Teeth Nos. 7 and 10 were lengthened and spaces closed with direct bonding using A1 Esthet X, by isolating each tooth with the teflon tape as described above. Final restorations can be seen in Figure 7d.
CONCLUSION
Plumber’s teflon tape makes bonding procedures simpler, better, and more predictable. In addition to the uses illustrated by the case reports presented in this article, teflon tape makes placement of indirect veneers, onlays, and bonded crowns simpler because the neighboring teeth can be isolated, and the tape will not interfere with full seating of the bonded restoration.
So go to the garage, take the teflon tape out of the tool box, and surprise your dental assistant with your new-found skill. Your patients will marvel at your aesthetic abilities.


