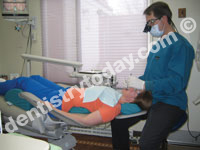
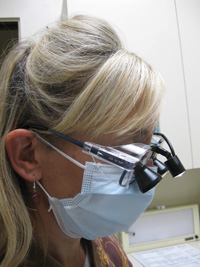
It has been well documented that back and neck problems are common among dentists.1 Periods of intense focus in prolonged static postural position with the dentist’s head and torso leaning forward and twisted with the arms extended are prime contributing factors to these problems in dentists. Good posture while working, improved lighting, magnification, and ergonomic equipment have been stressed to the dental population. These, combined with stretching and regular exercise, have greatly increased the number of years that the average dentist can work. However, regardless of one’s intentions and efforts, most dentists will eventually suffer with chronic and acute episodes of back and neck pain.
As a result of working conditions, the dentist’s anterior neck, hip, and chest muscles become tight and shortened. Thus, the dentist becomes frozen in a flexed position with the shoulders, neck, and back functioning in a less-than-ideal position.
As an analogy, imagine the chest and anterior neck muscles as coiled springs, which are pulling the head and shoulders forward. The back muscles can pull the shoulders and head back through voluntary contraction. But, as soon as the back muscles are released, the head and shoulders move forward again.
The pelvis, which is the foundation for the spine, is also often rotated or tipped. This forces the spine to compensate with a series of curves from the low back up to the neck to keep the head erect. Thus, you will notice that many of the exercises in the short program discussed in this article are related to releasing tight leg and hip muscles. For example, shortened and tight hip flexors (illiopsoas) and quadriceps (rectus femoris) can cause the pelvis to tilt forward, causing increased curvature of the low back as well as a protruding abdomen. In addition, these tight muscles prevent the gluteus maximus/medius and lower abdomen from functioning properly.
Performing self-myofascial release (SMR) using both the foam roll and medicine ball will help release these muscles, allowing them to return to their normal length. This activity will help decrease low back pain and allows the lower abdominals and gluteus maximus/medius, key muscles in core stability, to begin to function normally.
The emphasis in this program will be placed on releasing shortened, tight muscles in the chest, anterior neck, and hips. While the dentist generally perceives pain only in areas of the back, this pain will not be relieved until the shortened, tight anterior muscles in the neck, chest, and hips are released. This allows the elongated, weakened muscles of the back to return to their normal length and function.
This program is unique in 3 ways:
(1) it requires a minimum amount of equipment;
(2) it can be done in one’s home or office; and
(3) a minimum of time is required, and the program actually works best if it is broken into segments through-out the day.
The dentist-author had endured varying degrees of back and neck pain with only moderate levels of relief from various modalities until a program developed specifically for dentists was instituted. Co-authors of this article, Domenic Pompile, a physical therapist and certified strength and conditioning specialist, and Rick DeLopez, a certified strength and conditioning specialist, developed this unique program. By using this program, the author experienced immediate improvement and significant relief from chronic back and neck pain. This resulted in physical stress relief while working, higher energy in general, a decrease in nonsteroidal anti-inflammatory utilization, and deeper and more restful sleep. (Sounds too good to be true, doesn’t it?)
SELF-MYOFASCIAL RELEASE TECHNIQUE FOR THE DENTIST/TECHNICIAN (A PHYSICAL THERAPIST’S PERSPECTIVE)
Myofascial release is commonly used by many practitioners to loosen soft tissue and allow increased ranges of motion and flexibility in order ultimately to decrease pain and improve function. Unfortunately, many times the results may be temporary due to a number of reasons. But the fact still remains that the individual continues to suffer from discomfort, lack of range of motion (ROM), and lack of strength.
Many individuals attempt to alleviate their symptoms by increasing the strength or loosening the muscles or areas that they feel are troublesome. One common problem is that many patients try to loosen or strengthen their area of discomfort, but commonly receive little or no relief at all from their original symptoms. The reason for this is that the individual is incorrectly trying to release or loosen the muscle that is impeding his or her function. In other words, the individual has not been able to identify the true root of the problem and in essence is just putting a Band-Aid on the situation.
For individuals who are fixed in a static position for a lengthy period of time throughout the day, many postural changes take place. In turn, this will lead to a shortening of certain muscles in the body as well as a lengthening of the opposing muscles. For example, a dentist may be seated in a chair with the hips at 90º of hip flexion, the trunk rotated and side bent, along with an increased forward head posture. Many dentists may be fixed in this position for lengthy periods of time throughout the day, and this will lead to a shortening of many of the anterior structures as well as a lengthening of many posterior structures. Ultimately, as the anterior structures continue to become shorter and tighter, the posterior structures become lengthened, weak, and painful. Normally, due to the large degree of neck, shoulder, and back pain, the clinician may receive treatments to alleviate the discomfort, emphasizing the site of their pain along with soreness and tenderness. Unfortunately, due to the static positioning that continues to take place, the clinician will continue to become more and more tight anteriorly. However, he or she will continue to experience the majority of the symptoms posteriorly in the back of the neck and low back or experience a lack of ROM in the shoulders. The clinician may be aware of this static positioning, but unfortunately, this positioning is a part of the job with little or no ability to change. With this in mind, we must then clearly define the root of the problem and also assess and effectively treat the anomalies that it presents.
By instituting a 20-minute stretching and self-myofascial release program, the clinician will be able to lengthen the structures significantly that have become so tight due to this static positioning. He or she will also be able to shorten the lengthened muscle fibers in order for them to fire again and work more efficiently in maintaining proper posture. Ultimately, this will lead to a decrease in pain, increased joint range of motion and strength, and an increase in the present level of function.
Our program is designed to lengthen anterior structures systematically such as the pectoral, quadricep, illiopsoas, anterior cervical, and deltoid musculature. In turn, lengthening these tight anterior structures will help return the posterior muscles to their normal resting length, and they will begin to work more efficiently by giving support and maintaining posture.
These posterior structures will also become less painful, since they will not be working overtime to straighten the cervical or lumbar spine, as we have already released the spastic anterior structures. Our goal is to “open up” the individual by decreasing tightness and treating the root of the problem at hand. Strengthening the posterior structures is a very integral part along with stretching, but unless you begin to treat the root of the problem that is causing the dysfunction, the dysfunction will always remain. The program will also offer strengthening and stabilization activities to the low back, trunk, and neck along with numerous self-myofascial release techniques.
Briefly describing exercises in an article with a limited number of pictures is a challenging task. (For this reason, we have developed a DVD with stretches and a few exercises designed specifically for the dentist and technician). If you will work through the descriptions of the exercises using the pictures as references and do this simple workout, you will be amazed at how quickly you gain significant relief from chronic neck, back, and shoulder pain that is often associated with practicing dentistry.
HOW SELF-MYOFASCIAL RELEASE WORKS
When a muscle is placed between a foam roll or medicine ball and the patient’s weight, that muscle stretches. This stretches the tendon, which compresses the golgi tendon organ, and that muscle is signaled to elongate. At the same time, pressure is applied to a sore spot (latent trigger point) that causes hypoxia followed by a reactive hyperemia, and the pain at that spot decreases significantly in 25 or 30 seconds.2 When this technique is repeated for a few weeks, the sore spots (TPs) often disappear, and the muscle returns to a more functional length.
Stretches to be Done in the Office Daily
It is strongly recommended that all individuals consult with a physician prior to beginning these activities.
 |
 |
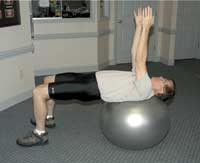
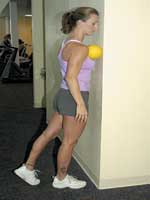
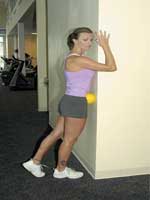
| Figure 1. The doorway stretch can be performed 2 or 3 times daily, between patients. | Figure 2. The thoracic/scapular stretch can be preformed once or twice daily. This exercise can be very relaxing, as is the stability ball stretch shown in Figure 3. |
(1) Doorway Stretch: Per-form this exercise 2 or 3 times daily, between patients. Stand in a doorway and raise one arm out to the side approximately 90º. Place the forearm on the back of the door jamb with palm facing forward. Draw in the belly button and slowly bring the same side leg forward until a slight stretch is felt in the chest and anterior shoulder. Keep your shoulders even, making sure that the opposing shoulder does not roll forward. Hold for 25 to 30 seconds, then repeat with the other arm (Figure 1).
Stability Ball Exercises
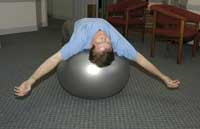 |
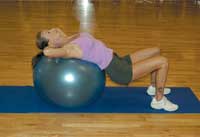
| Figure 3. The stability ball stretch. Draping your body over the ball, extend your arms out to the side and allow gravity to pull your arms toward the ground. Hold this position for 30 to 45 seconds. |
(1) Stability Ball Stretch: Sit on a stability ball. Slowly walk your feet out and lay back on the ball, draping your body over the ball. Extend your arms out to the side and allow gravity to pull your arms toward the ground. Hold this position for 30 to 45 seconds (Figure 3).
 |
 |
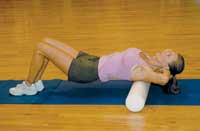
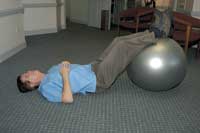
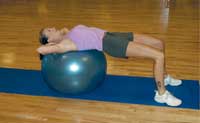
| Figures 4 and 5. Bridging on stability ball. Lie on the floor with arms straight out to your side and palms facing down for balance. Place the ball under the back of your knees. Draw in your abdomen and slowly lift your buttocks off the floor so only your arms and shoulders are touching the floor. There should be a straight line between your knees and shoulders. Squeeze your buttocks together, contract your abdomen, and hold for 2 to 3 seconds, then slowly lower to the floor. Repeat this exercise 10 to 15 times. |
(2) Bridging on Stability Ball: Lie on the floor with arms straight out to your side and palms facing down for balance. Place the ball under the back of your knees. Draw in your abdomen and slowly lift your buttocks off the floor so only your arms and shoulders are touching the floor. There should be a straight line between your knees and shoulders. Squeeze your buttocks together, contract your abdomen, and hold for 2 to 3 seconds; then slowly lower to the floor. Repeat this exercise 10 to 15 times (Figures 4 and 5).
 |
 |
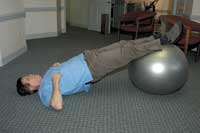
| Figures 6 and 7. Bridging on the stability ball lowering hips. Bridging on the stability ball strengthens your lower back, abdomen, and hips. |
(3) Bridging on the Stability Ball Lowering Hips: Sit on the stability ball, slowly walk your feet out, and lay back on the ball. The head and shoulders should be resting on the ball with the neck in a neutral position. Slowly lower your hips, directing the tailbone toward the stability ball. Then lift hips up slowly toward the ceiling; the chest should be lifted up with the shoulders, hips, and knees aligned in the position of a plank. In this position, contract your abdomen and buttocks and hold for 2 to 3 seconds. Don’t allow your legs to move in or out, and keep the ball from moving. Perform this exercise 10 to 15 times. Bridging on the stability ball strengthens your lower back, abdomen, and hips (Figures 6 and 7).
 |
| Figure 8. Scapular retraction/protraction on stability ball can be performed in 2 sets of 10 to 12 repetitions. |
(4) Scapular Retraction/ Protraction on Stability Ball: Lying on your back draped over the stability ball, slowly reach your arms toward the ceiling with your palms facing in until your shoulder blades are raised off the ball. Next, keeping your arms straight, begin to retract your shoulders toward the ball and pinch your shoulder blades together; hold for 2 to 3 seconds. Perform 2 sets of 10 to 12 repetitions (Figure 8).
SELF-MYOFASCIAL RELEASE USING THE FOAM ROLL AND/OR MEDICINE BALL
These exercises can be done at any time of the day and can be done incrementally. For example, they can even be done while watching television at home.
Pectoralis Major/Minor
 |
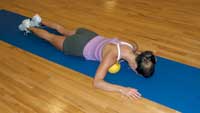 |
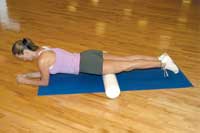
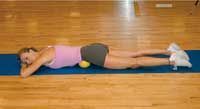
| Figure 9. Pectoralis major/minor. Place a small medicine ball on the wall and lean into the ball, placing it under your clavicle between the shoulder and sternum. Roll the ball up and down and side to side until a tender spot is located. Hold position on tender area until a release in the muscle is felt (approximately 30 to 45 seconds). Repeat this activity on the opposite side. | Figure 10. A more advanced version of the pectoralis major/minor exercise is performed while lying in a prone position. |
Place a small medicine ball (approximately 2 pounds) on the wall and lean into the ball, placing it under your clavicle between the shoulder and sternum. Roll the ball up and down and side to side until a tender spot is located. Hold position on tender area until a release in the muscle is felt (approximately 30 to 45 seconds). Repeat this activity on the opposite side (Figure 9). A more advanced version of this exercise is performed while lying in a prone position as is pictured in Figure 10.
Quadriceps
 |
| Figure 11. Quadriceps. Begin by lying prone with a foam roller under your thighs. Slowly roll your legs up to the hips and then back down to the knees using either your feet or upper body for assistance. Hold roller on tender spots for 30 to 45 seconds. |
Begin by lying prone with a foam roller on your thighs. Slowly roll your legs up to the hips and then back down to the knees using either your feet or upper body for assistance. Hold roller on tender spots for 30 to 45 seconds (Figure 11).
Illiotibial Band
 |
 |
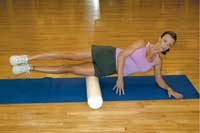
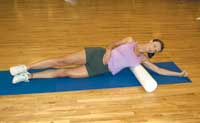
| Figures 12 and 13. Illiotibial band. This exercise will be very uncomfortable initially and should be performed slowly. |
Lie on your side with a foam roller under the side of your thigh. Raise the bottom leg slightly off the floor. Roll from the hip to the knee on the lateral side of the thigh. Hold tender spots 30 to 45 seconds. This exercise will be very uncomfortable initially and should be performed slowly. Repeat on opposite side. The top leg can be bent and the foot placed on the floor in front of the lower leg to decrease the pressure placed on the illiotibial band for the first week or so if you find this exercise painful (Figures 12 and 13).
Tensor Fascia Latae
Begin by lying with a foam roller under your thighs (quadriceps). Next, place the foam roller just lateral to the anterior pelvic bone about halfway between the positioning for the quadriceps and illiotibial exercises. Slowly roll on the foam roller until a tender spot is located. Hold this position for approximately 30 to 45 seconds or until tenderness has decreased by approximately 75%. Repeat the activity on the opposite side.
Illiopsoas
 |
 |
| Figure 14. Illiopsoas. Place a small medicine ball on the wall and lean into the ball, placing it on the anterior hip. Roll the ball in small circles until a tender spot is located. | Figure 15. The advanced version of the illiopsoas exercise is performed while lying in a prone position. This is an important SMR exercise. |
Place a small medicine ball on the wall and lean into the ball, placing it on the anterior hip. Roll the ball in small circles until a tender spot is located. Hold this position for 30 to 45 seconds. Repeat on opposite side (Figure 14). The advanced version of this exercise is performed while lying in a prone position as is shown in Figure 15. This is a very important self-myofascial release exercise.
Latissimus Dorsi
 |
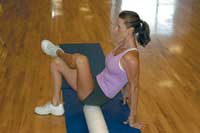 |
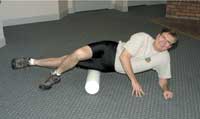
| Figure 16. Latissimus dorsi. Lie on your side with arm outstretched and thumb facing up. Place foam roller slightly below armpit and slowly move back and forth until a tender spot is located. Hold for 30 to 45 seconds. Repeat the activity on the opposite side. | Figure 17. Piriformis. Begin activity by sitting on a foam roll with arms placed just behind you for support. Next, cross the foot of one leg over the opposite knee and slowly roll on the posterior aspect of the hip of the crossed leg. Once a tender spot is located, hold for approximately 30 to 45 seconds. Repeat activity on the other side. Expect this muscle to be very tender initially. |
Lie on your side with arm outstretched and thumb facing up. Place foam roller slightly below armpit and slowly move back and forth until a tender spot is located. Hold for 30 to 45 seconds. Repeat the activity on the opposite side (Figure 16).
Piriformis
Begin activity by sitting on a foam roll with arms placed just behind you for support. Next, cross the foot of one leg over the opposite knee and slowly roll on the posterior aspect of the hip of the crossed leg. Once a tender spot is located, hold for approximately 30 to 45 seconds. Repeat activity on the other side. Expect this muscle to be very tender initially (Figure 17).
CONCLUSION
This is a relatively easy exercise program that really works. It requires a minimum amount of time and equipment, but can have a significant impact on how one feels while treating patients and, more importantly, how one feels all day every day.
These carefully selected exercises allow the individual to open up and regain and maintain more normal posture and function. Combining self-myofascial release with a few exercises on the stability ball is the key to this program. Performing each exercise is as vital as doing the exercises on a regular basis. It is worth the effort!
References
1. Valachi B, Valachi K. Mechanisms leading to musculoskeletal disorders in dentistry. J Am Dent Assoc. 2003;134:1344-1350.
2. Travell JG, Simons DG, eds. Myofascial Pain and Dysfunction: The Trigger Point Manual. Baltimore, Md: Williams & Wilkins; 1983:27.
Dr. Thomas DeLopez spent 3 years in the US Army as a dental officer and then entered private practice in Tallahassee, Fla, in 1974. He is the former president of the Leon County Dental Association and maintains a full-time practice that emphasizes restorative and cosmetic dentistry. Dr. DeLopez writes and lectures on crown and bridge dentistry and doctor/laboratory communications. He can be reached at drtomd@nettally.com.
Mr. Rick DeLopez, a former CPA and auditor, is a full-time strength and conditioning specialist in Boca Raton, Fla. He is a graduate of Florida State University and specializes in functional training to improve balance and core strength. In addition, he works at the Boca Raton Resort and Club as an exercise specialist, developing strength and conditioning programs for golfers and tennis players. He can be reached at (561) 702-9110 or rdelopez@hotmail.com. To order our DVDs, foam rollers, stability balls, and other fitness products, visit domric.com.
Mr. Pompile is a licensed physical therapist practicing in Boca Raton, Fla. He graduated from the University of Hartford with a bachelor of science degree and is also a certified strength and conditioning specialist from the National Strength and Conditioning Association (NSCA). He is involved in developing rehabilitative equipment for needs specific to postural dysfunction syndromes and has developed a shoulder machine specific for upper extremity postural dysfunctions, which will be available this year. He can be reached at (561) 417-2995 or dpomp76@aol.com.