|
INTRODUCTION
Every healthcare professional knows that one of the primary duties we have is to “do no harm.” One very important aspect to almost every restorative case, which is not discussed nearly enough, is doing no harm to neighboring teeth during the restorative preparation phase. Minimally invasive dentistry (MID), just by the definition of the term itself, has really become our responsibility to do no harm by doing the best possible restoration we can on the teeth that need it.
Working in Tight Spaces With Rotating Instruments: Informed Consent
Another important item to mention here is that we are simply dealing with rotating instruments in a very small and confined space. This carries with it an associated risk for human error. Accidents do happen, even though we all we try to the best of our abilities to be careful and not damage adjacent teeth. This risk should be noted in an informed consent to the patient before any restorative procedure. Yes, we do mean that seriously. A patient should have an informed consent for every single procedure that is done on them, just like they do for every procedure that is done in a physician’s office or in a hospital. There are certainly risks and benefits to every procedure that we do, and it is our duty to properly inform the patient of what could happen, even when it is a remote possibility. Feel free to visit commonsensedentistry.com to download current informed consent form for dental procedures.
Magnification
There are numerous ways to prevent damage to adjacent teeth during teeth preparation, especially for restorative procedures. The absolute first requirement for any dental restorative procedures these days would be the use of magnification glasses, surgical telescopes, or surgical microscopes. Magnification glasses will help somewhat, but they do not allow the clinician to see all the details that are required for proper teeth preparation. Surgical microscopes, with their ability to literally almost take you on a journey down the endodontic canal, are an incredible advancement. Unfortunately, for most general dental restorative practices, they are cost prohibitive at this time. Generally, the best choice for everyday magnification use in general dentistry is the surgical telescope.
There are a number of manufacturers who provide some excellent surgical telescopes (such as Orascoptic, Designs for Vision, SurgiTel, and others). There are a myriad of features and designs, and every dental practitioner should do their due diligence when deciding which surgical telescope is best for them and their practice. What is the bottom line? The use of magnification is required as the absolute minimum step to take to prevent damage to adjacent teeth during teeth preparation procedures.
|
Preventing Soft-Tissue and Osseous Damage in the Interproximal Zone
A major operative risk, as the preparation design approaches the gingival area, is possible trauma to both the soft tissue and the osseous structures. This can often result in the damage or even loss of the gingival papilla. When this type of trauma occurs, many times the end result can be an aesthetic restoration with good margins, but the patient may now experience a food trap between the teeth because of loss of the interproximal gingival structure. This so-called “black triangle” effect is one of the most frustrating aesthetic and functional complaints to dentists due to the lack of adequate treatments for this challenge. While there are new and successful techniques available which we have developed using laser biostimulation (with a diode laser such as Picasso [AMD Lasers]) and dermal filler materials, the best way to prevent this problem from happening is to place a physical barrier that will protect the tissue and bone.
Placing an Interproximal Barrier
Another way to prevent damage to adjacent teeth during preparation is by placing a physical barrier between the teeth. The most common way to do this in the past was to create this “barrier” with a tofflemire matrix band. The advantage of using a tofflemire band, or any appropriately thick metal strip for that matter, was the ability to at least absorb minor scratches and damage. In addition, it also gave the operator some “warning” to pull away from the interproximal area.
Today, metal matrix bands are often not regularly found in dental offices, especially if the dental office does not currently use amalgam. Furthermore, one must consider that the matrix band metal is a flimsy, soft metal that does not allow for much protection. Metal matrix bands also encircle the entire tooth, and many times the operator does not have a clear path of sight into the interproximal area that is being prepared. In addition, other matrix systems used today cannot double as protection for the adjacent tooth, primarily because they are made from clear matrices and will shred upon first contact with a rotating carbide bur or high-speed diamond.
Another choice that has been available for some time now is the use of a metal shield that was especially designed for this purpose, the InterGuard protective interproximal shield (Ultradent Products). These disposable shields (available in 4.0 and 5.5 mm vertical heights to accommodate varying teeth) do not encircle the tooth, and are adequately thick/tough enough to help protect the adjacent tooth from iatrogenic damage during preparation. If you are not using a rubber dam, or the shields are not adequately wedged properly and continually supervised using a high volume evacuation tip, the manufacturer advises that the clinician thread an ample length of floss through the hole provided in the side of the shield. The floss allows the clinician or assistant to easily retrieve an accidentally loose interproximal shield, thus preventing the patient from accidentally swallowing or aspirating it. (Note: The floss should be of a length to hang no less than 7 inches outside of mouth.)
In the clinical case example that follows, we will introduce a new and novel multipurpose, single-product option that was designed to help the clinician prevent interproximal and soft tissue damage during restorative preparation, while fulfilling all of the requirements of MID.
CASE REPORT
Diagnosis and Treatment Planning
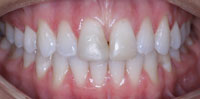
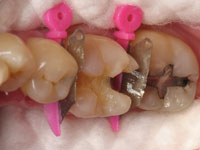
The patient presented with a failing composite restoration (Figure 1) in tooth No. 30. The integrity of the existing restorative margins was found to be poor, and a developing crack within the restoration was discovered on the distal aspect of the tooth. It was decided to restore the tooth with a direct composite resin.
Clinical Protocol
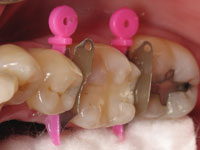
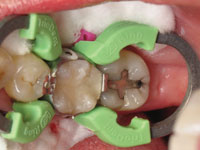
Figure 2 shows a unique new product called a Wedge Guard (Triodent Corporation) in place. The Wedge Guard is a versatile 2-in-one tooth and soft-tissue shield (60 µm thick). It helps the clinician successfully address some of the challenges discussed earlier in this article. First, it protects the adjacent tooth and the surrounding soft tissue during cavity preparation. After preparation is complete, the guard portion is simply and easily detached and the wedge remains in place, ready for the insertion of its compatible composite matrix band. The unique feature here is the detachable guard; this means that the wedge can stay in place, which protects and reduces bleeding of the interproximal papilla during the adhesive bonding procedure. Because there is no risk of nicking the adjacent tooth, preparation can be much quicker and less stressful for the dental clinician.
Preoperatively, after anesthesia was delivered, and while we were waiting for it to take effect, standard wooden wedges were firmly placed interproximally at the mesial and distal of tooth No. 30 to create separation between the teeth. Then, before preparation was started, the wooden wedges were removed and Wedge Guards were then easily placed between the teeth. Please note that in this case, the mesial Wedge Guard had been easily modified (cut) to enable direct line observation of the tooth preparation for the dental clinician (Figure 2).
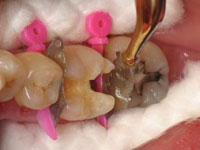
The preparation to receive the new composite resin restoration was completed. In Figure 3, one can observe complete protection of the interproximal gingival papilla, as well as the bur score marks on the Wedge Guard. A resin reinforced glass inonomer material (Fuji II LC [GC America]) was then flowed into the deepest portions of the preparation.
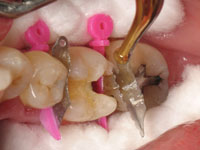
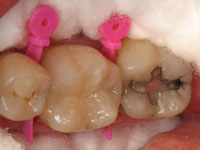
Figures 4 and 5 demonstrate the complete removal of the Wedge Guard from the Triodent Wave Wedge, the wedge stays in place and will be ready to accept the sectional matrix system.
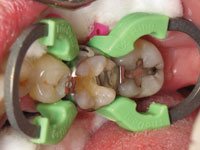
The V3 Ring Sectional Matrix System (Triodent Corporation) was then put in place on both the mesial and distal aspects of the preparation (Figure 6). One of the major advantages of this sectional matrix system is the ability to greatly reduce finishing because of the very accurate adaptation around the interproximal margins. In addition, the clinician is able to accomplish the restoration of the mesial and distal sections of the tooth at the same time, which is not always possible with certain sectional matrix systems.
Next, a self-etching bonding system (G-aenial Bond [GC America]) was applied to the tooth (according to the manufacturer’s directions) and the tooth was restored with an aesthetic nanohybrid composite (KALORE [GC America]) known for its high strength and polishability. After complete polymerization with a fast curing light (such as (VALO [Ultradent Products]) or the FlashMax 3 [Golden Misch]), the sectional matrices were removed as shown in Figure 7.
The completed restoration, as shown in Figure 8, demonstrates the incredible polishability that is now possible with nanohybrid composite resins. Please also note that the wave wedges were kept in place until after all of the finishing was done in order to facilitate proper interproximal finishing. After the entire procedure, the wave wedge was removed, allowing the teeth to spring back and to create an even better interproximal contact. In addition, the wave wedge was also kept in place for the entire procedure to protect the gingival areas, eliminating the chance of bleeding, which could compromise the integrity of the restoration at the gingival margin.
CLOSING COMMENTS
MID gives us the ability to accomplish beautifully aesthetic dentistry while maintaining as much natural tooth structure as possible. Because of the nature of dental rotary instruments during preparation procedures, we need to be concerned about not only the tooth/teeth that we are working on, but equally with the critical and vitally important adjacent hard and soft tissues; this includes the teeth, gingiva, associated bone, cheeks, and tongue. Today, we can be thankful to have innovative new products and techniques that, when used properly, will assist us in accomplishing our restorative goals without needless iatrogenic damage.
Acknowledgement
I would like to thank my good friend, Dr. Graeme Milchik for the beautiful dentistry and clinical photography shown in this article.
Dr. Malcmacher is a practicing general dentist and an internationally known lecturer, author, and dental consultant known for his comprehensive and entertaining style. An evaluator emeritus for CLINICIANS REPORT, Dr. Malcmacher is also the president of the American Academy of Facial Esthetics. For more information about his lecture schedule, BOTOX and dermal filler hands-on live patient training, to download his resource list, and to sign up for a free monthly e-newsletter, please visit commonsensedentistry.com. He can be reached at (440) 892-1810 or at the Web site drlouis@facialesthetics.org.
Disclosure: Dr. Malcmacher has received lecture honoraria in the past from GC America, Triodent, AMD Lasers, Ultradent Products, and Golden Dental Solutions. He did not receive any honorarium for writing this article.