
As a dentist who also owns his own dental laboratory, I’ve been in a unique position to observe many of the changes to both the clinical and technical sides of our profession over the past several years. The incorporation of more and more digital technologies has clearly been one of the most exciting changes, bringing added efficiencies to dentistry. The introduction of digital impressions is the latest technology to improve productivity, both chairside and in the laboratory.
IN-OFFICE SCANNING SYSTEM
Several years ago, I learned of the pending introduction of an in-office scanning system, and I attended a seminar on the technology in early 2008. Because my office produces all of its own restorations in the adjoining laboratory, I’d been waiting to get into the Lava system, and this chairside technology gave me the incentive to act. The device, the Lava Chairside Oral Scanner (C.O.S.) (3M ESPE) captures a continuous 3-dimensional video image of the mouth and displays the image simultaneously on a chairside monitor. The impressions can be used to create both traditional PFM and zirconia restorations, and the accuracy of the impression data means the fit of crowns produced with the system is outstanding.
ACCURACY IN THE DENTAL LABORATORY PAYS
On the laboratory side, Lava C.O.S. eliminates all the steps of model making. The digital impression data is sent to a stereolithography (SLA) facility, which creates the model in an automated process that cures layer upon layer of photosensitive polymer resin. This technology creates an exact model of the impression, which is then shipped back to the laboratory for the subsequent steps. When creating models from conventional impressions, the laboratory has to take a number of steps to ensure the model’s accuracy, but the SLA models produced from digital impressions in a one-step process are always consistent and accurate.
Having performed laboratory work on these models, I have seen the significant difference that this technology makes in the accuracy and fit of the final restorations. This means that seating times can be reduced significantly. I estimate that for an average case, my crown seating time has been cut in half. Additionally, the risk of remakes has also been clearly reduced. The following case illustrates this system’s capabilities in just such an instance.
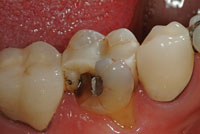 |
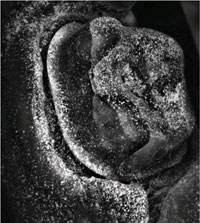
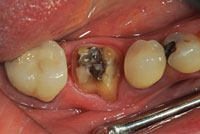
| Figure 1. The broken tooth, with an existing composite resin restoration, recurrent decay, and gingival recession on the buccal root. |
CASE REPORT
Diagnosis and Treatment Planning
A 57-year-old female called our office complaining of a broken tooth. The office manager immediately checked the patient’s records, and upon seeing that the most recent recall had occurred 3 months beforehand and that no existing conditions were present at that time, scheduled an appointment. Upon examination, we confirmed that tooth No. 30 had fractured. It had a previously placed composite resin restoration with some recurrent decay as well as gingival recession on the buccal root (Figure 1). Because the patient already had existing PFM crowns on Nos. 29 and 31, and because of the exposed root, it was determined that a PFM would be the best course of treatment. This would allow for a thin cover to be created, protecting the exposed root. In addition, the patient’s gums were slightly inflamed, and this was to be addressed before starting any operative procedures.
The area associated with the inflammation was pumiced using a rubber cup and floss. One week was allowed for healing, then the patient returned to our office for the crown preparation. It is important to deal with tissue management beginning with the initial patient appointments, understanding that this will help ensure a successful outcome for any case. (This topic will be addressed in more detail later in the article.)
Preparation Appointment
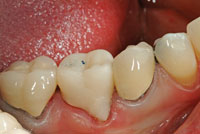
At the preparation appointment, I routinely pumice the tooth (teeth) again with a rubber cup and floss in order to remove any bacteria and food debris from the sulcus and interproximal areas (Figure 2). The contacts were then cut and the area was opened up without tissue trauma, after which a medium cord (Gingi-Pak Z-Twist No. 1 [Gingi-Pak]) impregnated with epinephrine was packed around the tooth (Figure 3). The medium cord performs 2 functions in the digital impression-taking procedure. First, its dark color forms the outline of the prep, just like taping off a wall before painting. This is especially helpful to envision the bone height and the attachment level; the cord makes it easy to see that roller coaster-like track circumnavigating the tooth. Additionally, the epinephrine soaks into the surface of the gums and constricts the capillaries, so there is hardly any bleeding during the rest of the procedure.
 |
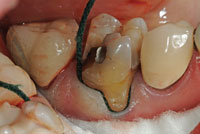 |
| Figure 2. The tooth was pumiced with a rubber cup and flossed. | Figure 3. A medium cord impregnated with epinephrine was packed around the tooth to outline the preparation, retract the tissue, and to minimize bleeding. |
 |
 |
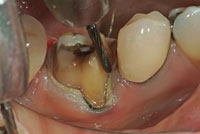
| Figure 4. After the placement of a second retraction cord, the tooth was cut down using a diamond bur (No. 770.10, Two Striper [Premier Dental Products]) and finished with a carbide bur (No. H375R.31.016 [Brasseler USA]). | Figure 5. A compomer (F2000 Compomer Restorative [3M ESPE]) was used to fill irregularities prior to the digital impression. |
 |
 |
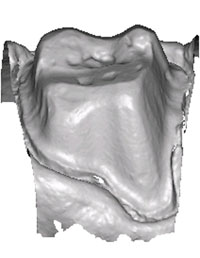
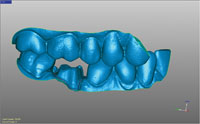
| Figure 6. The Lava C.O.S. system offers dentists advanced tools to review the preparation and margin, including: video review, 2-dimensional enhancement or 3-dimensional stereographic review. | Figure 7. Video images captured by the doctor are also used by the dental laboratory technician to accurately and confidently mark the margin digitally. |
Next, a second No. 10 AS braided gingival retraction cord with aluminum sulfate (SilTrax, [Pascal International]) soaked in Hemodent was packed on top of the first cord. This cord also cuts down on bleeding, and its added thickness gives even more tissue retraction. This step also demonstrates an additional advantage to cleaning the sulcus wi
th pumice at the beginning of the procedure—because the pellicle has been removed from the tooth, the cord packs in well and doesn’t pop out or slide around. By following this sequence of steps, there is significant time savings in that the impression can be taken immediately following the preparation procedure.
After positioning the second cord, gross reduction was accomplished using a diamond bur (No. 770.10, Two Striper [Premier Dental Products]) (Figure 4). The decay was cleaned out, and irregularities were filled with F2000 Compomer Restorative (3M ESPE) (Figure 5). The compomer serves as easy filler material that can be quickly shaped and light-cured. A carbide bur (H375RU.31.7675RUF.016 [Brasseler USA]) was then used to finalize the margins and smooth the surface.
Only the top retraction cord was then removed, thus leaving the lower cord in place for the impression scan. The Lava C.O.S. wand was then used to scan the prep for approximately 20 seconds, after which both the operative and opposing quadrant were scanned for one minute per quadrant. The impression was reviewed for accuracy on the chairside monitor to ensure all necessary data was captured (Figures 6 and 7), and the lab prescription was electronically submitted. After completion of the impression, the tooth was temporized with Protemp Crown material (3M ESPE) (Figure 8).
 |
 |
| Figure 8. The provisional crown (Protemp Crown [3M ESPE]) in place on the preparation. | Figure 9. After postprocessing, a virtual model can be simultaneously sent to the dental laboratory and model manufacturing facility. |
 |
 |
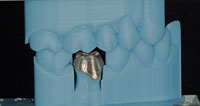
| Figure 10. The PFM was created on the stereolithographic model. (The metal coping is shown here.) | Figure 11. The temporary crown was removed and the area was pumiced prior to placement of the final restoration. |
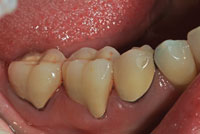 |
| Figure 12. The finished case. (Note the excellent fit of the extension over the exposed root, and the aesthetic blending with adjacent crowns.) |
In the laboratory, the die was digitally trimmed, and the margin was digitally marked. Then the digital file was sent to 3M ESPE for creation of an SLA model (Figure 9) to be used to finish the restoration (Figure 10).
The patient returned 2 weeks later for placement of the final crown. The temporary was removed, and the preparation was again cleaned with pumice (Figure 11). The crown was placed on the preparation to verify proper fit. Then, it was cemented in place with a self-etching, self-adhesive resin cement (RelyX Unicem [3M ESPE]). The crown’s thin extension fit perfectly over the exposed root and also blended well with the adjacent crowns, which were 9 and 11 years old (Figure 12).
DISCUSSION
Tissue Management
Tissue management is vitally important for both conventional and digital impressions, and we as dental professionals need to emphasize it. Increased time and attention given to preoperative as well as post-preparation tissue management can greatly impact time savings and contribute to a more accurate impression in all cases. Usually, tissue management is an afterthought that occurs between the prep and the impression, and that’s all the concern it has gotten in the past. However, it should be made a priority right off the bat and dealt with first. The reason we handle tissue management right away in our practice is b it eliminates the downtime between the preparation procedure and taking the impression. We do not have to sit around while waiting for bleeding to stop or to employ difficult/complex tissue-management procedures. With healthy tissues, we can go directly from the prep to the impression, making the procedure much easier and faster.
Our office manager also plays a major role in addressing tissue management. With the initial phone call from the patient, the office manager listens to the patient’s concerns and then reviews the patient’s recent history to determine the latest hygiene treatment received by the patient and when it occurred. Based on that information, a decision can be made as to the best course of action. For instance, upon that initial phone call, if it has been a long time since the patient’s last hygiene exam, and provided it is not an emergency situation and the patient is not experiencing great discomfort, the office manager will schedule a cleaning with the hygienist. However, if the patient has had a recent hygiene visit (again provided the patient is not experiencing any pain or discomfort), the receptionist will schedule an appointment with the assistant. The assistant and I will then work with the patient to establish a treatment plan. This protocol helps save time in more ways than one. By doing our homework up front and finding out what has preceded the current condition of the patient, we ensure that the patient comes in to see the most appropriate member of the dental team. By dealing with the tissues first—and getting them healthy right away—we save time when it comes time to prepare the tooth and take the impression.
Increased Accuracy
A case like the one presented in this article, with an irregular surface around the tooth, is one of the most difficult cases to perform on a routine basis. This is why it is an excellent example of what can be accomplished with a digital impression system like Lava C.O.S. With this technology, one is not limited to simple bread-and-butter cases, and in fact, the accuracy of a digital scan in a case like this can help ensure success in the fit of the crown.
The accuracy of the system stems from several factors, including the elimination of potential errors in the model work. In the past, if an error was built into the model, it would be extremely difficult to trace the problem back to the original error and prevent further problems. With digital impressions, you are actually able to see the impression as you make it and detect any errors very early in the process, allowing you to fix the problem before sending the information to the laboratory.
Digital impressions also give users an instant feedback mechanism for improving their preparation technique. Previously, some dentists would simply switch to a new dental laboratory after receiving a few bad crowns without identifying whether the root of the problem was with the dental technicians’ work or with the dentist’s own technique. With the digital impression, the real-time display of the impression allows the dentist to see instantly if ther
e needs to be any corrections or alterations. In fact, this feedback was what led me to start employing a 2-cord tissue packing technique.
CLOSING COMMENTS
Bringing the Lava C.O.S. into my practice has improved efficiency in the seating procedure and reduced the chance of remakes, resulting in noticeable changes in time savings and return on investment (ROI). The underlying cause for these results can be contributed to the fact that time is the biggest cost factor in dentistry. In my estimation, labor is a 70% budget item, with lab fees, materials, and space costs making up the rest. Time is the biggest factor of all because it affects the entire staff. Being able to save time with a procedure or technique far outweighs saving on lab or material costs.
Some say lost time is arbitrary and just a cost of doing business; however, it is easier to understand the effects of lost time and revenue by making some simple estimations. For instance, using digital impression technology has cut our seating time down by 50%. If you know your average production day numbers, you can calculate the approximate cost for an hour or half hour of chair time. Then, if you know how long it typically takes to seat a crown, it’s easy to calculate a dollar amount saved if you can shave off 30 minutes from the chair time allotted for the procedure. With these approximations, you can calculate the time savings and ROI that the technology is providing for the business. The importance of time as a cost factor when calculating ROI cannot be expressed enough, because time is something that cannot be recycled, recouped, or replaced.
When looking at the decision to purchase a new material or technology or adopt a new technique, it is essential to look at the time involved in using it in the practice because that time is nonrecoverable. Another factor relating to the ROI in the long term is the potential saving of time in less recements or remakes. Based on preliminary estimates, that would also contribute to increase the ROI.
Dr. Erickson graduated from the University of Minnesota Dental School in 1980 and is a Pankey Institute alumni. He is a member of the ADA and a past trustee of the Minnesota Dental Association. For the past 30 years, he has had a private practice in St. Paul, Minn. Also, he is an assistant adjunct clinical professor appointment with the University of Minnesota Dental School in the GPR program and a consultant and clinical researcher for 3M ESPE Dental. He can be contacted at (651) 484-4193 or at [email protected].
Disclosure: Dr. Erickson has consulted and performed clinical research for 3M ESPE.

