


In today’s economy, we have seen dramatic changes in lifestyle, health, and income. Because of this, we have seen patients delay dental treatment until it finally becomes very painful. Although patients may want full-mouth dental implant reconstructions with fixed restorations, this may not always be something that fits into their budgets. As dental providers, we need to offer our patients a variety of different treatment options in order to restore their dentition to proper form and function. This article focuses on the steps involved in providing denture and overdenture treatment, in addition to extractions, grafting, and dental implant placement.
CASE REPORT
Diagnosis and Treatment Planning
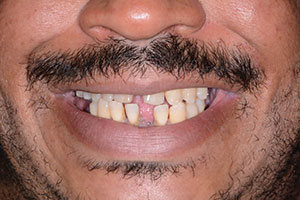
A patient presented to my practice for a consultation, wanting to restore his smile. He complained of generalized discomfort in his teeth due to the caries and periodontal disease that were readily apparent (Figures 1 and 2). Previously, the patient had teeth removed one at a time when there was severe pain or infection. However, this time he wanted to have a “game plan” and be proactive in any suggested treatment that would fit into his budget. He had already been informed by a few dental providers that he would probably need all his remaining teeth removed due to his advanced periodontal disease, so he was aware that this might be the case.
 |
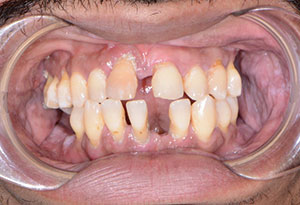 |
| Figure 1. Retracted, preoperative smile view. | Figure 2. Retracted, pre-op frontal view. |
 |
 |
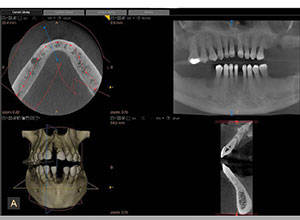
| Figure 3. A CBCT scan was taken (CS 8100 3D [Carestream Dental]). | Figure 4. Pre-op centric occlusion bite registration (Futar [Kettenbach LP]). |
 |
 |
| Figure 5. Immediate dentures. | Figure 6. Physics Forceps (GoldenDent) were used for extractions. |
 |
 |
| Figure 7. The area, grafted and sutured. | Figure 8. Try-in of the immediate denture. |
 |
 |
| Figure 9. Chairside soft denture reline material (Sofreliner Tough [Tokuyama Dental America]). | Figure 10. Dispensing Sofreliner Tough into the immediate denture. |
At the consultation appointment, the patient was informed that we would require a CBCT scan to assist us in accurately diagnosing his dental conditions (Figure 3). Using the CS 8100 3D (Carestream Dental), a CBCT scan was taken so that we would be able to identify the areas of infection and decay and also the areas of remaining bone for dental implant placement. Since the patient had expressed his concern about cost, our goal was to not only find a treatment modality that would restore aesthetics and function economically but also provide a treatment that could potentially be upgraded in the future.
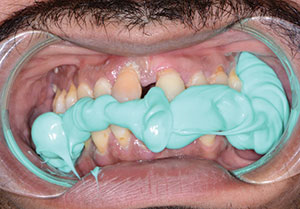
Preliminary impressions for immediate dentures were obtained using Silginat (Kettenbach LP), a cost-effective, elastomeric polyvinyl siloxane (PVS) impression material. Orthodontic retractors were utilized to verify that the patient was accurately biting in centric occlusion (CO) into the fast-setting bite registration material (Futar [Kettenbach LP]) (Figure 4). Photographs of the patient’s smile and midline were acquired in order to properly inform the dental laboratory team of any changes that were desired, including tooth position, tooth size, and arch form, for the immediate dentures (Figure 5).
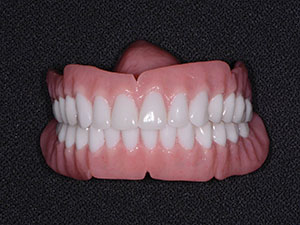
All risks, benefits, and alternatives were fully described to the patient and any questions fully answered. Upon listening to the various treatment options, the patient decided to have all his remaining teeth extracted and those sites grafted. In the upper arch, the patient would be getting a complete denture, whereas in the lower arch, he would be getting an overdenture retained by 4 dental implants.
In order to assist the patient with this investment, financing options using a third-party payment option (Alphaeon Credit) were discussed. This consideration was a very important part of facilitating acceptance of his care since it made the cost of treatment more economical.
Clinical Protocol
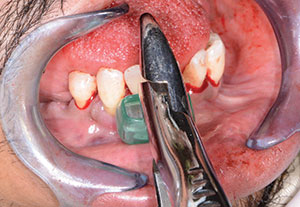
After local anesthesia was administered, we started removing the teeth in the maxillary arch (Physics Forceps [GoldenDent]) (Figure 6). Since the Physics Forceps act like a Class I lever, the only force applied with the beak is on the lingual aspect of the tooth. With the beak positioned at the lingual cervical portion, the soft bumper is placed on the buccal alveolar ridge at the approximate location of the muco-gingival junction. While the beak grasps the tooth, the bumper acts as the fulcrum, providing leverage and stability for the beak. Extraction is accomplished with slight wrist movement rotation in the buccal direction for about 30 to 60 seconds, depending on the length and curvature of the roots.
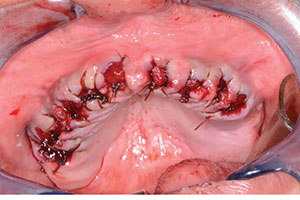
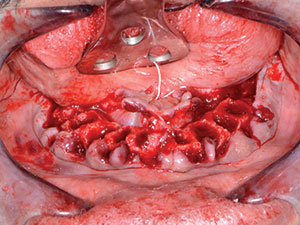
Once the teeth in the maxillary arch were removed, any granulation tissue remaining within the sockets was removed using a curette (GoldenDent), and any sharp areas of the alveolar crest were leveled with a bone bur (GoldenDent). OsteoGen Bone Grafting Plugs (IMPLADENT LTD) were then placed in each socket to facilitate bone growth within the sockets over a 4- to 5-month period for future implant placement if the patient desired. Using resorbable sutures, the OsteoGen Bone Grafting Plugs were further stabilized, and the tissue was sutured (Figure 7).
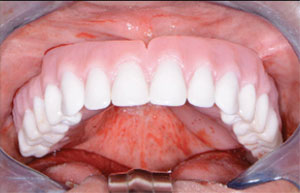
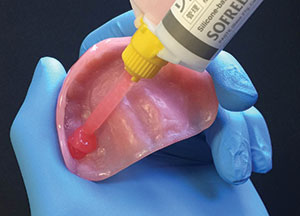
The immediate maxillary denture was tried in to confirm a passive placement, and the patient’s midline was also confirmed (Figure 8). Next, the immediate denture was fully seated with a self-cured, silicone-based soft reline material (Sofreliner Tough Medium [Tokuyama Dental America]) (Figures 9 and 10). According to the manufacturer, Sofreliner Tough is designed to provide long-lasting and consistent relief with outstanding durability for up to 2 years. This reline material is also claimed to have excellent stain and odor resistance and excellent adhesion to denture base materials.
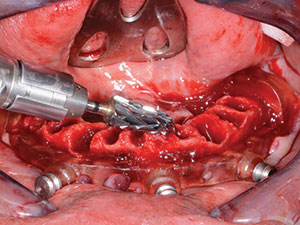
Using the same forceps and atraumatic technique as with the upper arch, the remaining lower teeth were extracted (Figure 10). The remaining sockets were curetted to further remove any debris or granulation tissue (Figure 11). Once cleaned out, the bone leveling guide was positioned over the mandibular ridge (Figure 12). This bone leveling guide was then used as a reduction guide to eliminate any undercuts while creating a leveled area with sufficient width for dental implant placement (Figure 13). Once the ridge was completely leveled to the height of this guide, the implant surgical guide was secured into place (Figure 14). Using the MGuide set (MIS Implants Technologies), the drilling sequence for 4 Seven (MIS Implants Technologies) dental implants was initiated. This computer-based planning system enhances both accuracy and effectiveness for a more ideal implant placement procedure. The drills in the MGuide kit are designed with built-in stoppers to allow precision preparation and placement to the planned depth and positions without the need of keys.
 |
 |
| Figure 11. The lower teeth were removed using the same forceps and extraction technique as with the maxillary extractions. | Figure 12. The remaining ridge after tooth removal. |
 |
 |
| Figure 13. Leveling bone using a CBCT-based guide. | Figure 14. Positioning the implant surgical guide. |
 |
 |
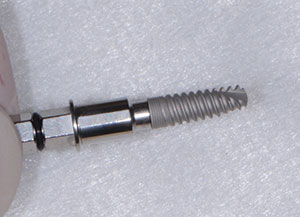
| Figure 15. A 3.75- × 13-mm Seven (MIS Implants Technologies) dental implant. | Figure 16. Overdenture attachments were inserted, followed by graft material. |
 |
 |
| Figure 17. Overdenture housings ready for pickup. | Figure 18. Chairside hard denture reline material kit (Rebase II [Tokuyama Dental America]). |
 |
 |
| Figure 19. Immediate postoperative retracted view. | Figure 20. Retracted, post-op smile view. |
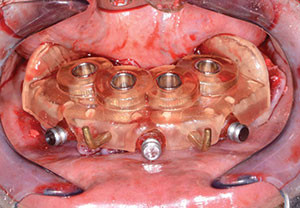
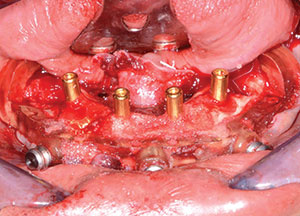
The four 3.75- × 13-mm Seven dental implants (Figure 15) were torqued down to the desired depth at approximately 50 Ncm. Next, 5.0-mm (in height) LOCATORs (Zest Dental Solutions) were inserted within the implants using the provided Zest tool. Using a torque wrench with the appropriate adapter, the LOCATORs were tightened to 30 Ncm (Figure 16). Now that the internal aspects of the dental implants were sealed, bone grafting putty material (GoldenDent) was injected into any remaining voids in the bone (Figure 17). Using resorbable sutures, primary closure was accomplished around the locations of the implants. In order to avoid tearing the sutures during the pickup procedure of the Zest housings, small strips of C-fold towel were used to cover any exposed areas of the sutures.
Since the bone had been leveled with the guide, there was no interference detected between the denture base and attachments in the anterior portion of the immediate denture. Using Rebase II chairside hard denture reline (Tokuyama Dental America) (Figure 18), the female components of the LOCATORs were then picked up. Since this material is methyl methacrylate-free, it doesn’t have a strong odor or taste. In addition, it generates very minimal heat while setting.
The first step in the pickup process was to brush a thin coat of Rebase II adhesive (included in the Rebase II Kit [Tokuyama Dental America]) into the area of the overdenture attachments. This is done to enhance the chemical retention between the denture base and the hard reline/pickup material. KY lubricant was then applied to the surrounding surfaces of the denture to prevent unwanted adherence of excess material. Once the powder and liquid of the Rebase II material were mixed, the material was then placed into a plastic dispensing syringe and injected into the internal anterior portion of the lower immediate denture as well as onto the receptor attachments.
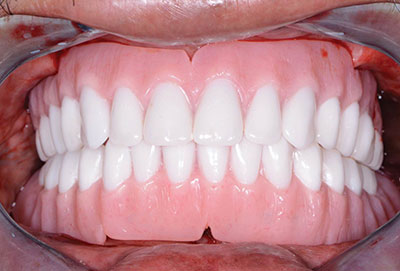
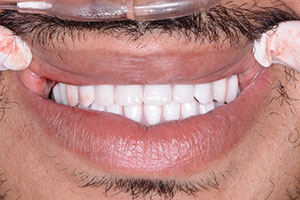
The prosthesis was held in position by the patient biting together in CO (Figure 19). After approximately 3 minutes, the overdenture with the incorporated retention caps was removed, and any excess material was removed with a trimming bur. The bite of the upper immediate denture with soft reline opposing the lower overdenture was verified, and any interferences were eliminated (Figure 20).
CLOSING COMMENTS
As we see more and more patients presenting with dental issues who require full-mouth extractions, we need to offer a variety of different treatment modalities to accommodate their aesthetic and functional needs. These treatment options also need to take their budgets into consideration. Overdentures are a great treatment option for these patients, which can later be upgraded to fixed restorations with additional dental implant therapy.
Dr. Nazarian maintains a private practice in Troy, Mich, with an emphasis on comprehensive and restorative care. He is a Diplomate of the International Congress of Oral Implantologists. He has conducted lectures and hands-on workshops on aesthetic materials, grafting, and dental implants throughout the United States, Europe, New Zealand, and Australia. He can be reached via email at aranazariandds@gmail.com.
Disclosure: Dr. Nazarian reports no disclosures.
Related Articles
Prosthetic-Driven Treatment Plan: Thoughtful Choices Ensure Optimal Results
Integrating a Systematic Digital Workflow


