
This clinical report presents a conservative and a dynamic approach to the aesthetic correction of a tapered upper jaw with composite resin. Due to the complexity of this aesthetic rehabilitation, the clinical treatment was divided into 2 phases: an initial correction and a final correction. Part 1 of this article described the initial aesthetic correction and the treatment planning of the final correction by means of digital imaging. Part 2 of this article describes in detail the utilization of a direct composite mock-up and the step by step clinical procedure of the final treatment.
INTRODUCTION
In cases of complex dental irregularities or jaw size abnormalities, it is often preferable to split the treatment into 2 or more phases. An extensive aesthetic correction could be very difficult for the patient to become familiar with and accept if completed in one session.1,2 Therefore, an initial correction can be made in order to help the patient get used to the new look and feel. After this first aesthetic correction, it could be easier for the patient to imagine more precisely the outcome of a more extensive aesthetic correction. A very good tool that can be used to visualize the final aesthetic result is a digital imaging and image manipulation. Visualization of the aesthetic result before the treatment serves to improve clinician-patient communication.3-8 If patients can actually see and evaluate a suggested aesthetic result in advance, the decision whether or not to move on with the treatment is made more easily.6-8 Another valuable method for treatment planning in complex dental cases can be the utilization of a composite mock-up. This procedure will help the patient not only to visualize the result but also to feel the proposed physical changes in the oral cavity that will occur as a consequence of the proposed dental treatment. In this stage, patients will still have the opportunity to cancel the final treatment if not satisfied. Conclusively, the chance for post-treatment disappointment will be diminished.
CASE REPORT
(A Recap of the Diagnosis and Treatment Plan From Part 1)
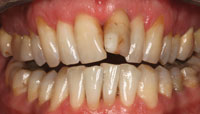
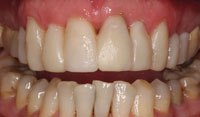
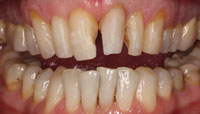
A 38-year-old male patient with a tapered upper jaw, moderate overbite, midline displacement, and extensively restored anterior teeth (tooth No. 9 had been endodontically treated) expressed the need for improved aesthetics of his smile (Figures 1 and 2). After evaluation of the patient’s wishes and expectations, the clinical data were collected. For this particular patient, an orthodontic treatment was not a consideration, and he wished for an optimal aesthetic result with minimum tooth preparation of healthy tissues. However, for the authors it was clear that an extensive treatment with composite was necessary in order to meet the patient’s desire for improved dental aesthetics. The treatment was therefore divided into 2 phases. The first phase was reserved for the initial aesthetic correction of the frontal area; this treatment was described in part 1 of this article “Improving Aesthetics in a Narrow Jaw With Composite, Part 1” at dentistrytoday.com. The patient was informed that depending upon his satisfaction after the initial treatment, a choice could be made to continue with more extensive treatment utilizing composite resin restorative materials.
 |
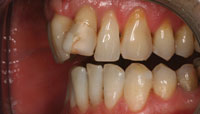 |
| Figure 1. Preoperative frontal view. | Figure 2. Preoperative lateral view. |
 |
 |
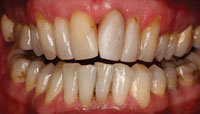
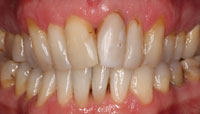
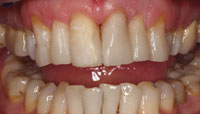
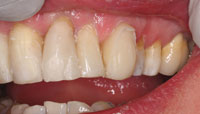
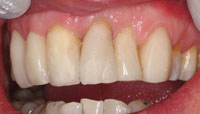
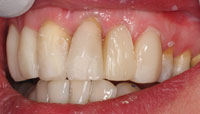
| Figure 3. Frontal view, 2 years after the initial treatment. | Figure 4. Lateral view, 2 years after the initial treatment. |
Mock-Up
Two years after the initial treatment, the patient was still happy with his restorations (Figures 3 and 4). However, he was now ready to undergo the more complex and extensive treatment that had been presented using the digital mock-up. The narrow (omega-like) upper jaw was still a big aesthetic problem for him and he wanted it to be optimally improved with composite.
By using composite mock-ups, a dentist can establish physical demonstrations of the treatment planning for each particular case. Moreover, patients can see and feel the changes in their mouth, thus enabling them to share in the decisions involved prior to the treatment. Composite mock-ups are also an excellent tool to visualize the light behavior on the modified tooth surfaces.5 The composite mock-up approved by the patient can be captured by dental impressions and photographs, which can be used for model analysis and treatment support, especially in cases when porcelain crowns or facings are required.5
 |
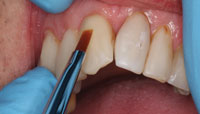 |
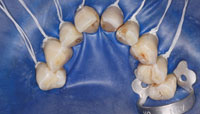
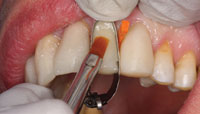
| Figure 5. Dental brush (moisturized with an unfilled resin) was used with a relatively low viscosity composite resin to create the mock-up. | Figure 6. Nonadhesive application of composite was done to allow for trouble-free removal of composite. |
 |
| Figure 7. Frontal view of the mock-up. (Note that the incisal part of the teeth was positioned toward vestibular to improve the aesthetics of the buccal corridor.) |
In this particular patient case, where the narrow aspect of the jaw had to be corrected, the composite mock-up was an outstanding method to visualize the effect of teeth enlargement. The authors used a soft dental brush Quast (Cavex), slightly moisturized with an unfilled resin, Heliobond (Ivoclar Vivadent) and composite resin (Quadrant Anterior Shine [Cavex]) of a relatively low viscosity (flowable composite) to accomplish fine handling and smooth application of the material (Figure 5). Composite was applied directly over the buccal surfaces without the use of etchant and adhesive in order to allow for trouble-free removal of the composite (Figure 6). It was spread over the buccal surfaces of the teeth, paying special attention to the sculpting of new and more vestibular positioned incisal edges (Figure 7). This approach was necessary in order to test the effect of the teeth enlargement on the lips and cheeks.9-11
Color Determination
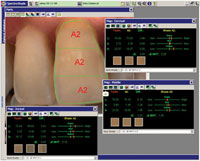
The patient was satisfied with the color of his upper right central incisor tooth No. 8; therefore, this tooth was used as a target for color determination. Its color was measured with SpectroShade Micro (MHT) and expressed in CIEL*a*b* values (Figure 8).12,13 The closest match established was comparable to the Vita classical shade tab A2. Color difference ∆E between the tab A2 and tooth No. 8 was also calculated. It appeared that the color difference was visually perceptible for each segment of the tooth:14
• ∆E cervical = 3.63
• ∆E middle = 2.33
• ∆E incisal = 4.97
 |
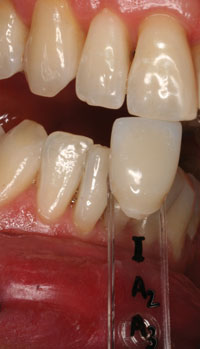 |
| Figure 8. Digital color analysis with SpectroShade Micro (MHT). | Figure 9. Tooth color determination with in-office fabricated 2-layered composite tabs. |
The difference was mainly in yellowness because the tooth was more yellow than the tab (Figure 8). In order to get a “natural look” of the composite restorations, color was determined using custom made stratified (layered) composite tabs fabricated by the authors (Figure 9).10,15,16 The unique stratified tabs were composed of 2 composite labels frequently used by the authors. The body of the tabs consisted of a hybrid composite (Z250 [3M ESPE]) in 2 chromatic expressions: one for the cervical part (more saturated), A3; and one for the middle/incisal part, A2. The superficial layer of the tabs was built up with the microhybrid composite Quadrant Anterior Shine in the same chromatic range as the hybrid layer. The CIEL*a*b* values of the self-made tabs were also measured with the SpectroShade Micro and the most similar layered composite tab was selected for the tooth buildup. The selected shade tab for this case consisted of: Layer 1 – A3 cervical + A2 middle/incisal (Z250) and Layer 2 – A3 cervical + A2 middle/incisal (Quadrant Anterior Shine) (Figure 9).
Clinical Procedure for Composite Veneers
Treatment started with local anesthesia, and a rubber dam was applied to prevent patient discomfort during the treatment and to assure a controlled working area. Then, the old restorations and the incisal edges, which had to be positioned toward vestibular, were slightly prepared, the teeth surfaces sandblasted with aluminum oxide (27 µm), etched, rinsed, dried, and treated with a 3-step adhesive (All Bond 2 [BISCO]) procedure (Figures 10 to 12). The proximal aspects of all teeth were consecutively separated with transparent matrices (Directa Matrix Strips [Directa]) and hybrid composite (Z250) was applied mesially, distally, and on the incisal edges in order to position those buccally (Figure 13). In this way, strong hybrid-composite frameworks were prepared for the build-up of microhybrid composite facings.10,17 In this stage, the restorations were only roughly polished with a diamond bur and the rubber dam was removed so that the occlusion and position of the incisal edges could be verified (Figure 14).
 |
 |
| Figure 10. In maximum occlusion, the lateral cross-bite is assessable. | Figure 11. Teeth are prepared for buildup of hybrid composite framework. Teeth Nos. 8 and 10 are proximately reduced to allow for the widening of tooth No. 9. |
 |
 |
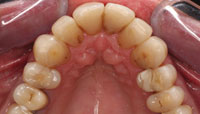
| Figure 12. Occlusal view shows that the enamel has been reduced occlusally (from the canine and premolars) to allow for composite addition and correction of cross-bite without resulting in over-contoured teeth. | Figure 13. The incisal part of the teeth was moved buccally with hybrid composite. The teeth were prepared for aesthetic facings with microhybrid composite. |
 |
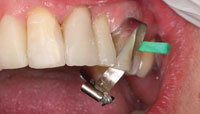 |
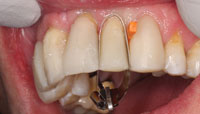
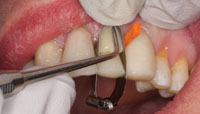
| Figure 14. After the rubber dam was removed, the occlusion was checked and adjusted, and the new position of the incisal edges was also evaluated. | Figure 15. The metal matrix band (Automatrix NR [DENTSPLY Caulk]) was applied around the vestibular surface of tooth No. 11 with a 45° orientation. It was then stabilized with wooden wedges. |
 |
 |
| Figure 16. Composite was polymerized during and after the removal of the metal band. |
Figure 17. The excess of composite was removed. Then, the transition area in the cervical part was polished with fine diamond burs. |
 |
 |
| Figure 18. The facing for tooth No. 10 was the next to be built up using a matrix band. | Figure 19. Composite was first applied with an Ash 49 instrument. The greatest mass was positioned in the cervical part and then thinned out toward the middle part. |
A composite facing was first completed on tooth No. 11. A metal matrix (Automatrix NR [DENTSPLY Caulk]) was passed through the contact points easily and served to separate the facing from the neighboring teeth. The matrix was slightly buckled in order to fit the cervical borderline perfectly, then dental wedges were used proximally in order to prevent over-contouring, leakage of saliva, crevicular fluid, and/or blood. That left the buccal surface of the tooth surrounded by matrix and wedges and very well isolated for the purpose of the adhesive exposure (Figure 15). The buildup of the facing was carried out with the application of a chromatic version of microhybrid composite (Quadrant Anterior Shine ) on the cervical part of the tooth No. 11; and then the application of a less chromatic version of composite on the middle and the incisal part. After curing, the matrix was removed and the buccal surface was contoured with a fine grit diamond bur (FG 249U012 [Horico]) (Figures 16 to 18).
Continuing with tooth No. 10 (Figure 19), the first portion of composite was syringed against the matrix and then adapted with an Ash 49 instrument, making sure that no air bubbles were captured (Figure 20). Hereby, the greatest mass was positioned in the cervical part and depleted towards the middle part. Directly after the first composite application, the dental brushes (Quast and Flat Brush [GC America]) were utilized to smoothly spread the composite (Figure 20). Consecutive layers of composite (A3, followed by A2), were applied like “roof tiles” in order to acquire a natural-depth appearance. The veneer was cured during the layering, and once again after the removal of the metal matrix (Figure 21).
 |
 |
| Figure 20. A dental brush was used to spread composite smoothly over the entire surface. | Figure 21. Lateral view after polymerization of tooth No. 11 and tooth No. 10 before polishing. |
 |
 |
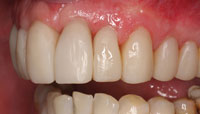
| Figure 22. Lateral view of the canine and lateral incisor after polishing. | Figure 23. Frontal view in maximum occlusion. |
 |
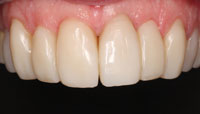 |
| Figure 24. Occlusal view, 2 months postoperatively. | Figure 25. Frontal view (in detail), 2 months postoperatively. |
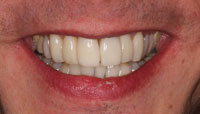 |
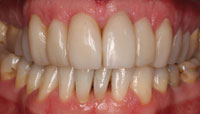
| Figure 26. The improved smile of the patient, 2 months after treatment. |
Every composite facing was contoured with a fine diamond bur (FG 249U012), paying careful attention to the transitional area between the restoration part formed by matrix, and the one formed by the dental brush (Figure 22). Facings were then consecutively applied to the other incisors, canines, and premolars, taking into account the harmony in their mesiodistal dimensions.10
After 3 months, the patient came into the office for the final evaluation. This time period was needed for the patient to get used to the new feel and appearance of the teeth and to discover any possible problems. During this visit, the patient’s dental hygiene was checked and the composite veneers were polished to an optimal high luster. Prior to final polishing, the restorations were once again evaluated for proper occlusion and articulation. Also, the desired natural-appearing morphology was evaluated with special attention to the incisal/occlusal aspect, which is essential for natural aesthetics (Figures 23 and 24).9,10 The teeth looked relatively long, so the cervical contouring was refined and enhanced with a pear-shaped bur (FG 379EF023 [KOMET]) in order to suggest a less apically located crown (Figure 25). Next, the surface design and light reflections were assessed in different illuminations and from different directions, and corrected where needed; then the veneers were polished with polishing cups (Politip P large cup [Ivoclar Vivadent]) and Diamond Polishers large cup [Heraeus Kulzer]), ensuring very smooth surfaces (Figures 24 to 26). Finally, the patient was instructed how to brush and clean interproximally with dental floss (Dentotape [Johnson & Johnson]) in order to maintain the aesthetic result as long as possible.
CONCLUSION
Nowadays, trend-setting industries often set the tone for aesthetics in the public eye, but in order to experience something “beautiful,” a strong intimate affection for the work that has been done needs to be present. This feeling is utterly personal. Therefore, the one who desires an aesthetic improvement, and the one who is supposed to create it, needs to explain their aesthetic visions to each other before the actual process of change takes place. If the patient and the creator only verbally describe their aesthetic wishes to each other without having the opportunity to visualize them or to feel the alterations, the outcome of any treatment and their mutual satisfaction could be undermined.
Relatively simple and nonexpensive techniques can be used to help visualize the intended treatment result before the actual treatment has taken place. These techniques include employing computerized image manipulation and composite resin mock-ups; these can be seen respectively as a 2- and 3-dimensional means of visualization. Using these techniques, dentists can also discover whether the intended aesthetic result is feasible and what possible obstacles might be encountered during the course of treatment; this can be essential for properly treatment planning a case. It is also to be expected that patients may become more interested in the treatment that has been presented to them even though they may not have wished that improvement previously. However, if dentists decide to utilize visualization techniques as tools “to sell” a particular treatment, they must be very well aware that their subjective clinical abilities and any existing dental/patient limitations that could impact the final clinical outcome.
References
- Maio G. Being a physician means more than satisfying patient demands: an ethical review of esthetic treatment in dentistry. Eur J Esthet Dent. 2007;2:147-151.
- Nuy M, Gordijn B.Cosmetic dentistry. An ethical reflection on the boundaries of embellishment [in Dutch]. Ned Tijdschr Tandheelkd. 2003;110:154-158.
- Goldstein CE, Goldstein RE, Garber DA. Imaging in Esthetic Dentistry. Chicago, IL: Quintessence Publishing; 1998.
- Roeters J, de Kloet H, Jeurissen A. Handboek Voor Esthetische Tandheelkunde. Nijmegen, The Netherlands: STI; 1998, 2005.
- Atlas of PLVs. In: Gurel G. The Science and Art of Porcelain Laminate Veneers. Chicago, IL: Quintessence Publishing; 2003: Chapter 7.
- Papasotiriou OS, Nathanson D, Goldstein RE. Computer imaging versus conventional esthetic consultation: a prospective clinical study. J Esthet Dent. 2000;12:72-77.
- Goldstein RE. Attitudes and problems faced by both patients and dentists in esthetic dentistry today: an AAED membership survey. J Esthet Restor Dent. 2007;19:164-170.
- Goldstein RE, Garber DA. Improving aesthetic dentistry through high technology. J Calif Dent Assoc. 1994;22:23-24, 26, 28-29.
- Vanini L, Mangani F, Klimovskaia O. Conservative Restoration of Anterior Teeth. Viterbo, Italy: ACME; 2005.
- de Kloet HJ. Esthetische tandheelkunde met facings van composietmateriaal. ACTA Quality Practice. 2006;1:26-37.
- Talarico G, Morgante E. Psychology of dental esthetics: dental creation and the harmony of the whole. Eur J Esthet Dent. 2006;1:302-312.
- Dozic A. Electronic tooth-color measurement. In: Dozic A. Capturing Tooth Color. Wageningen, The Netherlands: Ponsen & Looijen BV; 2005:23-32.
- Dozić A, Kleverlaan CJ, El-Zohairy A, et al. Performance of five commercially available tooth color-measuring devices. J Prosthodont. 2007;16:93-100.
- Johnston WM, Kao EC. Assessment of appearance match by visual observation and clinical colorimetry. J Dent Res. 1989;68:819-822.
- Dozic A. Kleurdiagnose. ACTA Quality Practice. 2005;1:31-35.
- Dozic A. Praktische werkwijzen om voorspelbaarheid van esthetische kleur- en vorm-uitkomst van composiet-restauraties te vergroten. ACTA Quality Practice. 2008;4:19-28.
- Meijering AC. A clinical study on veneer restorations [thesis/dissertation]. Nijmegen, The Netherlands: Katholieke Universiteit Nijmegen; 1997.
Dr. Dozic is assistant professor at Academic Centre for Dentistry in Amsterdam, the Netherlands, and guest professor at Faculty of Dentistry in Sarajevo, Bosnia, and Herzegovina. She also works in a private dental practice specializing in restorative dentistry in Amsterdam. She received her PhD in Dental Materials Sciences on theme “color of teeth” in 2005. She is lecturing in a master phase of dental curriculum and postacademically covering different aspects of aesthetic dentistry. She is also conducting research implying: electronic color determination, optical properties of dental materials, color change of teeth due to external factors, and the aesthetic outcome of different restorative methods in clinical dentistry. She has published more than 26 articles internationally and is the editor of the Annual Book About Dental Esthetics in the Netherlands. She maintains membership in many professional associations and academies. She can be reached at (0031) 617452560 or via e-mail at [email protected].
Disclosure: Dr. Dozic reports no disclosures.
Dr. de Kloet studied dentistry at Free University in Amsterdam, the Netherlands. Since his graduation in 1974, he has been involved in research and clinical practice in the field of direct adhesive-aesthetic-composite dentistry, exploring the technical and aesthetic limits of composite materials. Currently, Dr. de Kloet works part-time at the Academic Centre for Dentistry in Amsterdam, where he organizes postgraduate courses in Holland and Belgium. He is co-author of more than 30 publications and 2 textbooks about aesthetic composite dentistry, in Dutch and German, with Joost Roeters of the Dental School of Radboud University, Nijmegen. He lectures internationally for 3M ESPE, Kerr, and Ivoclar Vivadent and for national and local associations of dentistry. He also is a renowned lecturer on digital dental photography. He can be reached via e-mail at [email protected].
Disclosure: Dr. de Kloet reports no disclosures.
{rscomments on}

