During the course of day-to-day practice, dentists often face the challenges associated with restoring anterior dentition. In particular, visibly obvious damage to the maxillary central incisors is common among children, and the likelihood that dentists will be called upon to restore chipped, fractured, and otherwise traumatized teeth in children is strong.1,2 Depending on the nature of the trauma, damage to the maxillary central incisors may range from cracks to fractures to complete avulsion.1
Based on the patient’s condition and motivation for treatment, the dentist may propose indirect restorations such as crowns or veneers, or a more immediate solution by placing direct composite materials. The former—indirect porcelain veneers and crowns—have proven longevity and higher patient satisfaction when restoring anterior dentition, despite the multiple visits and substantial cost involved.3,4 In recent years, however, manufacturers have introduced direct composite materials that demonstrate a variety of enhancements. These include improved physical properties, increased durability and strength for long-term function, and polychromatic qualities for the chairside creation of restorations with aesthetic and lifelike characteristics.5-7
In the face of fractured and traumatized anterior maxillary central incisors, age should be an important consideration when identifying the most suitable restorative treatment for a given patient. For example, young patients’ teeth may exhibit thicker enamel compared to an older patient with thinner enamel and lower value.8 Furthermore, the enamel of young patients may also demonstrate high density, low translucency, high luminosity, and high reflectivity.8 These characteristics will affect the dentist’s choice of restorative modality and the manner in which the proposed restorations are created.
Specifically, it is incumbent upon dentists to understand not only the anatomical structure of a patient’s teeth, but also the manner in which that structure influences the optical properties and aesthetics observed in the natural teeth.6-8 In order to recreate the polychromatic effects that appear in natural teeth, dentists must impart variations of hue (the color name or basic color), chroma (the intensity, vividness, or dullness of a color), and value (brightness, as in lightness or darkness of color) into the restorations they create.6-9
Therefore, truly lifelike and natural-looking restorations—whether direct or indirect—must replicate the variations of color found in the enamel and dentin layers of natural teeth. To achieve this, the correctly colored composite or porcelain must be applied in the appropriate places and proportions and in such a way that the effects of light observed in natural teeth are imitated.6,8
Given that it is recommended for young patients, especially those under the age of 10, to receive conservative treatment whenever possible,1 composite restorations may be the ideal choice when faced with treating fractured maxillary central incisors in children. Direct restorations can enable dentists to conserve as much remaining tooth structure as possible once the stability of the tooth is confirmed and ensured.1,8,9 However, it is incumbent upon dentists to ensure that such restorations are built-up in the most natural-looking way possible by using materials that are engineered to mimic the form, function, and aesthetics of natural teeth.
Such minimally invasive approaches are essential when treating otherwise “virgin” teeth—ie, those that have not been previously restored as a result of disease, decay, or trauma—since the anticipated desire for conservative treatment in the future dictates the need for conservative treatment now. In particular, it is this author’s opinion that clinicians should refrain from taking a young patient to the ultimate restorative endpoint; ie, it is imperative that we avoid aggressive reduction of enamel, conserve as much of the anatomical pulp as possible, and respect the existing enamel structure.
CONSIDERING DIRECT RESTORATIVES
Indications for composite restorations include the treatment of children and adolescents primarily because of the conservative nature of the preparation techniques required.8 Microfilled composites have been indicated for anterior restorations based on their polishability, but their physical characteristics precluded their use in high-stress areas.10 As a result, hybrid materials have been introduced that enable the placement of composites in the posterior regions; however, their lackluster optical qualities deemed them inappropriate for use in the highly-aesthetic anterior region.10
As a result of improvements and variations to the composition of dental materials, direct restorations can now be placed—using the appropriate composite and layering techniques that imitate the internal structures of natural teeth—to create lifelike aesthetics with predictable durability in the anterior and posterior regions.11-13 The further evolutionary development of enhanced direct composite material characteristics has contributed to the availability of specific product lines that are now suitable for placement anywhere in the mouth based on their strength, durability, and optical properties.14,15
Replicating the appearance of natural teeth requires the use of either a variety of composite shades in order to imitate what is observed in natural teeth, particularly in more challenging, complex cases, such as a class IV fracture,8 or the use of a single composite material that demonstrates a chameleon effect and aesthetic invisibility similar to what occurs in natural teeth. For example, a tooth consists of enamel, which affects the luminosity and opalescence of the tooth, as well as dentin, which determines the tooth’s chroma.8
Among the recently introduced direct restoratives that claim to offer the optimal combination of necessary characteristics—as well as a range of composite shades for incisal, enamel, and dentin layers—are Gradia Direct (GC America), Vit-l-escence (Ultradent Products), Filtek Supreme Universal Restorative (3M ESPE), and 4 Seasons Universal Composite System (Ivoclar Vivadent). These have all been reported by the respective manufacturers to support universal application for aesthetic anterior and posterior restorations.
CASE REPORT
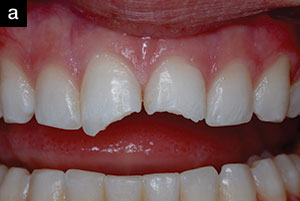
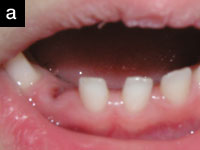
An 11-year-old boy presented with fractures in both maxillary central incisors (teeth Nos. 8 and 9) resulting from a skateboarding accident that occurred 2 days earlier (Figures 1 through 4). The patient had been taken immediately to a clinician, who recommended an aggressive treatment plan that included root canal therapy and placement of a post and core. However, the patient’s parents declined the invasive treatment and instead sought a more conservative approach.
A complete examination, which included a review of radiographs, photographs, and the patient’s intraoral condition, was performed. The patient was generally in good health, but his age and the continuing development of his teeth would dictate the restorative process.1,2 However, no pathologies were present that would hinder treatment.
 |
 |
| Figure 1. Close-up, preoperative view of the patient’s natural smile. | Figure 2. Retracted preoperative view emphasizing the extent of fractures to teeth Nos. 8 and 9. |
 |
 |
| Figure 3. Preoperative 1:1 view of the patient’s condition. | Figure 4. Preoperative incisal view of the patient’s fractured anterior maxillary central incisors. |
TREATMENT PLANNING
The patient’s parents expressed a desire for the most conservative treatment possible, but also one that would be the most natural-looking. They were pleased at the prospects of restoring both anterior maxillary teeth with direct composite restoratives, and they selected this option.
The case was evaluated in detail, and visual assessment was completed to analyze the occlusion and morphologic, histologic, and optical characteristics of the adjacent teeth. Since this case involved both central incisors, aesthetic and morphologic success was dependent upon optical and anatomical symmetry.16 Based on the variety of inherently natural-looking shaded composites available, the Gradia Direct system was selected for use in this case.
MATERIAL
Gradia Direct is a light-cured, microfilled hybrid resin composite designed to mimic the reflectivity observed in natural teeth. According to the manufacturer, Gradia Direct composites are similar to natural tooth structure in their composition, which includes diverse, multifaceted structures; a variety of particles consisting of a microfilled matrix of resin composite; compounds mainly of silica; prepolymerized fillers; and a urethane dimethacrylate comonomer matrix.
The amount of each element and its particle size distribution, when combined, produce many different interfaces with different reflective properties. When used for direct restorations, the results include internal reflectivity and optical properties that replicate those of natural teeth. The product line includes a range of standard body shades, special inside opaque shades, and outside shades for enamel translucency and increased value, in addition to a posterior resin with clinical opacity and fluoro-aluminosilicate glass for enhanced radiopacity.14 The Gradia Direct system also features traditional shades based on the Vita Classic Shade Guide (Vita Zahnfabrik; distributed by Vident), which provides the dentin or body layer and determines the basic hue and chroma of the restoration.14 Additionally, there are a variety of enamel shades available, which contribute to the restoration’s value, luminosity, and opalescence.14
DIAGNOSTIC WAX-UP
Prior to initiating the restorative procedure, an impression was taken in order to fabricate a diagnostic wax-up and ultimately, an aesthetically enhanced wax-up indicating the optimal length of the central incisors.17 A high-viscosity putty stent was also created for use as a volumetric, 3-dimensional guide for placement of the composite restorations (Figures 5 and 6).8,17,18 The putty stent would also preserve the exact facial/lingual line angle and indicate where to place the composite material in order to ensure symmetry with the contralateral teeth. Additionally, a shade map and colorimetry were employed to determine the appropriate shades of composite to be used. Surface texture differences and surface gloss differentiations were noted.17
 |
 |
| Figure 5. View of the aesthetically enhanced diagnostic wax-up with putty stent in place. | Figure 6. View of the putty stent in place in the patient’s mouth. |
During the shade-taking process, the Gradia Direct shade guide—which is based on the Vitapan Classical shades—was used, since it contains 4-step tabs that enabled the clinician to judge the influence of material thickness on shade. Additionally, by positioning one shade thickness over another, it was possible to gauge the effect of shade layering on the final restoration.
PREPARATION PROTOCOL
A 1.5-mm modified shoulder preparation was completed on teeth Nos. 8 and 9 using diamond burs, and a 2-mm facial bevel was placed on both teeth. Additionally, an infinite/virtual bevel was added for use in transitioning the enamel shade of composite into the remaining tooth structure.17 The long bevel was approximately 0.3 mm in depth, and it extended 2 mm to 3 mm around the entire margin. This preparation technique supports fracture resistance and durability of the restorations by enabling the placement of a layer of composite at the restorative margins.17,19
COMPOSITE LAYERING TECHNIQUE
The prepared teeth were pumiced, rinsed, and dried. The teeth were then etched for 20 seconds using a self-etching adhesive bonding system (UniFil Bond, GC America).14 The self-etching primer (UniFil Bond Self-Etching Primer) was then gently air-dried for 5 seconds. The UniFil Bonding Agent was applied to the preparations and light-cured for 10 seconds using an LED curing light (UltraLume LED 5, Ultradent Products), which was also used throughout the case.
The putty stent was placed in the patient’s mouth for special reference. Buildup of the restoration was initiated by placing a 2-mm thick layer of the selected P-A2 shade of Gradia Direct composite on tooth No. 8, which formed the lingual enamel layer (Figure 7). This shade was selected to form the lingual enamel layer in order to control the restoration’s opacity and eliminate the possibility of any show-through. This step was repeated on tooth No. 9 (Figure 8), and the composite was sculpted and light-cured for 20 seconds.
 |
 |
| Figure 7. The lingual enamel layer was created by placing the standard posterior P-A2 shade of Gradia Direct composite on tooth No. 8. | Figure 8. The same composite was then placed on tooth No. 9 to create the lingual enamel layer. |
The putty stent was then removed so that the P-A2 layer could be previewed to assess opacity (Figure 9), as well as to allow the bulk of the artificial dentin layers of both teeth to be placed. A 2-mm thick dentin replacement layer was formed by placing standard anterior shade A2 of the Gradia Direct composite on teeth Nos. 8 and 9 to create the body and mammelons (Figure 10). This layer was sculpted into place just short of the proximal and incisal edges, as well as onto the long bevel to mask the fracture line, and light-cured for 20 seconds.
 |
 |
| Figure 9. This P-A2 layer was then previewed without the putty stent in order to assess opacity. | Figure 10. The dentin replacement layer was formed by placing standard anterior shade A2 of the Gradia Direct composite to create the body and mammelons of teeth Nos. 8 and 9. |
At this point, sufficient room remained for placement of the final enamel layer and special effect layers of composite. To create the natural-looking variations in shade and chroma, a second dentin layer—anterior Shade A1—was placed in the middle and incisal third of teeth Nos. 8 and 9 (Figure 11), sculpted, and light-cured for 20 seconds. By placing the additional dentin layer, the author was able to ensure a better depth of color, diffusion of light, and stabilization of the overall color, in addition to achieving greater control of the restoration’s value. A thin transitional layer of anterior WT (White Translucent) Gradia Direct composite was then placed at the gingival and middle third, and NT (Natural Translucent) Gradia Direct composite on the incisal third, of teeth Nos. 8 and 9 (Figure 12), after which the teeth were light-cured for 20 seconds.
 |
 |
| Figure 11. A second dentin layer—this time in anterior Shade A1—was placed in the middle and incisal third of teeth Nos. 8 and 9. | Figure 12. A transitional layer of anterior WT (White Translucent) Gradia Direct composite was placed at the gingival and middle third, and the anterior NT (Natural Translucent) composite was placed on the incisal third of teeth Nos. 8 and 9. |
To further enhance the youthful appearance and control the luminosity of the restorations, a thin final enamel layer of BW (Bleaching White) Gradia Direct composite was placed on teeth Nos. 8 and 9 with the putty stent in place (Figure 13), sculpted, and light-cured for 20 seconds. Prior to imparting surface texture and tertiary characterizations, the enamel layer was critiqued (Figure 14). Transenamel light-curing was then completed from multiple aspects to ensure the total depth of cure.
 |
 |
| Figure 13. To enhance the youthful appearance of the restorations, a final enamel layer of BW (Bleaching White) Gradia Direct composite was placed on teeth Nos. 8 and 9. | Figure 14. Prior to polishing and finishing, the final enamel layer was critiqued. |
ANATOMICAL CONTOURING, POLISHING, AND FINISHING
A variety of burs and diamonds (Brasseler USA) were used for contouring, gross reduction, and finishing and polishing of the restorations. The final incisal edges—as well as the slight opening of the embrasure between the central incisors—were created using a 3M ultra-fine polishing disc (3M ESPE). Surface texture and tertiary anatomy were created using a Brasseler diamond bur (Figure 15), while a Brasseler green stone was used to establish the spectral reflectance layer (Figure 16) and create natural-looking light-reflecting zones. Final polishing was accomplished using a chamois/felt wheel (Brasseler USA) (Figure 17), in addition to Jiffy polishers, cups, discs, and points (Ultradent Products). The final restorations blended invisibly with the adjacent dentition and demonstrated natural-looking, lifelike characteristics (Figures 18 through 20).
 |
 |
| Figure 15. Surface texture and tertiary anatomy were created using a diamond bur. | Figure 16. A green stone was used to establish the spectral reflectance layer. |
 |
 |
| Figure 17. Final polishing was accomplished using a chamois/felt wheel (Brasseler USA). | Figure 18. Postoperative close-up view of the patient’s natural smile. |
 |
 |
| Figure 19. Postoperative close-up view of the patient’s anterior maxillary central incisors. | Figure 20. Postoperative incisal view of the patient’s restored dentition. |
CONCLUSION
Developments in composite technology and placement techniques have changed the manner in which dentists practice and deliver quality dental care, particularly in those instances when an immediate, emergency restoration is required. Specifically, dentists are operating in an era when scientific enhancements to composite materials and an understanding of artistic/optical qualities are enabling them to exercise greater restorative creativity, ingenuity, and control in order to provide the most conservative and functionally sound treatments possible. When dentists combine technical expertise in the use of these materials with a thorough knowledge of tooth morphology, aesthetics, and artistic approaches, the direct restoration of fractured anterior maxillary central incisors can be efficacious in replicating the appearance and function of natural dentition. Furthermore, when pursuing the re-creation of the natural dentition, dentists can now ultimately express their creative and conservative skills using materials that enable them to replicate truly what is observed in nature.
References
1. Saghezchi KS. Treatment of a broken central incisor in children after trauma. J Cosmet Dent. 2003;19(1):108-112.
2. Featherstone RW. Accreditation clinical case report, case type IV: class IV direct resin restoration (tooth No. 8). J Cosmet Dent. 2003;19(2):44-48.
3. Peumans M, Van Meerbeek B, Lambrechts P, et al. Porcelain veneers: a review of the literature. J Dent. 2000;28(3):163-177.
4. Meijering AC, Creugers NH, Roeters FJ, et al. Survival of three types of veneer restorations in a clinical trial: a 2.5 year interim evaluation. J Dent. 1998;26(7):563-568.
5. Fahl N Jr. Achieving ultimate anterior esthetics with a new microhybrid composite. Compend Contin Educ Dent Suppl. 2000;26:4-13.
6. Terry DA, Geller W, Tric O, et al. Anatomical form defines color: function, form, and aesthetics. Pract Proced Aesthet Dent. 2002;14(1):59-67.
7. Terry DA. Direct reconstruction of the maxillary anterior dentition with composite resin: a case report. Pract Periodontics Aesthet Dent. 1999;11:361-367.
8. Vanini L, Theunissen JP. Development of esthetics in the anterior region: contemporary composite applications. J Dental Symposia. 2002;2-10.
9. Terry DA. Direct composite resin restoration of adolescent class IV tooth fracture: a case report. Pract Periodontics Aesthet Dent. 2000;12(1):23-29.
10. Terry DA. Dimensions of color: creating high-diffusion layers with composite resin. Compend Contin Educ Dent. 2003;24(2 suppl):3-13.
11. Feigenbaum NL. How direct bonding satisfies an esthetic need. Compend Contin Educ Dent. 2003;24(2):134-144.
12. Radz GM. Creating natural vitality with direct-bonded composite veneers. Compend Contin Educ Dent. 1999;20(1):62-70.
13. Terry DA, McLaren EA. Stratification: ancient art form applied to restorative dentistry. Dent Today. 2001;20(9):66-71.
14. McDonald JM. Restoring function and esthetics with a new micro-hybrid composite. Contemp Esthet Restor Practice. 2003;7(9):22-32.
15. Nash R, Lowe RA. Microfill and microhybrid composites: a clinical comparison. Contemp Esthet Restor Practice. 2002;6(1):74-81.
16. Milnar FJ. A marriage of art and science: direct anterior class IV restorations with an optimized particle composite. Contemp Esthet Restor Practice. 2001;5(7):34-40.
17. Garcia LT, Bohnenkamp DM. The use of diagnostic wax-ups in treatment planning. Compend Contin Educ Dent. 2003;24(3):210-216.
18. Behle C. Placement of direct composite veneers utilizing a silicone buildup guide and intraoral mock-up. Pract Periodontics Aesthet Dent. 2000;12(3):259-266.
19. Bichacho N. Direct composite resin restoration of the single anterior tooth: clinical implications and practical applications. Compend Contin Educ Dent. 1996;17(8):796-802.
Dr. Milnar is a graduate of the University of Minnesota School of Dentistry. An accredited member of the American Academy of Cosmetic Dentistry (AACD) and a board examiner for accreditation, he also is a developer/evaluator of new materials for several dental product manufacturers and medical device and biomedical companies. Dr. Milnar is the editor for the AACD Academy Connection Newsletter and maintains a full-time practice emphasizing appearance-related dentistry in St. Paul, Minn. He lectures internationally and is a co-founder of the Minnesota Academy of Cosmetic Dentistry. He can be reached at (651) 645-6111.
Disclosure: Dr. Milnar has received financial and materials/product support from GC America.