


INTRODUCTION
Many clinicians have heard of the concept of heated composite since its introduction to dentistry in the early 1980s,1 yet a significant number of them still have many questions as to why heated composite may be advantageous and how is it that we can effectively heat composite for restorations. Before we can tackle the latter, we need to have an understanding of the benefits heated composite can provide.
When composite is heated, the physical properties of the material are modified. Many of these modifications can help make it easier to handle the composite and enable a better adaptation of the material to our preparations. What happens to composites as they heat? At a microscopic level, the particles of composite experience an increase in kinetic energy and move faster than their room-temperature counterparts. This increased movement of monomers and free radicals in heated composite increases the degree of conversion when curing and may also even increase the depth of cure.2,3 In addition, heating composite will change the consistency of the material. When it is warmed, packable composite can become less viscous in nature. This results in a packable composite that handles more like a flowable resin. When placing a heated composite, the ability of the material to flow enables a better adaptation of the composite to the prep and can reduce the incidence of voids in the restoration and improve the marginal adaptation.2,4 Heated composite can also lead to a decrease in sorption and solubility compared to room-temperature composite.2
There are a host of different ways to heat composite materials. Various dental-specific composite heating units are on the market that can hold composite compules, as well as syringes, with various heat settings to achieve a desired consistency. Other alternative methods have been implemented, including hot water baths, coffee cup heaters, and dental operatory overhead lights. Regardless of how the composite is heated, it’s important to warm the material to at least 60° C (140° F) and place the material shortly after removing the composite from the heat source.5 Composites lose approximately half of their heat as soon as 2 minutes after they’ve been removed.6
Composite resin restoratives and resin-based cements share the same component parts. Each material is made up of filler particles surrounded by a resin matrix. The basic difference between them is that they vary in the amount of filler particles (volume percentage) they have. This difference in filler amounts accounts for their varying rates of flow and/or viscosity. For example, the low viscosity of a flowable composite is achieved by decreasing the filler concentration, which, in turn, increases the amount of resin and polymerization shrinkage. On the other hand, increasing the percentage of filler particles increases the viscosity, thereby decreasing the flow and polymerization shrinkage. The ideal material for inserting glass or non-glass ceramics would be a composite resin material with a high filler concentration for strength, low polymerization shrinkage, a high modulus of elasticity, and a high flowability that allows the ceramic restoration to be easily placed.7,8 This ideal luting material would have to allow for the full seating of the restoration without the excessive pressure that can result in a fracture to the restoration. The material would have low solubility as well as high compressive and tensile strengths. Elevating the temperature of composite resin has been shown to improve the flow characteristics of composite resin, increase the degree of monomer-to-polymer conversion, and reduce the amount of polymerization contraction stress by reducing the light-exposure time.5,6 All of these benefits have been made available through the use of a unit for warming composite resin material. A veneer-warming tray has been manufactured that can be used in conjunction with this unit to warm preloaded glass ceramic restorations using tested composite resins. The same effects that are seen for composite restorative materials now can be achieved for composite resins used to bond porcelain restorations.
The following case presentation will highlight the use of a highly filled composite resin to cement a minimally invasive glass ceramic.9
CASE REPORT
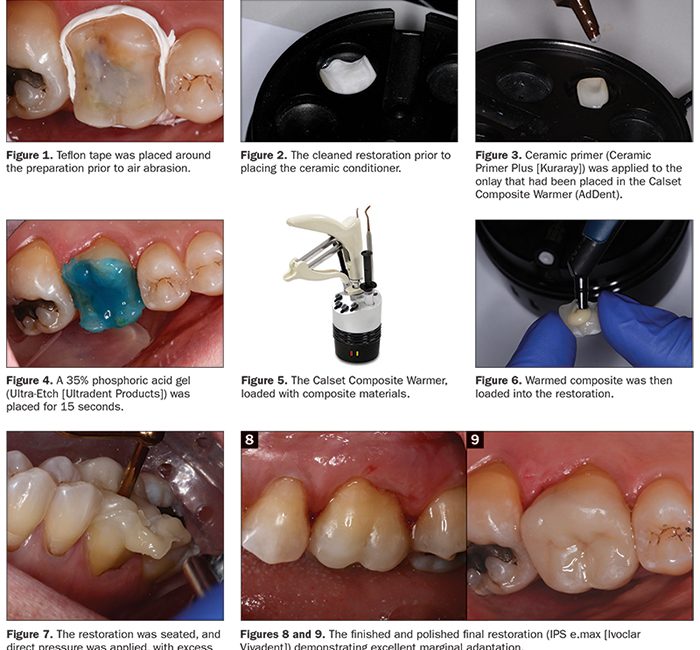
A 61-year-old female patient returned for her crown cementation appointment. After verifying the patient’s medical history, the area was anesthetized (4% Articaine, 1:100,000 epinephrine [Septodont]). Isolation under a rubber dam setting would have been preferable; however, due to the patient’s intolerance for using this technique, a DryShield evacuation system was employed to help achieve an optimal working environment. After the provisional restoration was removed, we cleaned the prepared tooth carefully using 50-µm aluminum oxide under approximately 20 psi of pressure with the PrepStart H2O (Zest Dental Solutions). Teflon tape was packed around the tooth as well to help prevent any gingival bleeding due to the air abrasion process (Figure 1).
The posterior lithium disilicate restoration (IPS e.max [Ivoclar Vivadent]) was then tried in to check the fit and margins. After try-in, cleaning of the intaglio surface was done by applying phosphoric acid for 5 seconds to remove any salivary proteins that can reduce the desired adhesive bond strength. The restoration was then air dried to verify it had that “frosty” look of the internal surface of the previously in-lab-etched (HF acid) restoration (Figure 2). The onlay was then placed on a porcelain restoration tray with the lid off at a temperature of 155°F/68°C, or the “Red” setting on the warmer (Calset Composite Warmer [AdDent]). Ceramic Primer Plus (Kuraray), which contains a combination of silane and a phosphate monomer (MDP), was then applied on the intaglio surfaces of the preheated restoration, and time was allowed for the ethanol to evaporate and dry completely (Figure 3).
 |
Once the restoration was conditioned and ready for insertion, our attention was then turned back to the prepared tooth. The surface was previously cleaned with aluminum oxide. Next, 35% phosphoric acid gel (Ultra-Etch [Ultradent Products]) was applied over the entire surface of the preparation and allowed to set for 15 seconds, with initial placement beginning on the outer enamel rim and working our way internally (Figure 4). It is always advisable to have longer etch time on enamel than dentin. The acid-etchant gel was then rinsed off with air and water for approximately 10 seconds. Excess water was then carefully removed from the preparation with a dedicated compressed air line so as to not desiccate the dentinal surfaces nor add any additional potential oil contamination. A generous amount of adhesive (CLEARFIL Universal Bond Quick [Kuraray]) was applied to the preparation in an agitated scrubbing motion for 20 seconds. The solvent was then carefully air dried with oil-and water-free compressed air for 10 seconds until the film of solvent could no longer be seen moving along the preparation. Due to its expansive surface area, the adhesive was then light cured for 30 seconds (minimum) using a light source greater than 800 mW/cm2 (VALO [Ultradent Products]). The result should be a shiny tooth surface that is evenly covered with the adhesive. This should be carefully checked, as any areas of the cavity that appear matte in appearance are an indication that insufficient adhesive was applied to those sites. This can result in reduced bond strength of the restoration in these areas and, at the same time, inadequate dentinal sealing, which may lead to postoperative sensitivity. If such areas are found in the visual inspection, additional application of the adhesive is required.
The composite/luting cement (CLEARFIL APX [Kuraray]), which had been placed and was sitting in the Calset Composite Warmer for approximately 5 to 7 minutes at 155°F/68°C (Figure 5), was now ready for use. That is the desired time when utilizing APX, a very highly filled composite. In the author’s experience, this material has a tendency to partially set and become less than desirable to work with for an application like this when left in the warmer longer than 12 to 15 minutes. Remember, all composites are not the same, and it’s best to experiment with different composites when warmed to understand how they handle. This should be done prior to utilizing them in a procedure to avoid a poor outcome.
The compule was then pulled from the warmer, and the APX (shade A2) composite was placed directly onto the restoration (Figure 6). The restoration was seated on the tooth with direct pressure to allow the excess composite to easily flow out from under the margins (Figure 7). The dental assistant continued to apply pressure while excess composite was removed with the aid of microbrushes and floss to clean the interproximal surfaces. Once satisfied, the restoration was light cured from all angles for approximately 40 seconds per surface to ensure adequate polymerization.
After removal of the isolation device (DryShield), the restoration was carefully adjusted using fine diamonds (TSZ Tech [Premier Dental]) to ensure proper occlusal function. Next, the restoration was polished with a lithium disilicate polishing kit (Brasseler USA) to achieve a smooth occlusal surface. On the buccal and lingual margins, a silicone-based, aluminum oxide-impregnated composite polisher (Enhance [Dentsply Sirona]) was used due to its unique ability to polish or remove excess resin to create an extremely pleasing finish along the tooth-ceramic interface (Figures 8 and 9).
CLOSING COMMENTS
Elevating the temperature of composite resins has been shown in the literature to improve flow characteristics, increase the degree of monomer-to-polymer conversion, and reduce the amount of polymerization contraction stress by reducing the curing light exposure time. All of these benefits have been made available through the use of a composite warming unit. The same benefits that warmed composite provide for direct restorative applications can also be realized when placing indirect restorations. Utilizing the enhanced physical properties of packable composites as resin cement can help the clinician achieve the advantages of better physical properties, improved marginal adaptation, and shade versatility to produce highly functional and aesthetically pleasing restorations that will last for years to come.
References
- Bausch JR, de Lange C, Davidson CL. The influence of temperature on some physical properties of dental composites. J Oral Rehabil. 1981;8:309-317.
- de Castro FLA, Pazinatto FB, de Lima E, et al. The effect of preheating and opacity on the sorption and solubility of a composite resin. Gen Dent. 2016;64:57-61.
- El-Korashy DI. Post-gel shrinkage strain and degree of conversion of preheated resin composite cured using different regimens. Oper Dent. 2010;35:172-179.
- Fróes-Salgado NR, Silva LM, Kawano Y, et al. Composite pre-heating: effects on marginal adaptation, degree of conversion and mechanical properties. Dent Mater. 2010;26:908-914.
- Muñoz CA, Bond PR, Sy-Muñoz J, et al. Effect of pre-heating on depth of cure and surface hardness of light-polymerized resin composites. Am J Dent. 2008;21:215-222.
- Daronch M, Rueggeberg FA, Moss L, et al. Clinically relevant issues related to preheating composites. J Esthet Restor Dent. 2006;18:340-350.
- Freedman G, Krejci I. Warming up to composites. Compend Contin Educ Dent. 2004;25:371-378.
- Torii Y, Itou K, Itota T, et al. Influence of filler content and gap dimension on wear resistance of resin composite luting cements around a CAD/CAM ceramic inlay restoration. Dent Mater J. 1999;18:453-461.
- Della Bona A, Anusavice KJ, Shen C. Microtensile strength of composite bonded to hot-pressed ceramics. J Adhes Dent. 2000;2:305-313.
Dr. Schmedding has been a practicing cosmetic and restorative dentist for the last 25 years. He is a 1993 honors graduate from the University of the Pacific Arthur A. Dugoni School of Dentistry. He currently maintains a private practice in Walnut Creek, Calif. He works with numerous manufacturers on the implementation and testing of various restorative products being brought to market. Dr. Schmedding lectures internationally, focusing on topics related to aesthetic and restorative dentistry. He can be reached via email at troy.schmedding.dds@gmail.com.
Disclosure: Dr. Schmedding reports no disclosures.
Related Articles
The Direct Bulk-Fill Restorative Option
Q&A: Today’s Restorative Dentistry With Dr. Troy Schmedding
Cement Tackles Range of Materials and Indications


