INTRODUCTION
Direct composite resin has the ability to offer an alternative to lab-fabricated all-ceramic materials, with aesthetic and functional results that can rival those of porcelain. Moreover, this can be accomplished in the least invasive way available in dentistry—and at a lower fee. Results are same day; anesthetic is rarely necessary; and, in my experience, the restorations can have the same lifespan as many all-ceramic materials.
So why don’t we offer this service to our patients more often? Part of the reason has to do with the following misconceptions about composite: (1) Strength. If composite is used to add incisal length, many clinicians feel it will fail. (2) Staining. It is thought that marginal and surface staining should be expected. (3) Shadowing. Class IV situations, large diastemas, and added length will all be evident with show-through from the back of the mouth. (4) Color stability. The color is expected to change over time. (5) Polish. The resin will always look dull, especially compared to ceramics. (6) Surface texture/developmental anatomy. These are considered difficult to create on the restoration surface.
Another issue is having the skillset necessary to achieve a result that is biomimetic and replicates all aspects of a natural tooth. Practicing the concept of the art of dentistry falls into the hands of the clinician. It takes effort on behalf of the clinician to gain the knowledge and artistic creativity necessary to learn this discipline. In dental school, the focus is on how to prepare teeth so that a laboratory technician can create a restoration. Although I thoroughly enjoy collaborating with some amazing ceramists, there is a special sense of satisfaction in being able to create a beautiful restoration by blending the art and science of dentistry. It becomes your art!
There are many cases where less invasive procedures can be offered. When forming a treatment plan, the cosmetic considerations need to be balanced with the patient’s long-term interests. Clear, concise communication is imperative for the patient to understand the benefits and risks of each treatment modality for an elective aesthetic procedure. Orthodontic intervention can further allow for a healthy occlusal scheme and tooth positions. Very often, this combination offers minimally invasive cosmetic options.
CASE REPORT
Diagnosis and Treatment Planning
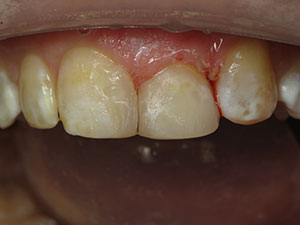
A patient presented to our office for a consult regarding treatment options to correct the shapes and positions of his front teeth. He was concerned with cost and worried about “grinding down” his teeth if he were to choose porcelain veneers. His previous dentist proposed Invisalign clear aligners (Align Technology), followed by a reshaping of his central incisors (teeth Nos. 8 and 9).
 |
 |
| Figure 1a. Preoperative tooth position. | Figure 1b. Tooth position was improved using Invisalign clear aligners (Align Technology). |
My standard protocol for treatment planning a case following full diagnostic workup (radiographs, full periodontal charting, etc) is to take a full series of photographs and diagnostic models. A PowerPoint digital slide series is then created. Borrowing from Dr. Frank Spear, repose photos are used to assess the proper amount of display for the central incisors. Smile photos help to create a smile that is in harmony with the patient’s lower lip.
In this case, based upon the information gathered, it was clear that reshaping the central incisors would make for an unattractive smile, as tooth position at rest would not offer age-appropriate display. Reshaping would also bring the incisal edges of the centrals even with the laterals, causing the corridors to display a longer incisal length than the anterior segment; this would create a reverse smile line. The treatment plan proposed was to use Invisalign clear aligners to treat the crowding of the anterior segment (Figure 1). In this way, a healthier occlusal scheme would be achieved, and then a mockup of the case would be done. The patient would then decide if he wanted to proceed with our recommendations for direct composite additions to add incisal length to teeth Nos. 7 to 10 or simply have teeth Nos. 8 and 9 reshaped.
Post Invisalign Workup
Once the anterior teeth were aligned, new photos and models were taken. The patient was planning to attend a reunion and wanted the front teeth treated prior to Invisalign refinement, which would gain some arch width in the maxillary corridors. It was decided that we could proceed with final anterior aesthetics and then create new records for Invisalign to complete the final expansion of the maxillary bicuspids. I waxed up the anterior teeth and transferred it using a lab putty matrix (Panasil [Kettenbach LP]) and a bis-acryl provisional material (Integrity [Dentsply Sirona]). The patient was thrilled with the look and decided to proceed with treatment.
 |
 |
| Figure 2a. The putty matrix (Panasil [Kettenbach LP]). | Figure 2b. Tooth preparation (No. 8). |
 |
 |
| Figure 3. White Opaque (WO) (Esthet•X HD [Dentsply Sirona]) being added, using putty matrix to form the incisal “footprint.” | Figure 4. The putty matrix (Panasil) was used to place WO (Esthet•X HD) to block out shadowing and to create an incisal halo effect. |
 |
| Figure 5. White Enamel (Esthet•X HD) was added to the frame of the WO and striated with a composite placement instrument (IPC OA-S [Cosmedent]). |
Preparations
To prepare a putty matrix, a Bard-Parker 20 blade was used to remove the facial and buccal portions of the matrix, preserving the incisal edges (Figure 2a). This establishes the incisal “footprint” of the teeth being treated, allowing the clinician to form an incisal halo, or “French tip,” on the restoration. The basic principles to creating an invisible restoration were taught to me by Dr. Buddy Mopper. They are as follows: (1) you need to create a long, infinite bevel (Figure 2b); (2) opacity must be controlled; (3) a microfill should be applied as the final surface material; (4) the microfill should end on etched, unprepped enamel; and (5) use discs, not rubber points, to finish margins and flat surfaces.
The preparations involved form an “infinite bevel,” heavier at the incisal and feathering toward the middle third.
Addition of Composite
The technique I have developed involves 3 shades: White Opaque (WO) (Esthet•X HD [Dentsply Sirona]), White Enamel (WE) (Esthet• X-HD), and a corresponding body shade (Renamel Microfill [Cosmedent]). To begin, with the guide in place, WO is placed in the putty guide and contoured to form a “frame” of the shape along with the most labial position of the incisal edge (Figure 3). This addition blocks out shadowing from the back of the mouth and creates a halo effect (Figure 4). The next composite addition is to use shade WE, placed within the WO frame. The WE composite allows for light refraction through the incisal third, thus creating a very natural appearance. Care must be taken to not add material facial to the WO composite placement. This addition should be striated in a vertical fashion using the clinician’s preferred instrument (Figure 5). A white opaquer (Creative Color [Cosmedent]) can be conservatively placed with a composite brush (Cosmedent) (Figure 6a). This step mimics the dentin-enamel junction and forms minor milky white craze lines. The final addition of composite is done using the body shade. For this step, Renamel Microfill is used (Figure 6b). This is an inherently weaker composite due to its low filler content and .04-µm particle size. It should never be placed in a load-bearing situation. It is best used as a thin, final layer, because it has unparalleled polishability and color stability. This layer is added in a generous amount at the incisal portion of the restoration. This is done using a wetting agent (DeTak [TAUB Products]) that helps break down surface tension of the material before it is manipulated toward the cervical region. These steps are repeated to the distal and mesial areas being restored.
 |
 |
| Figure 6a. Creative Color (Cosmedent) WO was applied with a dental brush (Cosmedent). | Figure 6b. Renamel Microfill (Cosmedent) body shade is used. |
 |
 |
| Figure 7a. FlexiDisc (Cosmedent) polishing discs (coarse, medium, fine, superfine) are used—dry! | Figure7b. CeraMiste points (Shofu Dental) white stripe was used to form developmental anatomy. |
 |
 |
| Figure 8. Enamelize (Cosmedent) and FlexiBuff Mini (Cosmedent) was used for the final polishing step. | Figure 9. The final result, blending composite to existing tooth structure (Nos. 6 to 11). |
Finishing
First, turn off the water! The composite finishing steps should be done dry, because (in my experience) dry polishing, in combination with good lighting, will produce much better results. First, a composite finishing bur (ET6 [Brasseler USA]) with a light touch is used to refine any areas that were not sculpted ideally during the addition phase and to remove any excess composite at the CEJ. Make sure to remove any scratches or other imperfections in the resin. These areas can clearly be seen because any scars or voids will fill with composite dust. Your assistant should blow air onto the surface to allow for visualization of these dust-filled sites. Next, use discs, such as FlexiDisc (Cosmedent), to continue polishing the restorations (Figure 7a). Begin with the coarse grit disc and then progress through the entire series to superfine. Using polishing discs in a dry setting with good lighting allows the clinician to perfect the proximal line angles. One will see light refract back from the middle third of the tooth. This recipe permits the operator to maintain the flat surfaces of incisors in 3 planes while achieving a mirror-like enamel finish.
Adding Developmental Anatomy and Final Polishing
I have developed an easy way to cultivate realistic surface topography on a composite restoration. It involves using a polishing point, such as Super Fine CeraMiste points (Shofu Dental) (Figure 7b). (CeraMiste points were originally developed to polish porcelain.) While I prefer an electric handpiece, either an electric or an air-driven handpiece can be used. When using an electric handpiece, run it at a slow speed between approximately 18,000 and 20,000 rpm. Using no water, decide where to place the anatomy. This can be done using a pencil to outline the sites. Now, using a vertical sweeping motion, use the pointed third of the point to develop a depression in the surface of the resin. Once this is established, begin to lay the belly of the CeraMiste point into the depression, with the pointed end toward the cervical and the wide end at the incisal. Using the same vertical sweeping motion from cervical to incisal, with good lighting and no water (dry), the clinician can create lifelike surface texture. Repeat this sequence to create the appearance of 3 distinct lobes. Lastly, with a light vertical stroke, sweep the surface between the 2 developmental recesses to create perfect surface texture. Once this is done, the final step is to place a composite polishing paste, such as Enamelize (Cosmedent), on a mini felt pad (FlexiBuff [Cosmedent]) (Figure 8) and, using a light touch at a slow speed (4,000 rpm electric) and working dry, buff the restorations and watch the artwork pop (Figures 9 to 15)!
 |
 |
| Figure 10. (a) Before and (b) after treatment. |
 |
 |
| Figure 11. A view (a) before Invisalign treatment and (b) of the final result. |
Occlusion
My occlusal schemes are based on the teachings of Dr. Ross Nash. He is an invaluable teacher/mentor for any astute clinician who may be looking for straightforward approaches to full-mouth rehabilitations. Anterior guidance should allow for the coupling of teeth Nos. 8 and 9 against teeth Nos. 24 and 25. An excursive right and left movement should gain canine rise, while all movements should attempt to clear the laterals of any contact. In this case, tooth No. 6 was not performing this function. As a courtesy to the patient, and to protect the rest of the case from traumatic forces, we performed a complimentary augmentation of the incisal edge of tooth No. 6 to create proper guidance.
 |
 |
| Figure 12. (a) Before and (b) after treatment. |
 |
 |
| Figure 13. (a) Repose-before and (b) repose-after, shown here. |
 |
 |
| Figure 14. (a) Before and (b) after full-face photos. |
 |
 |
| Figure 15. (a) Repose-before and (b) repose-after full-face photos. |
CLOSING COMMENTS
This case demonstrates a conservative approach that can certainly be applied to a number of cases that present for cosmetic consultations. When done properly, direct composite can allow the clinician to create highly aesthetic restorations. The minimally invasive nature of the treatment allows for saving more natural tooth structure and decreases the risks associated with more aggressive techniques. Our patients will also have more options down the road when the time comes for replacement. These cases can be easily repaired, as the putty matrix is given to each patient for safekeeping. The lower fees typically charged for these procedures (as compared to higher-cost all-ceramic options) allow us to offer our services to more patients. With proper training, any restorative clinician is capable of offering this valuable service to his or her patients.
Dr. Bylis received his undergraduate degree from the Brooklyn College of Pharmacy in 1982. He graduated from Georgetown University School of Dentistry in 1986 and then completed a general practice residency with the Veterans Administration in Washington, DC. He has been in private practice in Anne Arundel County, Md, since 1987. The focus of his practice is on comprehensive care with a strong emphasis on cosmetics. Dr. Bylis serves as clinical instructor in the Advanced General Dentistry Residency at the University of Maryland School of Dentistry. He lectures for Dentsply Sirona on restorative techniques and has also lectured with Dr. Ross Nash at the prestigious Nash Institute for Dental Learning in Huntersville, NC, in courses including hands-on training in aesthetic dentistry and full-mouth rehabilitation. Dr. Bylis also serves as an implant director for the American Academy of Facial Esthetics, where he is responsible for providing implant training for general dentists. He can be reached at (410) 969-2177, by visiting bylisdental.com, or via email at dr.bylis@bylisdental.com.
Disclosure: Dr. Bylis reports no disclosures.
Related Articles
Restoring a Class IV Fracture Using a Compactable, Universal Nanohybrid Composite
Dental Implants in the Aesthetic Zone
The Golden Proportion: Fact or Fiction?